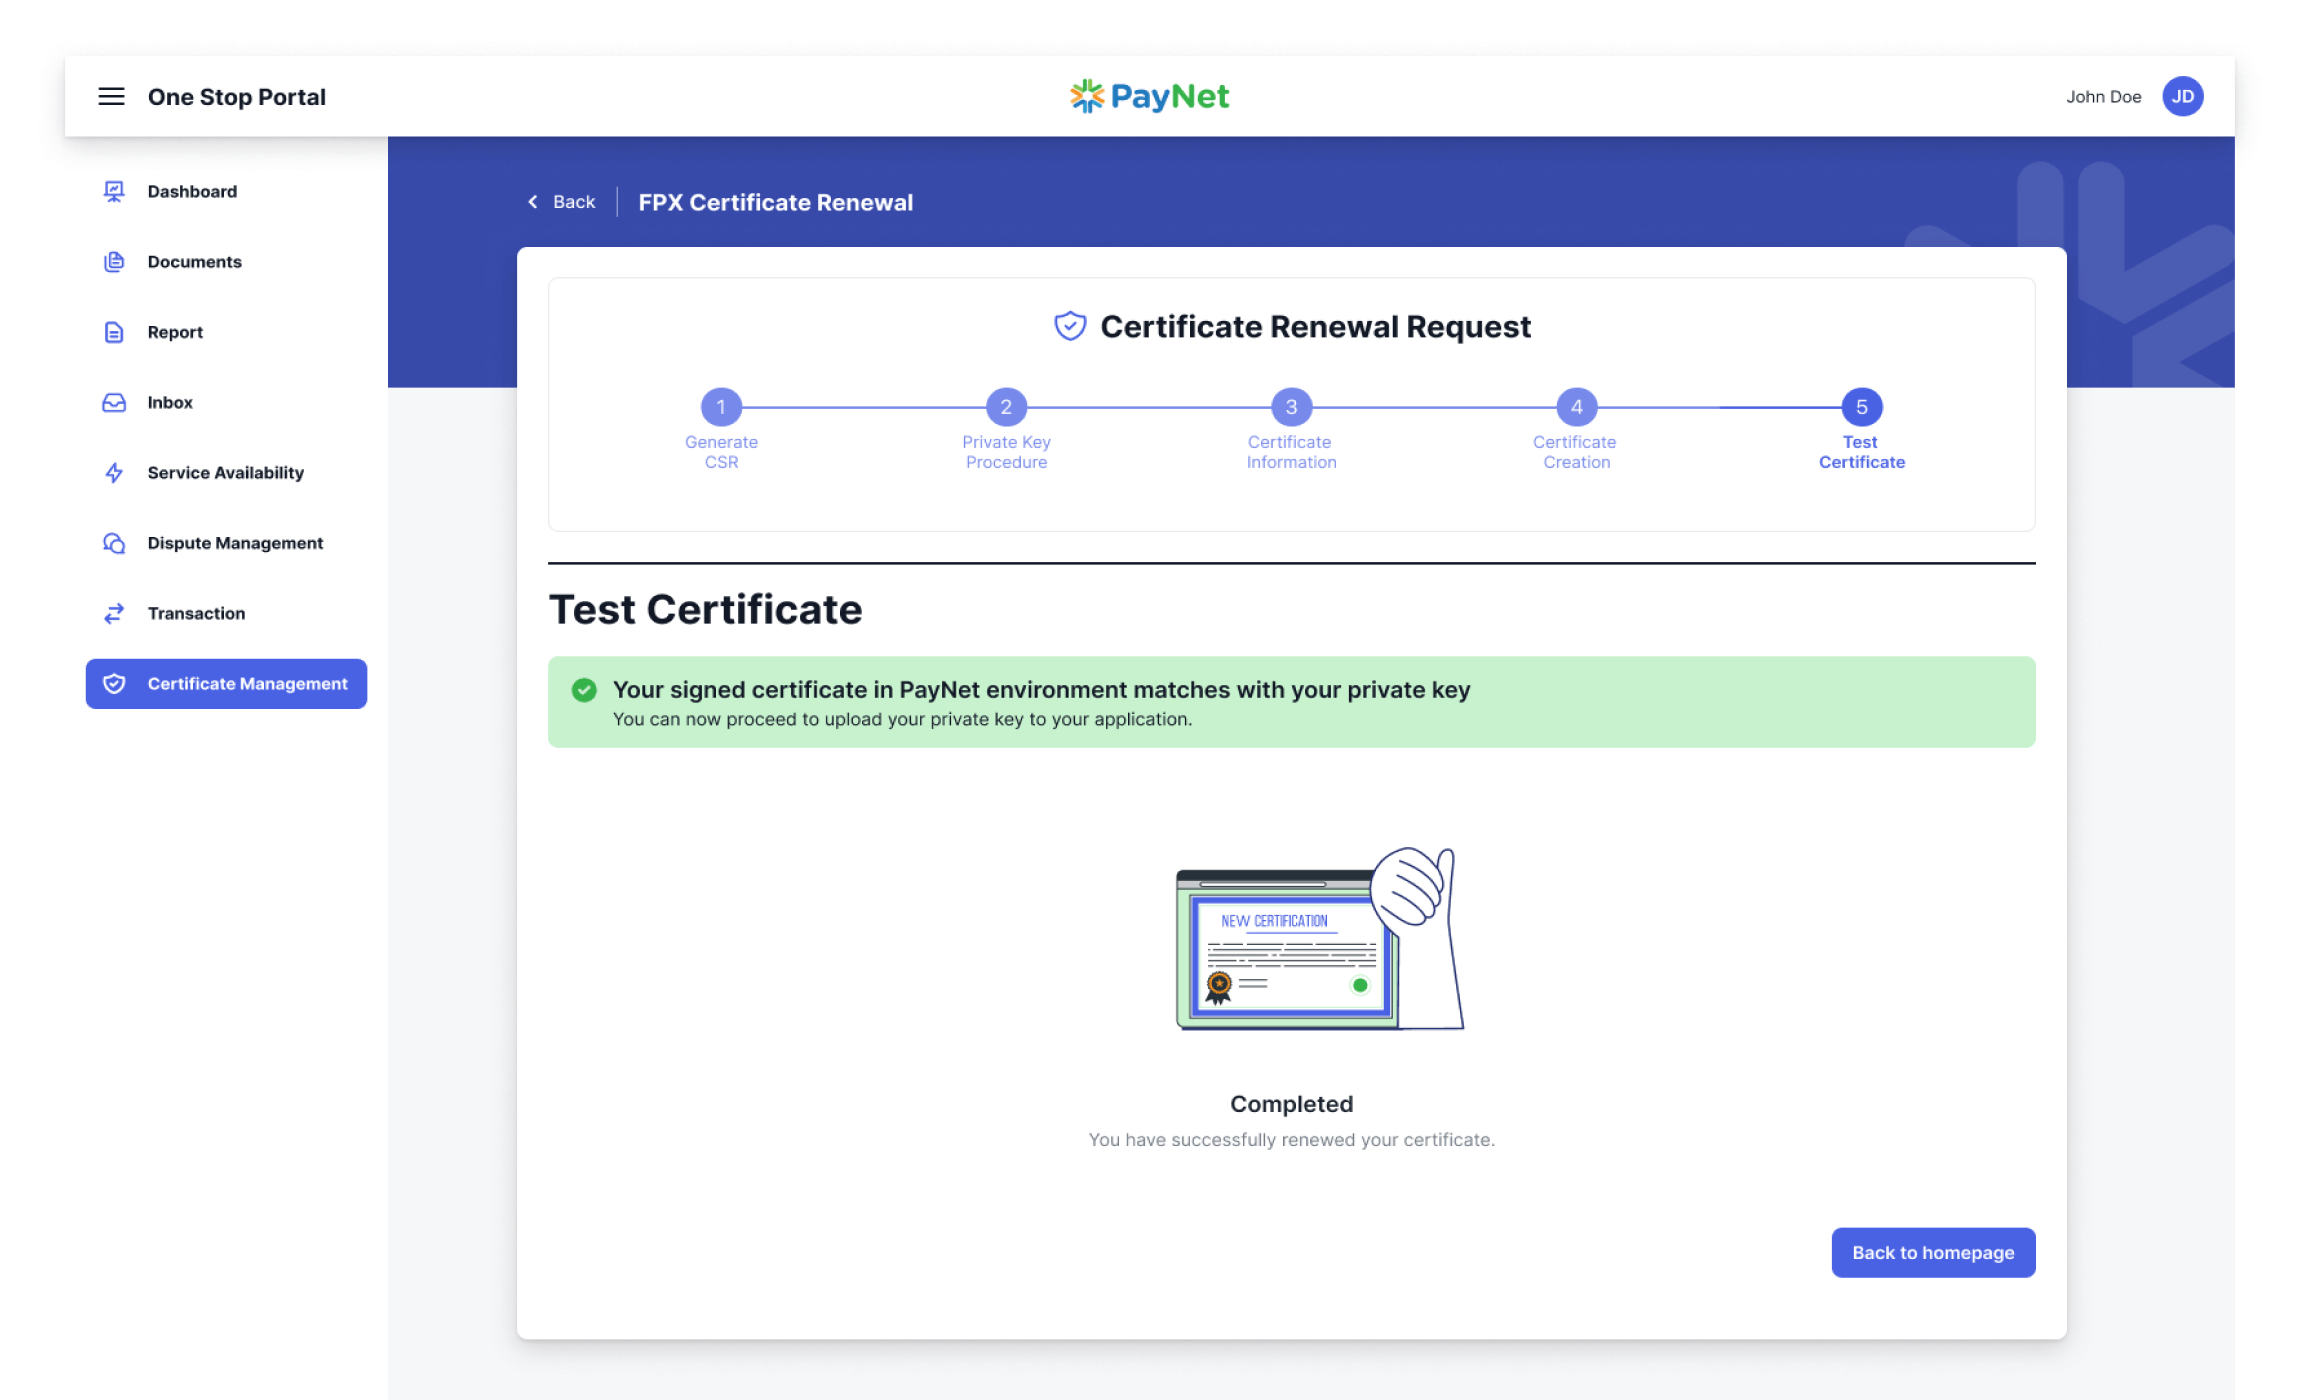
Certificate Renewal Process
Launch Certificate Management Dashboard
To begin managing and renewing digital certificates for your product, navigate to the Certificate Management Dashboard within the One Stop Portal (OSP).
1
Log into the One Stop Portal (OSP)
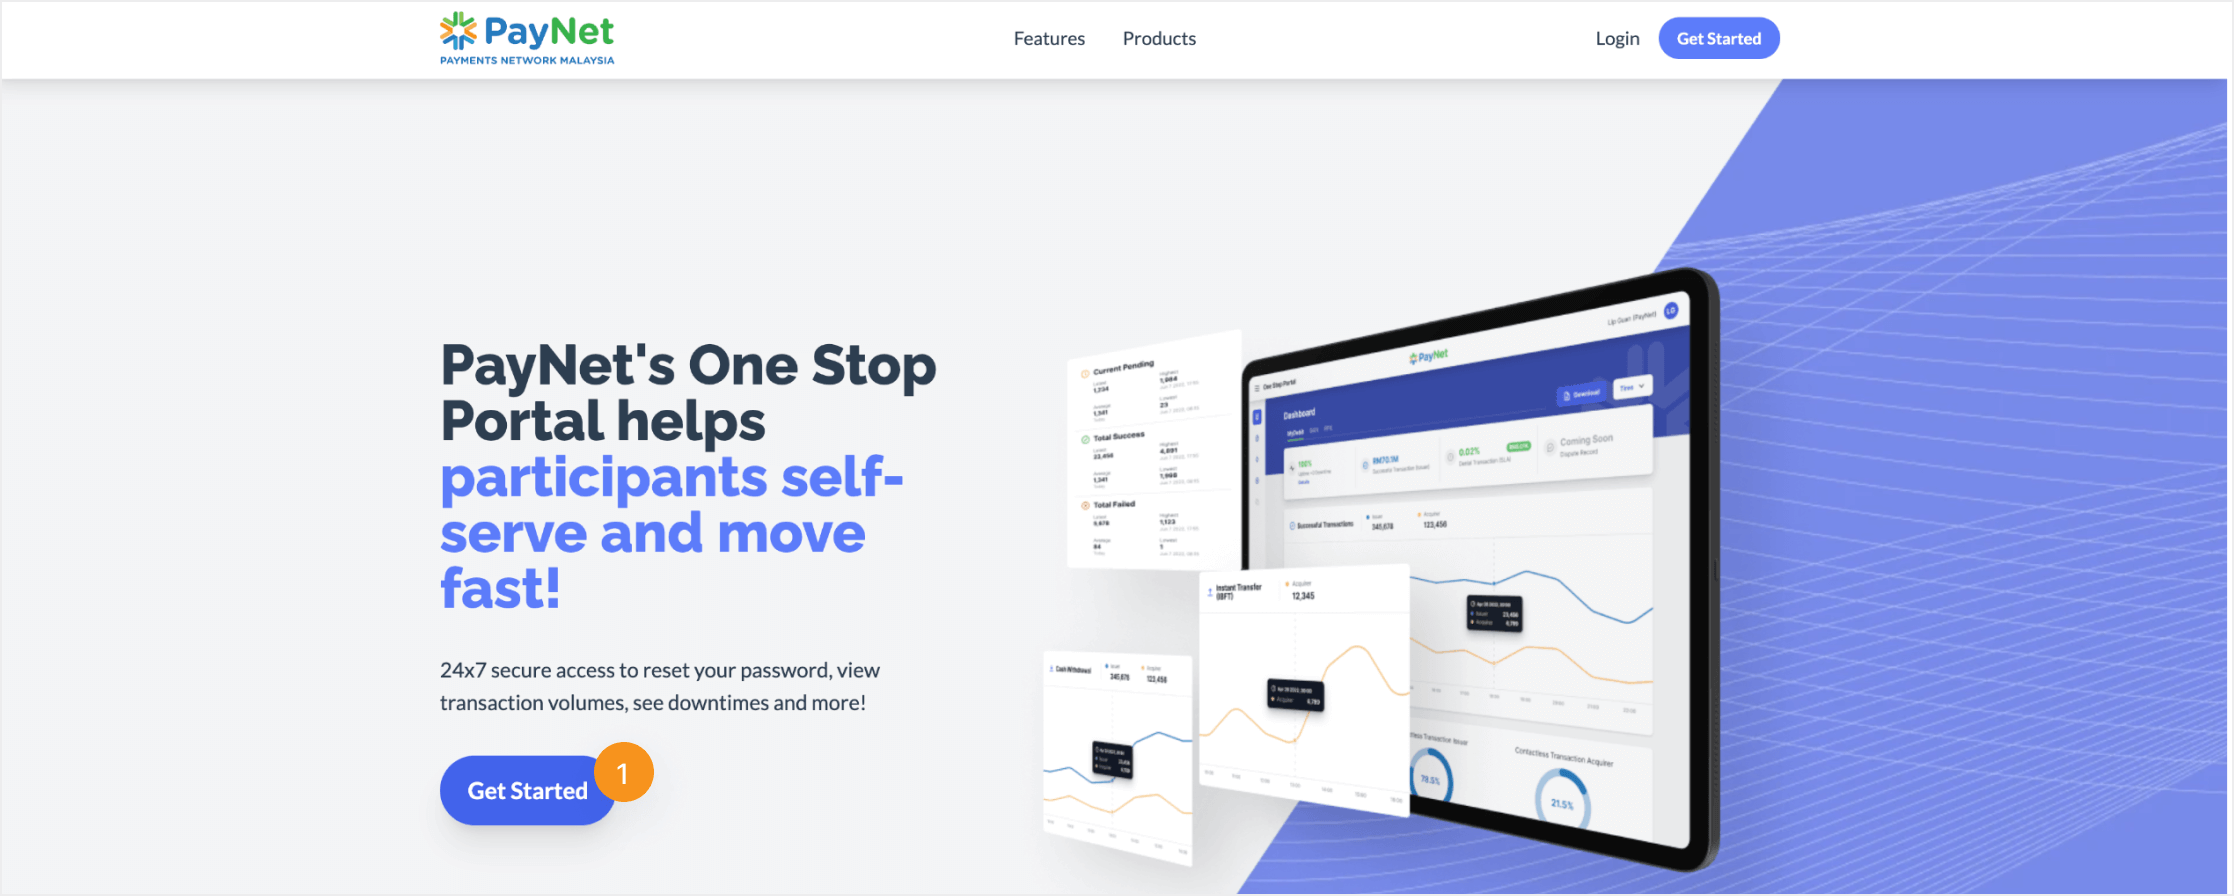
2
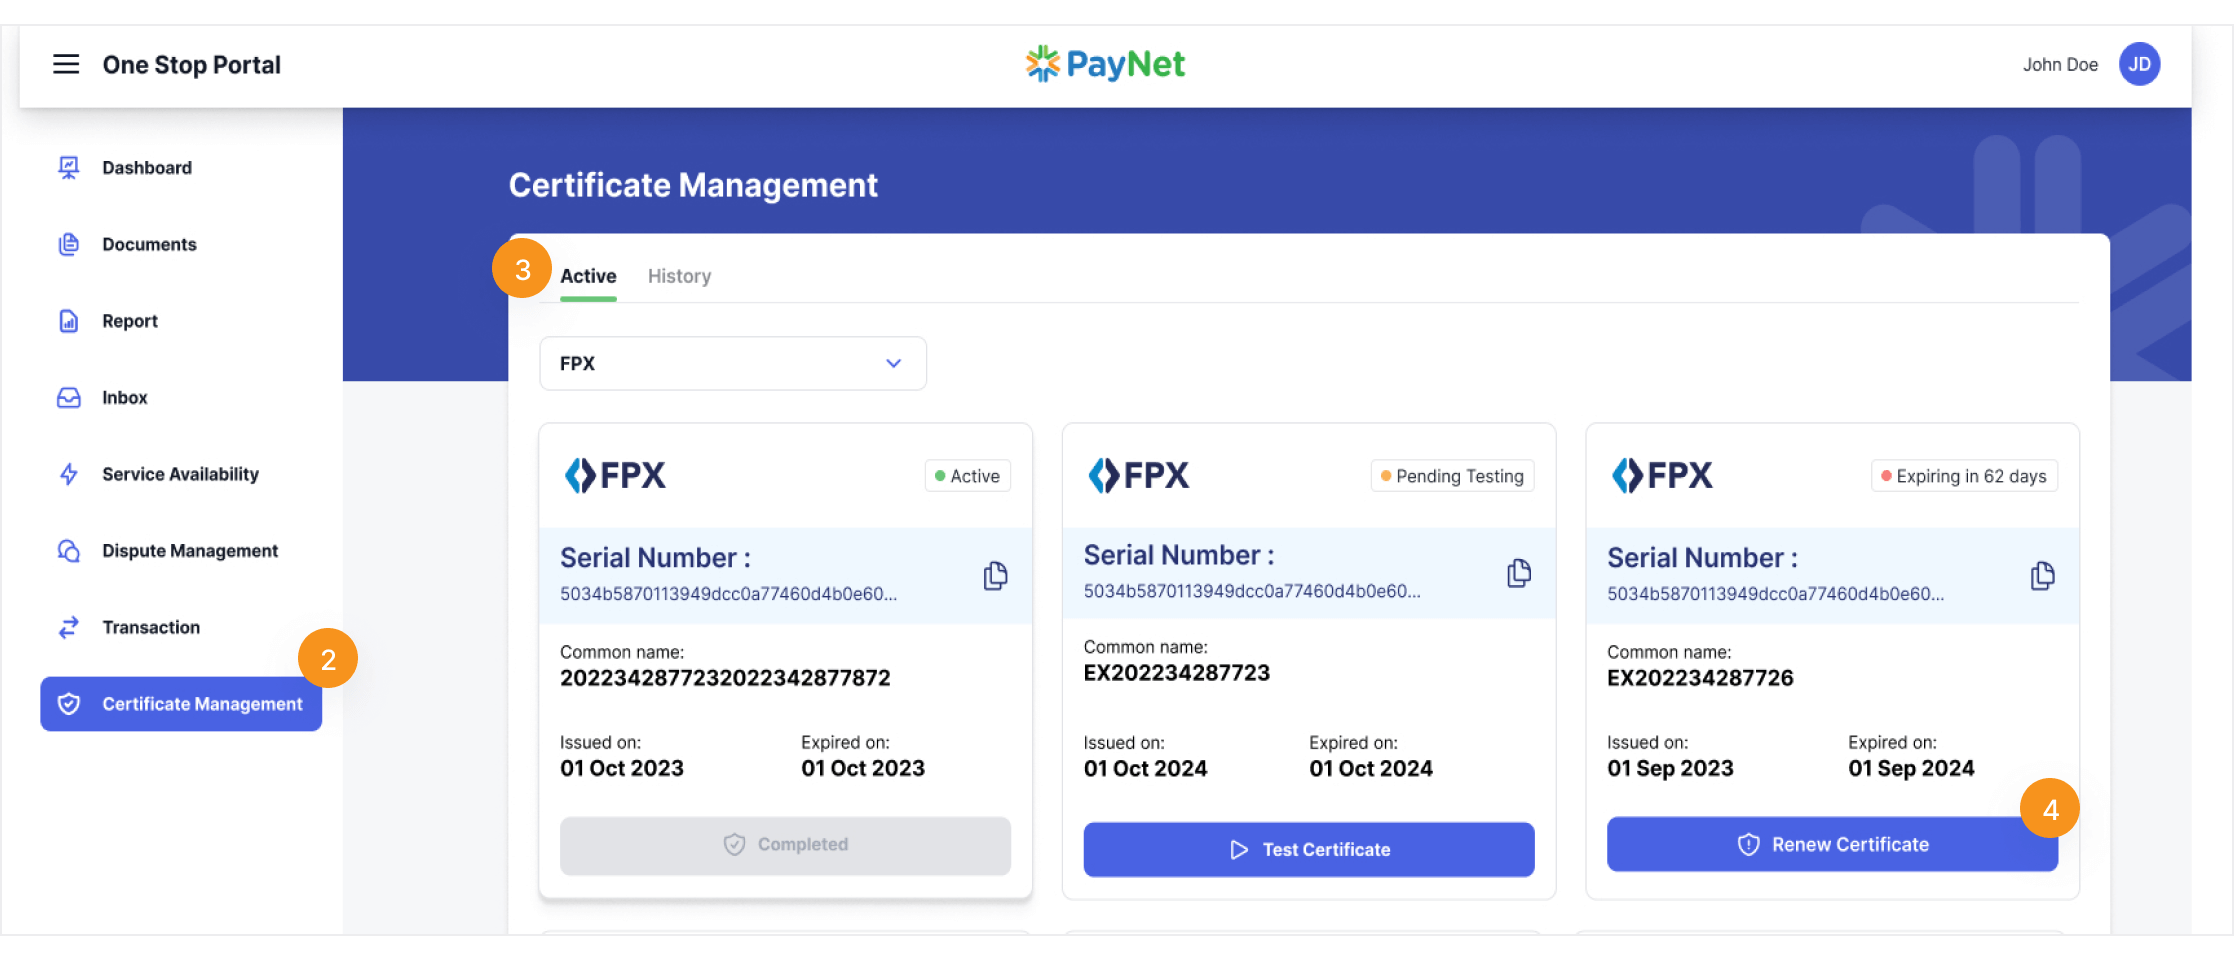
Select ‘Certificate Management’ from OSP's left sidebar.
3
Select ‘Active’ tab on Certificate Management dashboard.
4
Identify certificates with yellow or red label, indicating certificates that are either expiring in less than 90 days or have passed their expiration date. Click on ‘Renew Certificate’.
Certificate Signing Request (CSR) Procedure
The initial step in the Certificate Renewal Request is the Generate Certificate Signing Request (CSR) procedure. You have two (2) methods to create a CSR for certificate renewal: PayNet can generate a new CSR for you, or you can generate a CSR file manually. Please choose the option that best suits your preference.
This CSR (Certificate Signing Request) is a file that will be used to create a ‘signed public certificate’. It should include registered information about your business, and a public key matching the private key used to electronically sign the CSR.
5
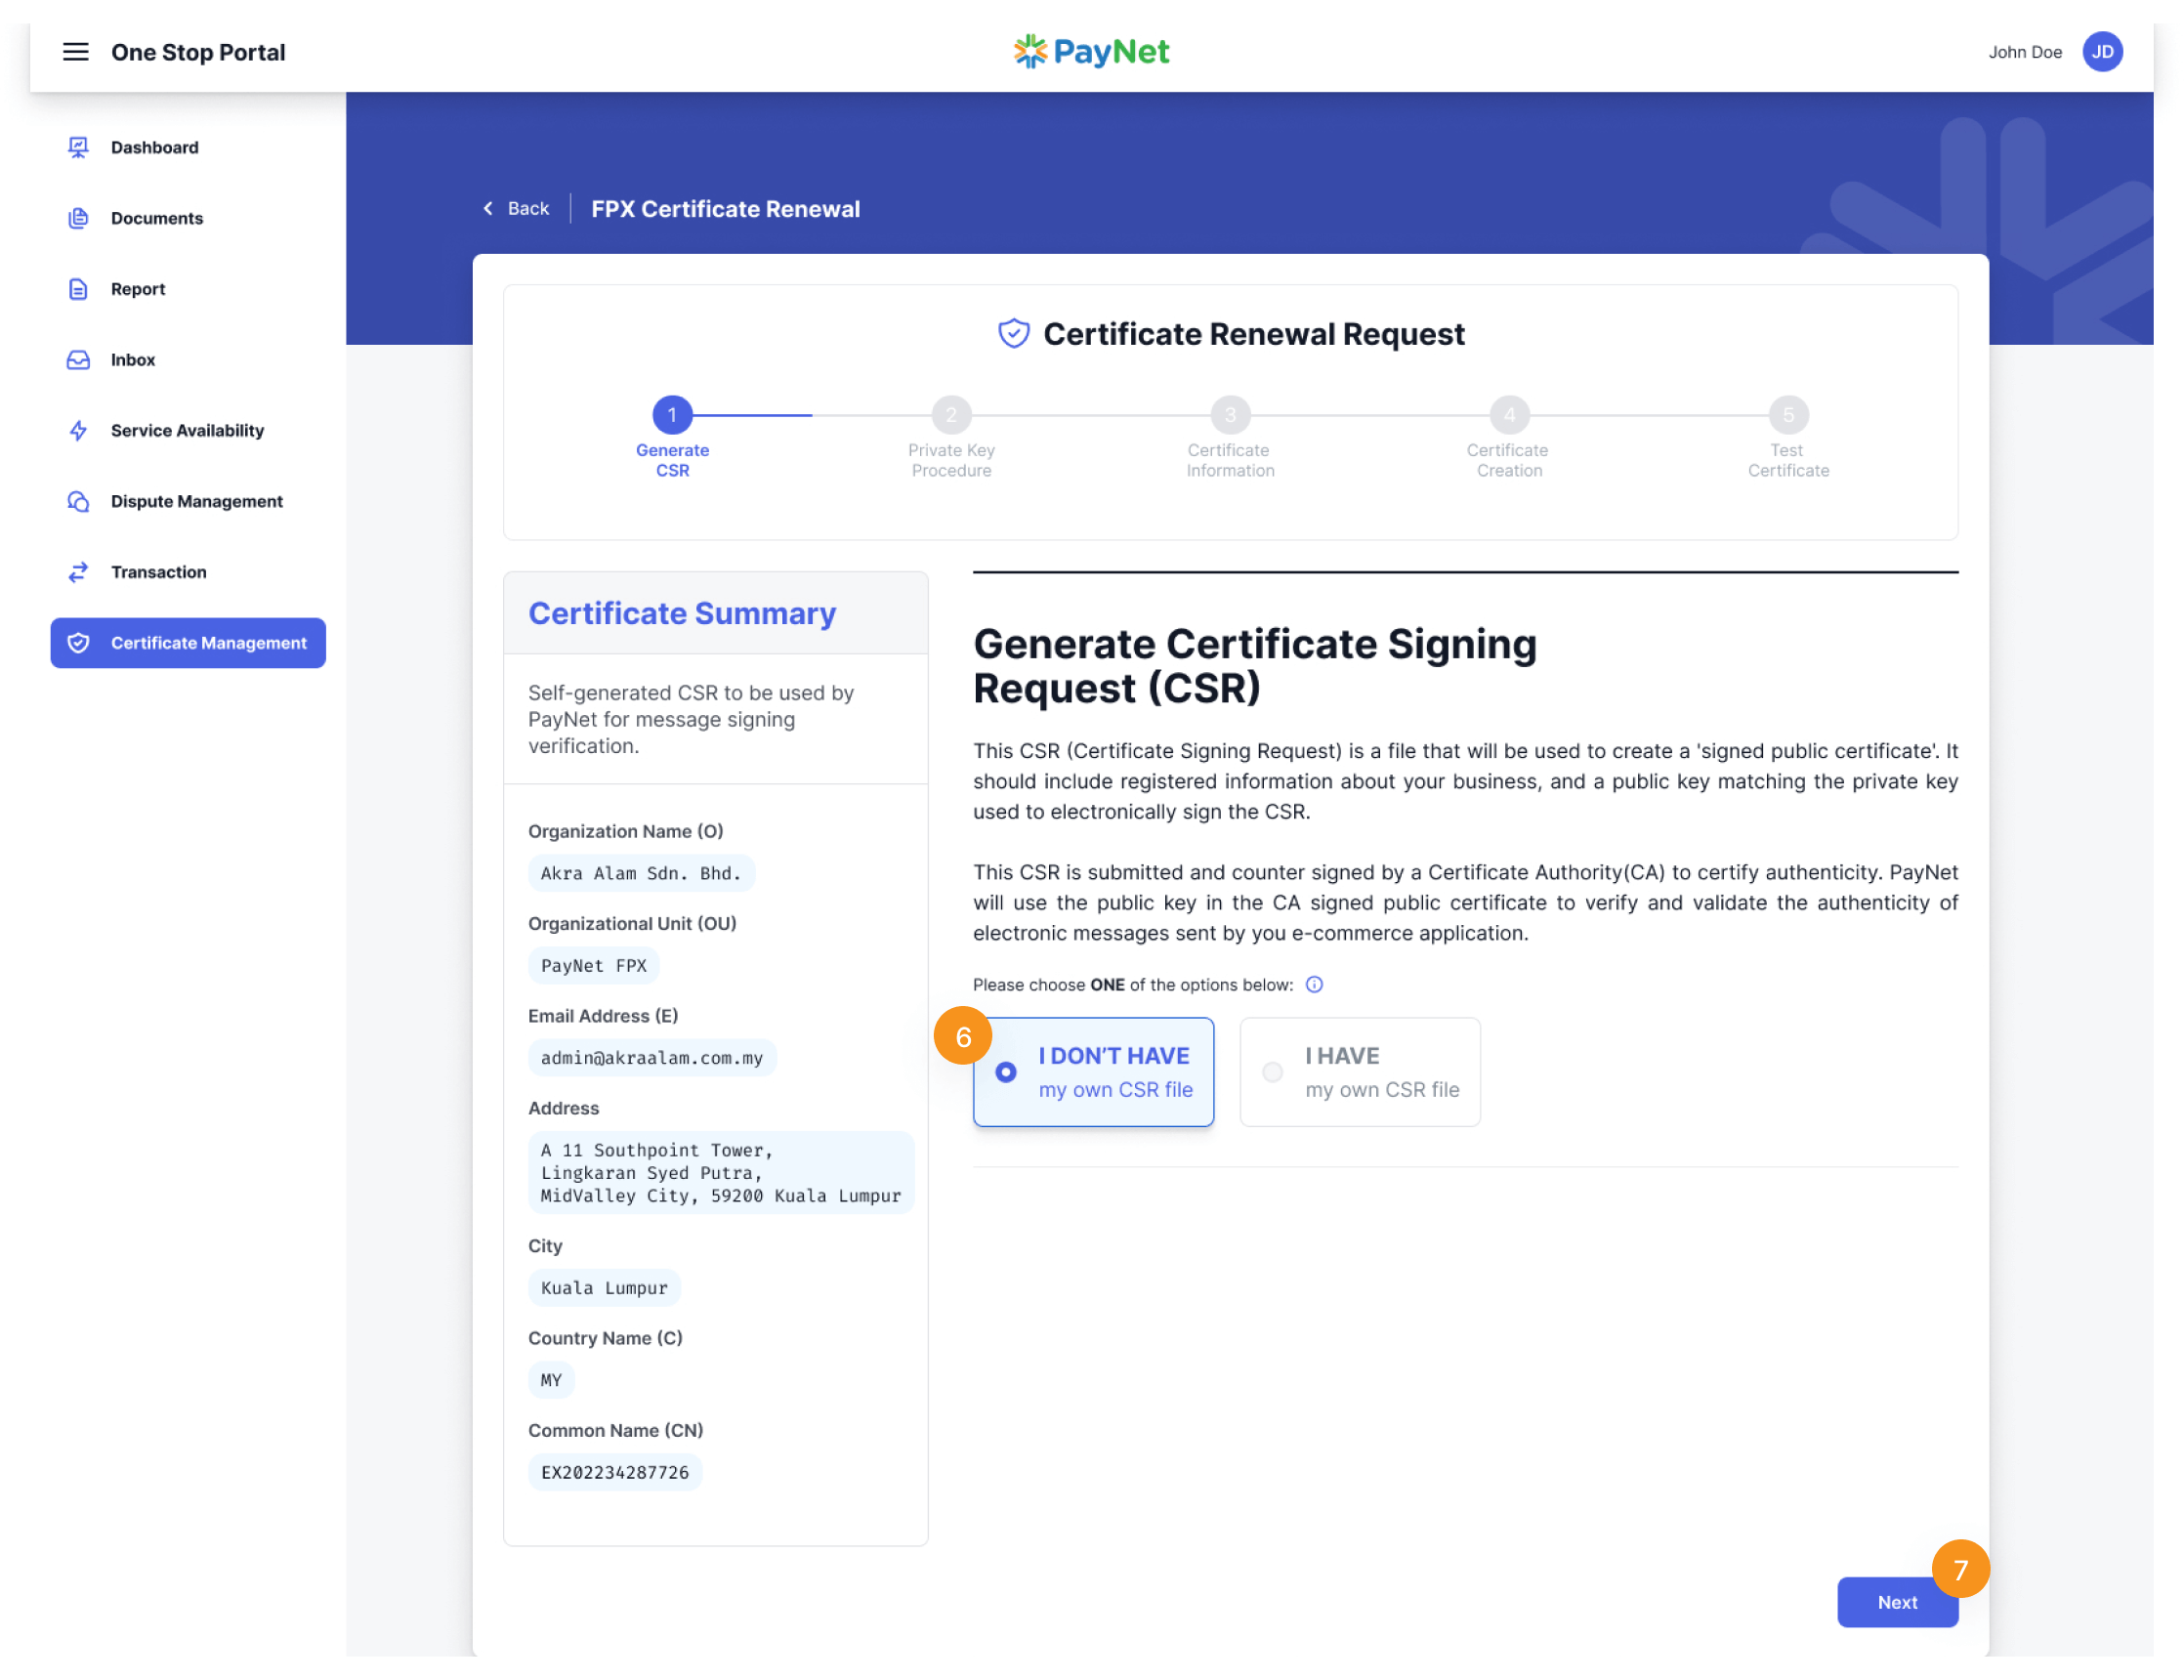
Step 1: Generate CSR, there are two (2) options for participants to choose from: the first option is ‘I DON’T HAVE my own CSR file’ and the second option is ‘I HAVE my own CSR file’.
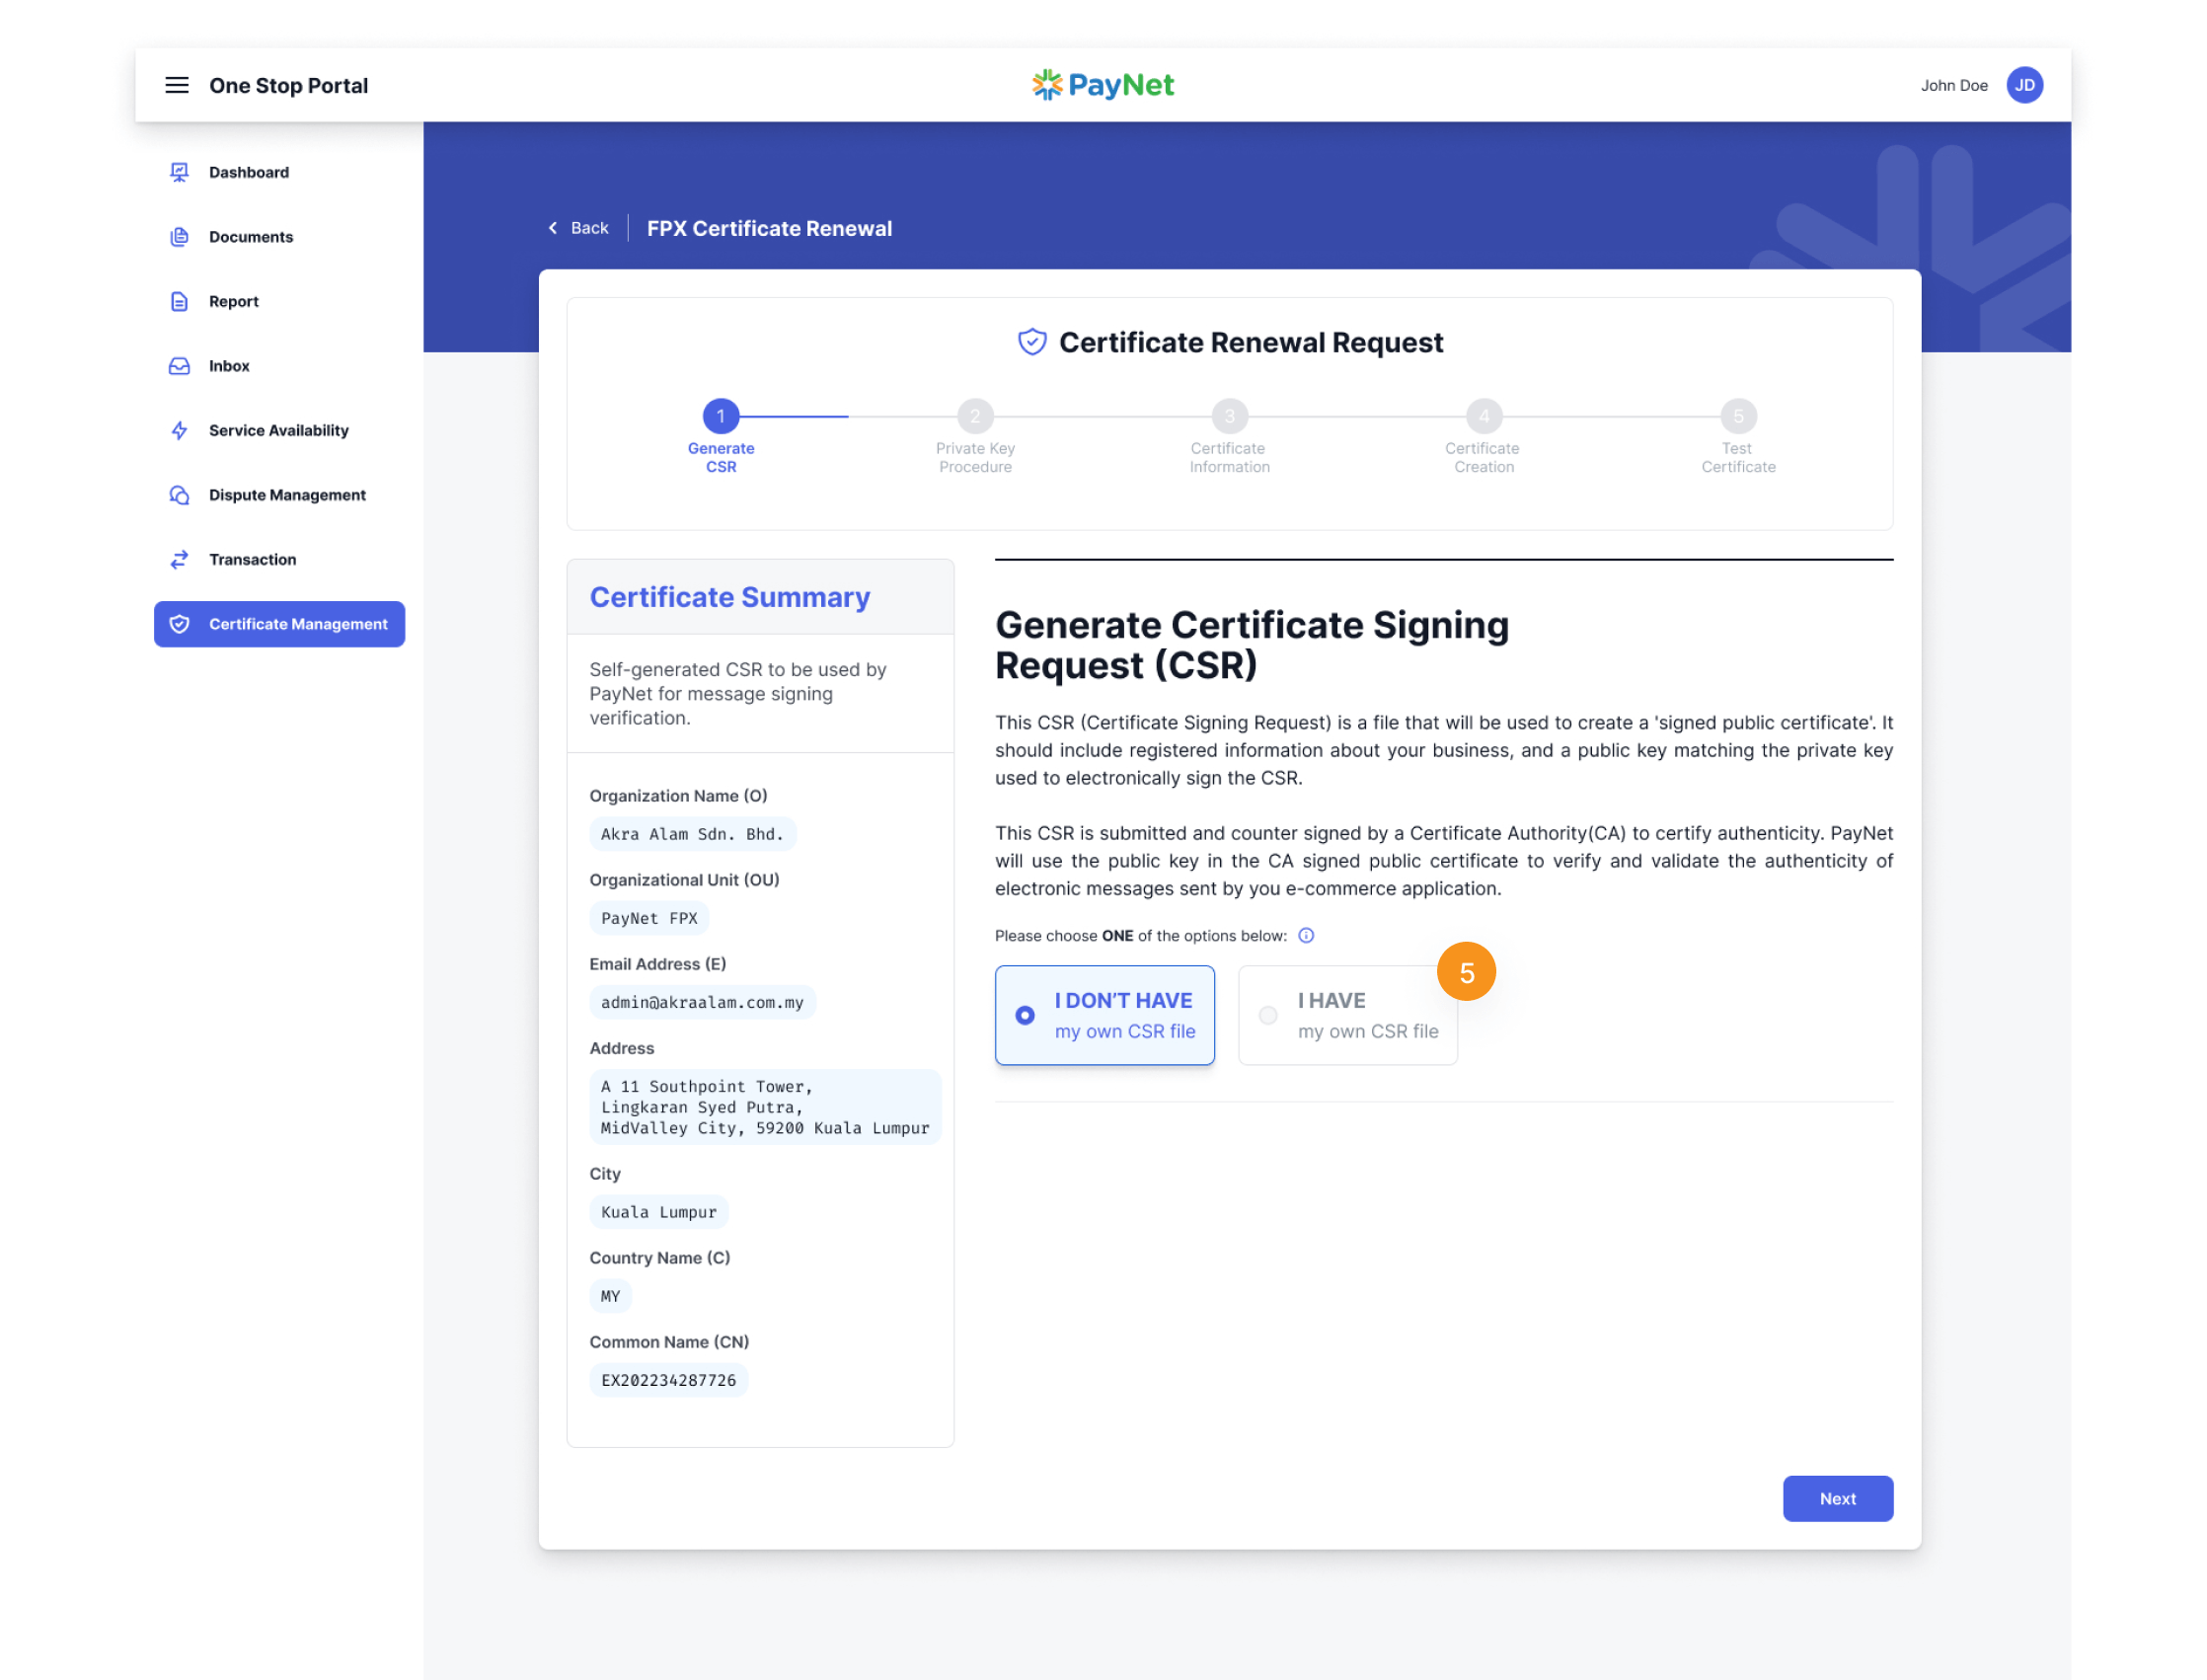
- OPTION 1: I DON’T HAVE my own CSR file
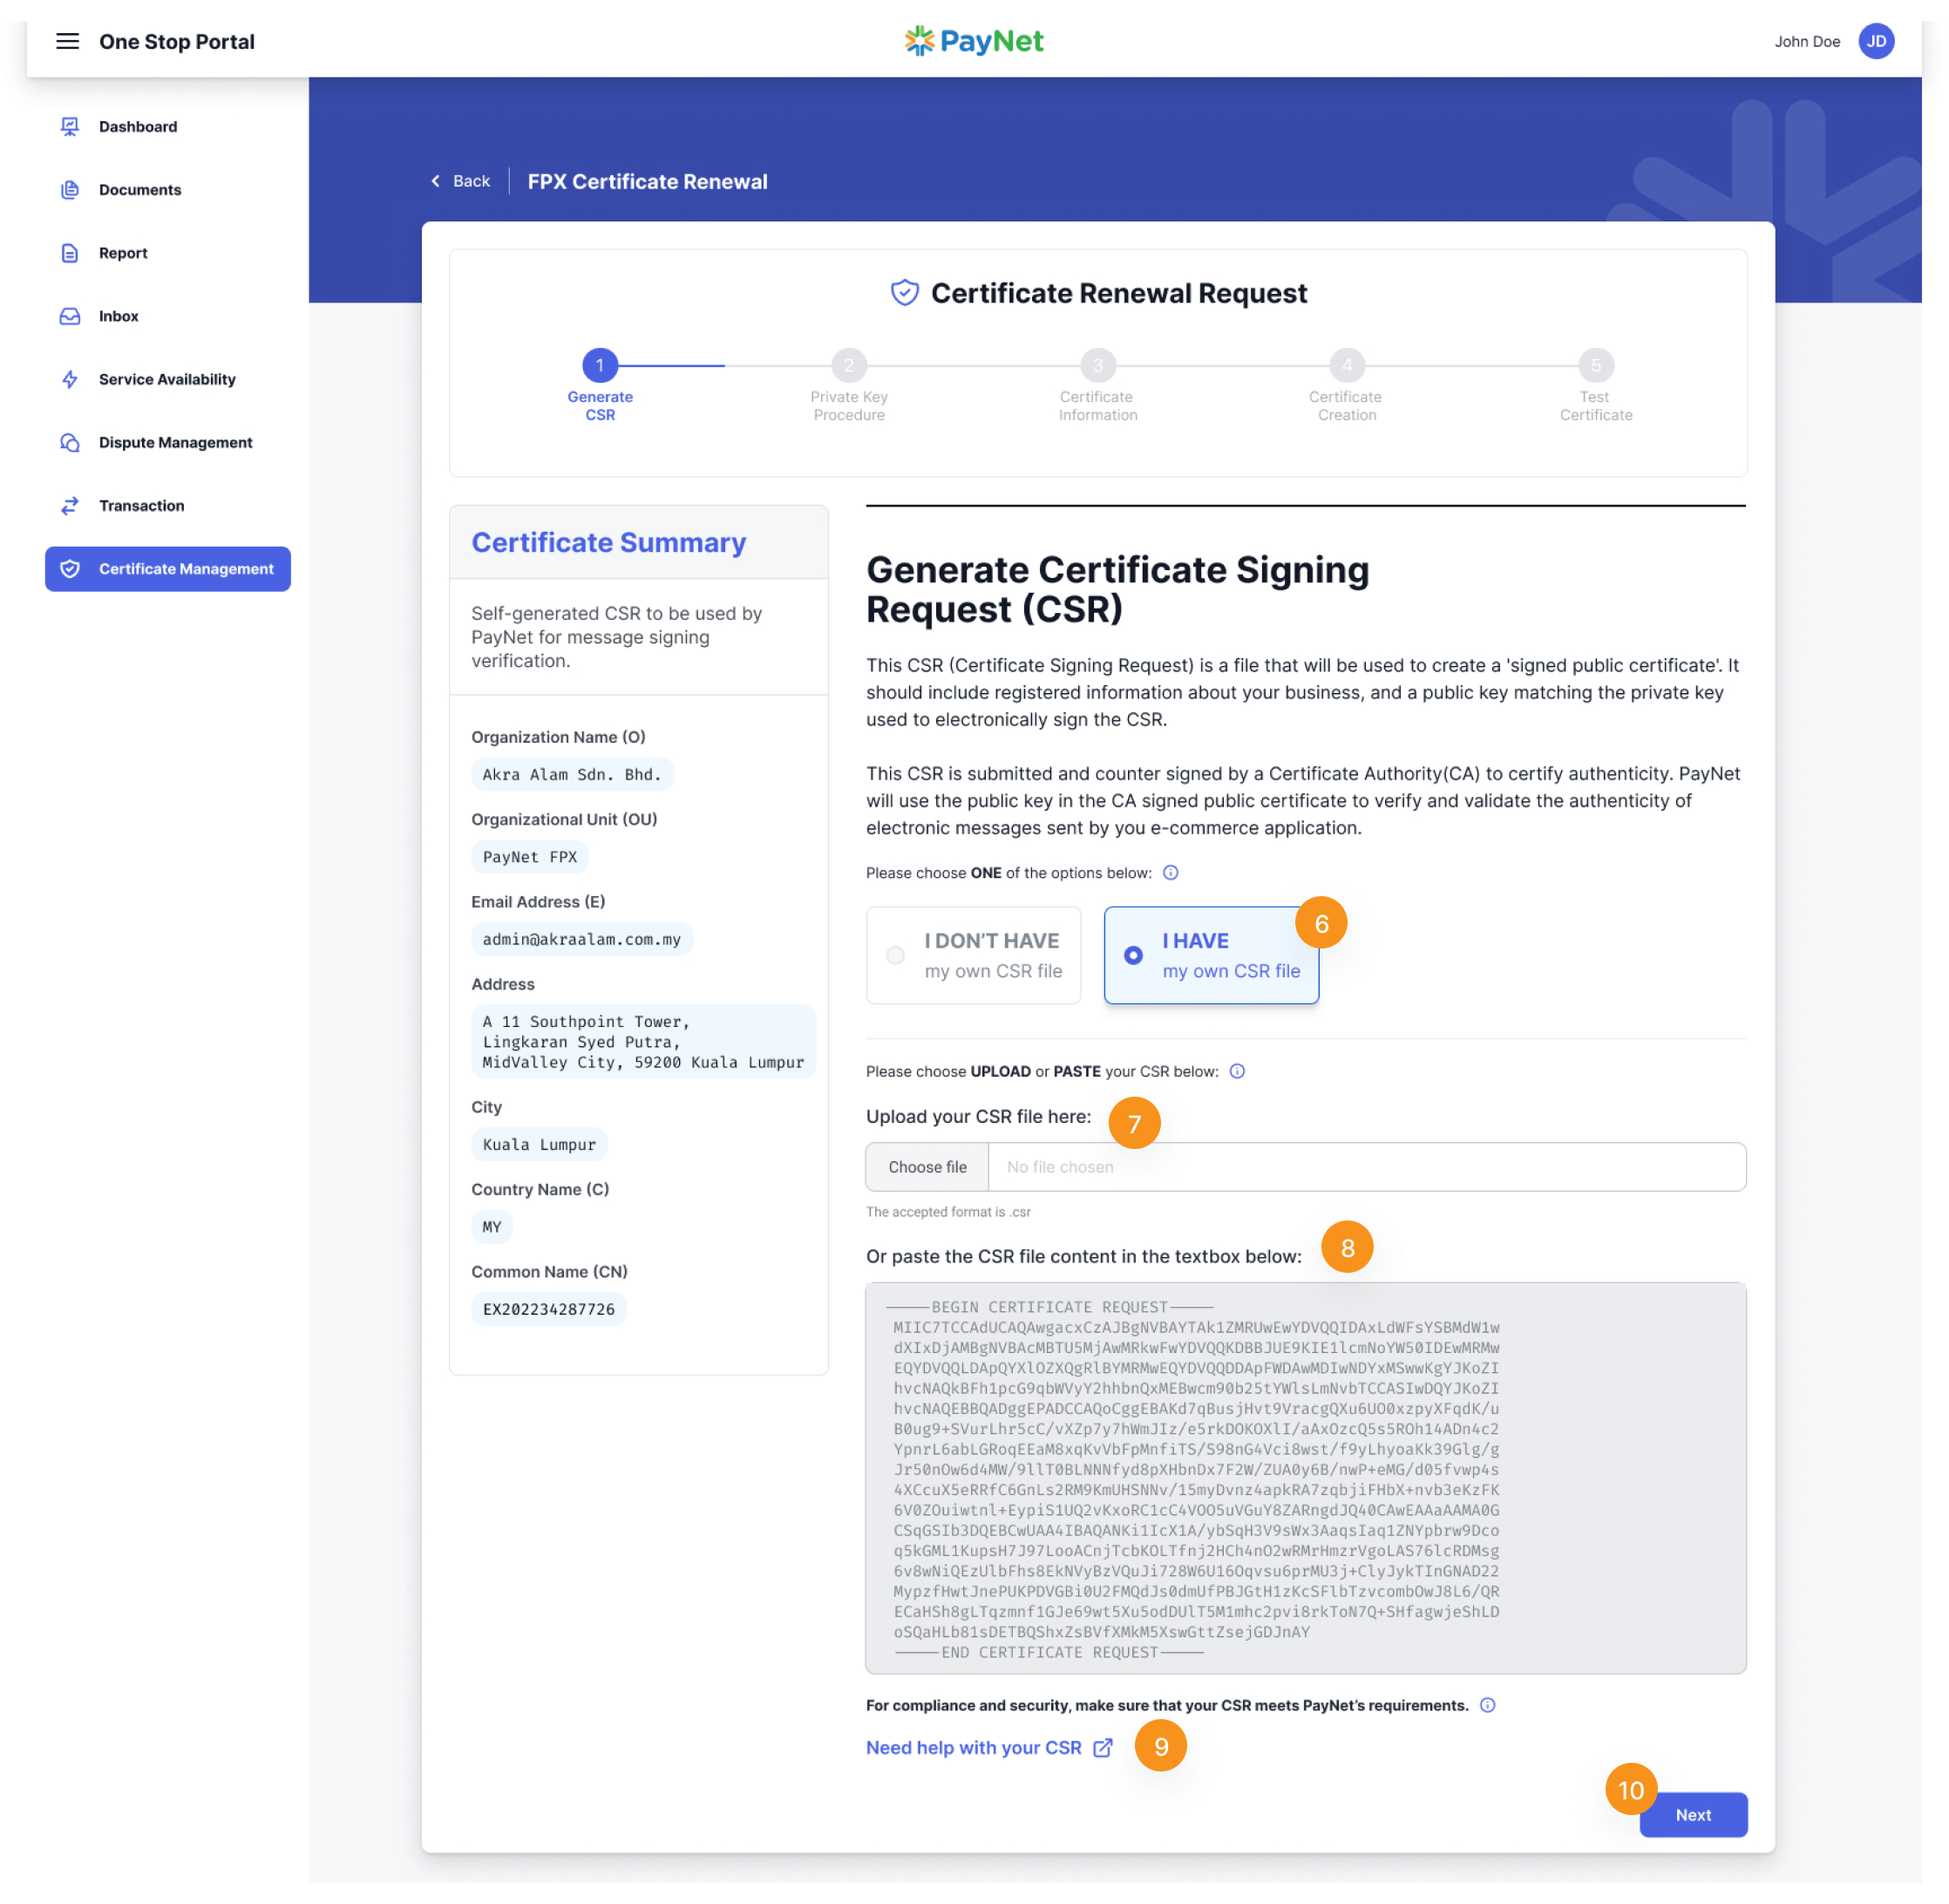
- OPTION 2: I HAVE my own CSR file
6
Participants choose the first option, ‘I DON’T HAVE my own CSR file’.
7
Select ‘Next’ from the bottom right of the page to proceed.
8
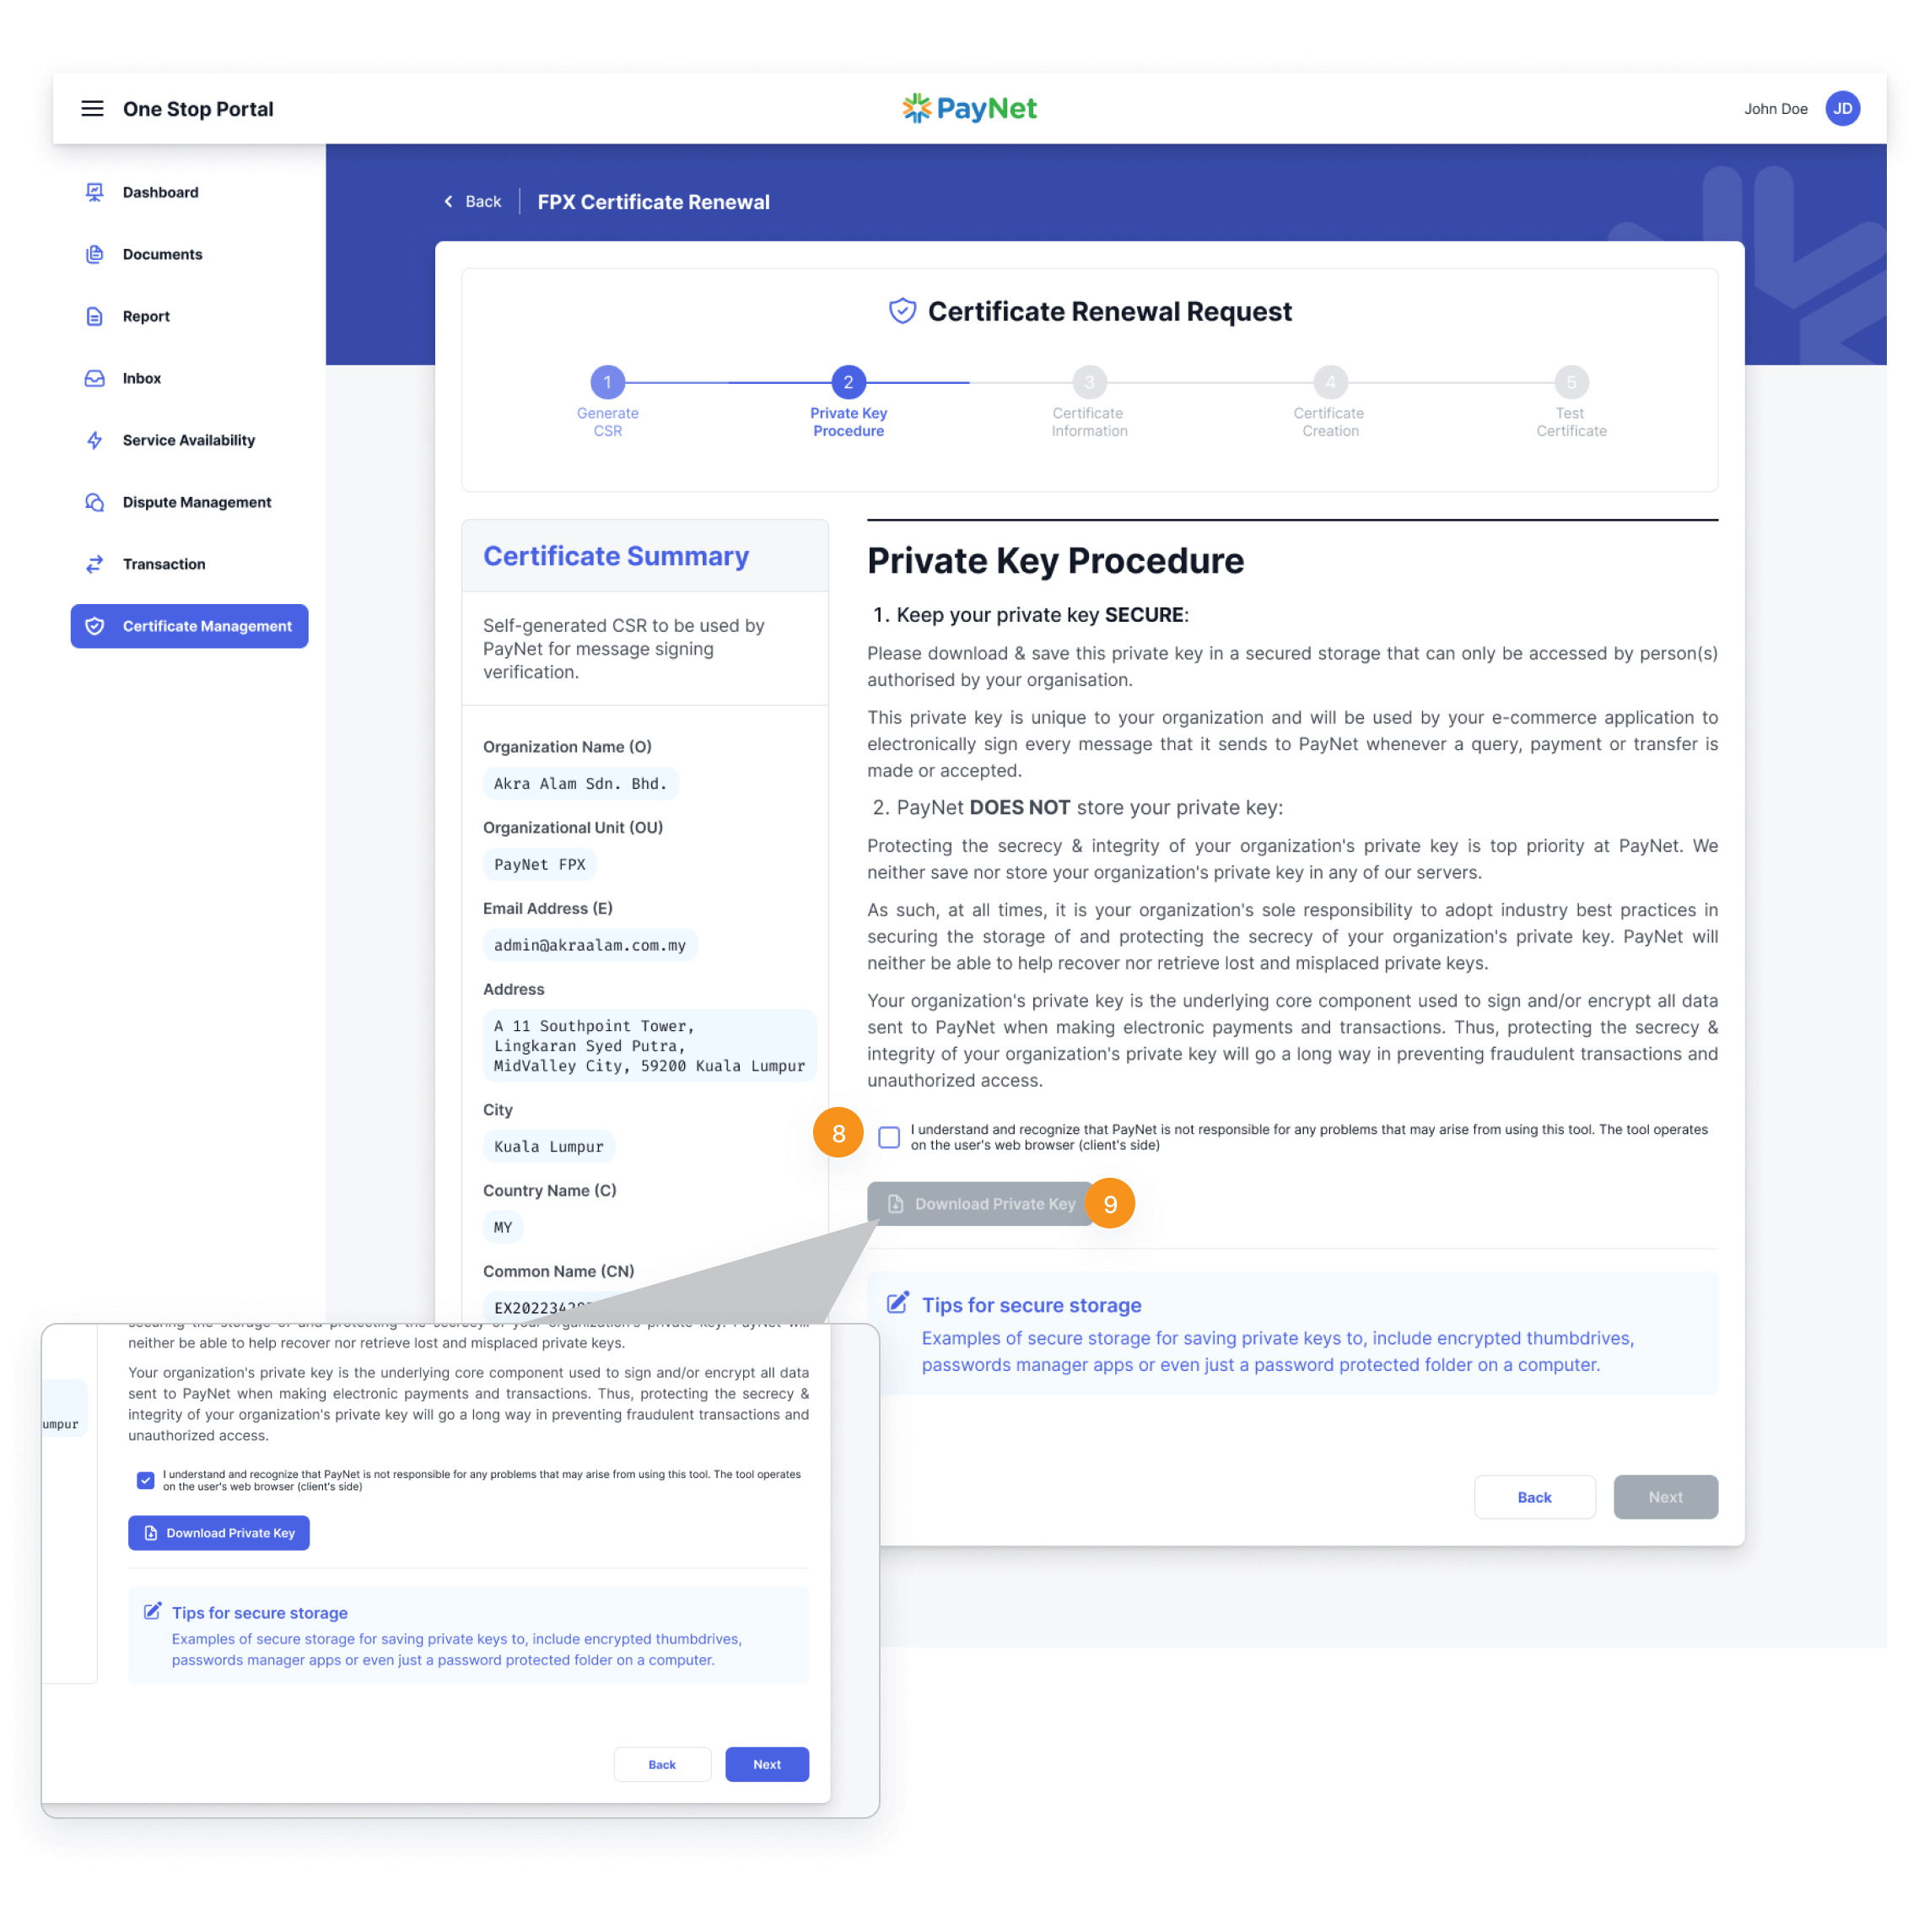
Participant must check the consent in order to download the private key file.
9
Click on ‘Download Private Key’ button.
10
Select ‘Next’ from the bottom right of the page to proceed to the next step, Certificate Information.
6
Participants choose the second option, ‘I HAVE my own CSR file’.
7
Click ‘Choose File’ (.csr file only) button and upload your CSR file.
8
Or paste the CSR file content in the textbox:
(Your CSR must include the -----BEGIN NEW CERTIFICATE REQUEST-----
and -----END NEW CERTIFICATE REQUEST----- tags)
9
Please ensure that the generated CSR adheres to our guidelines. You may click on ‘Need help with your CSR’ to follow our guidelines.
10
Select ‘Next’ from the bottom right of the page to proceed to the next step,Certificate Information.
Certificate Information
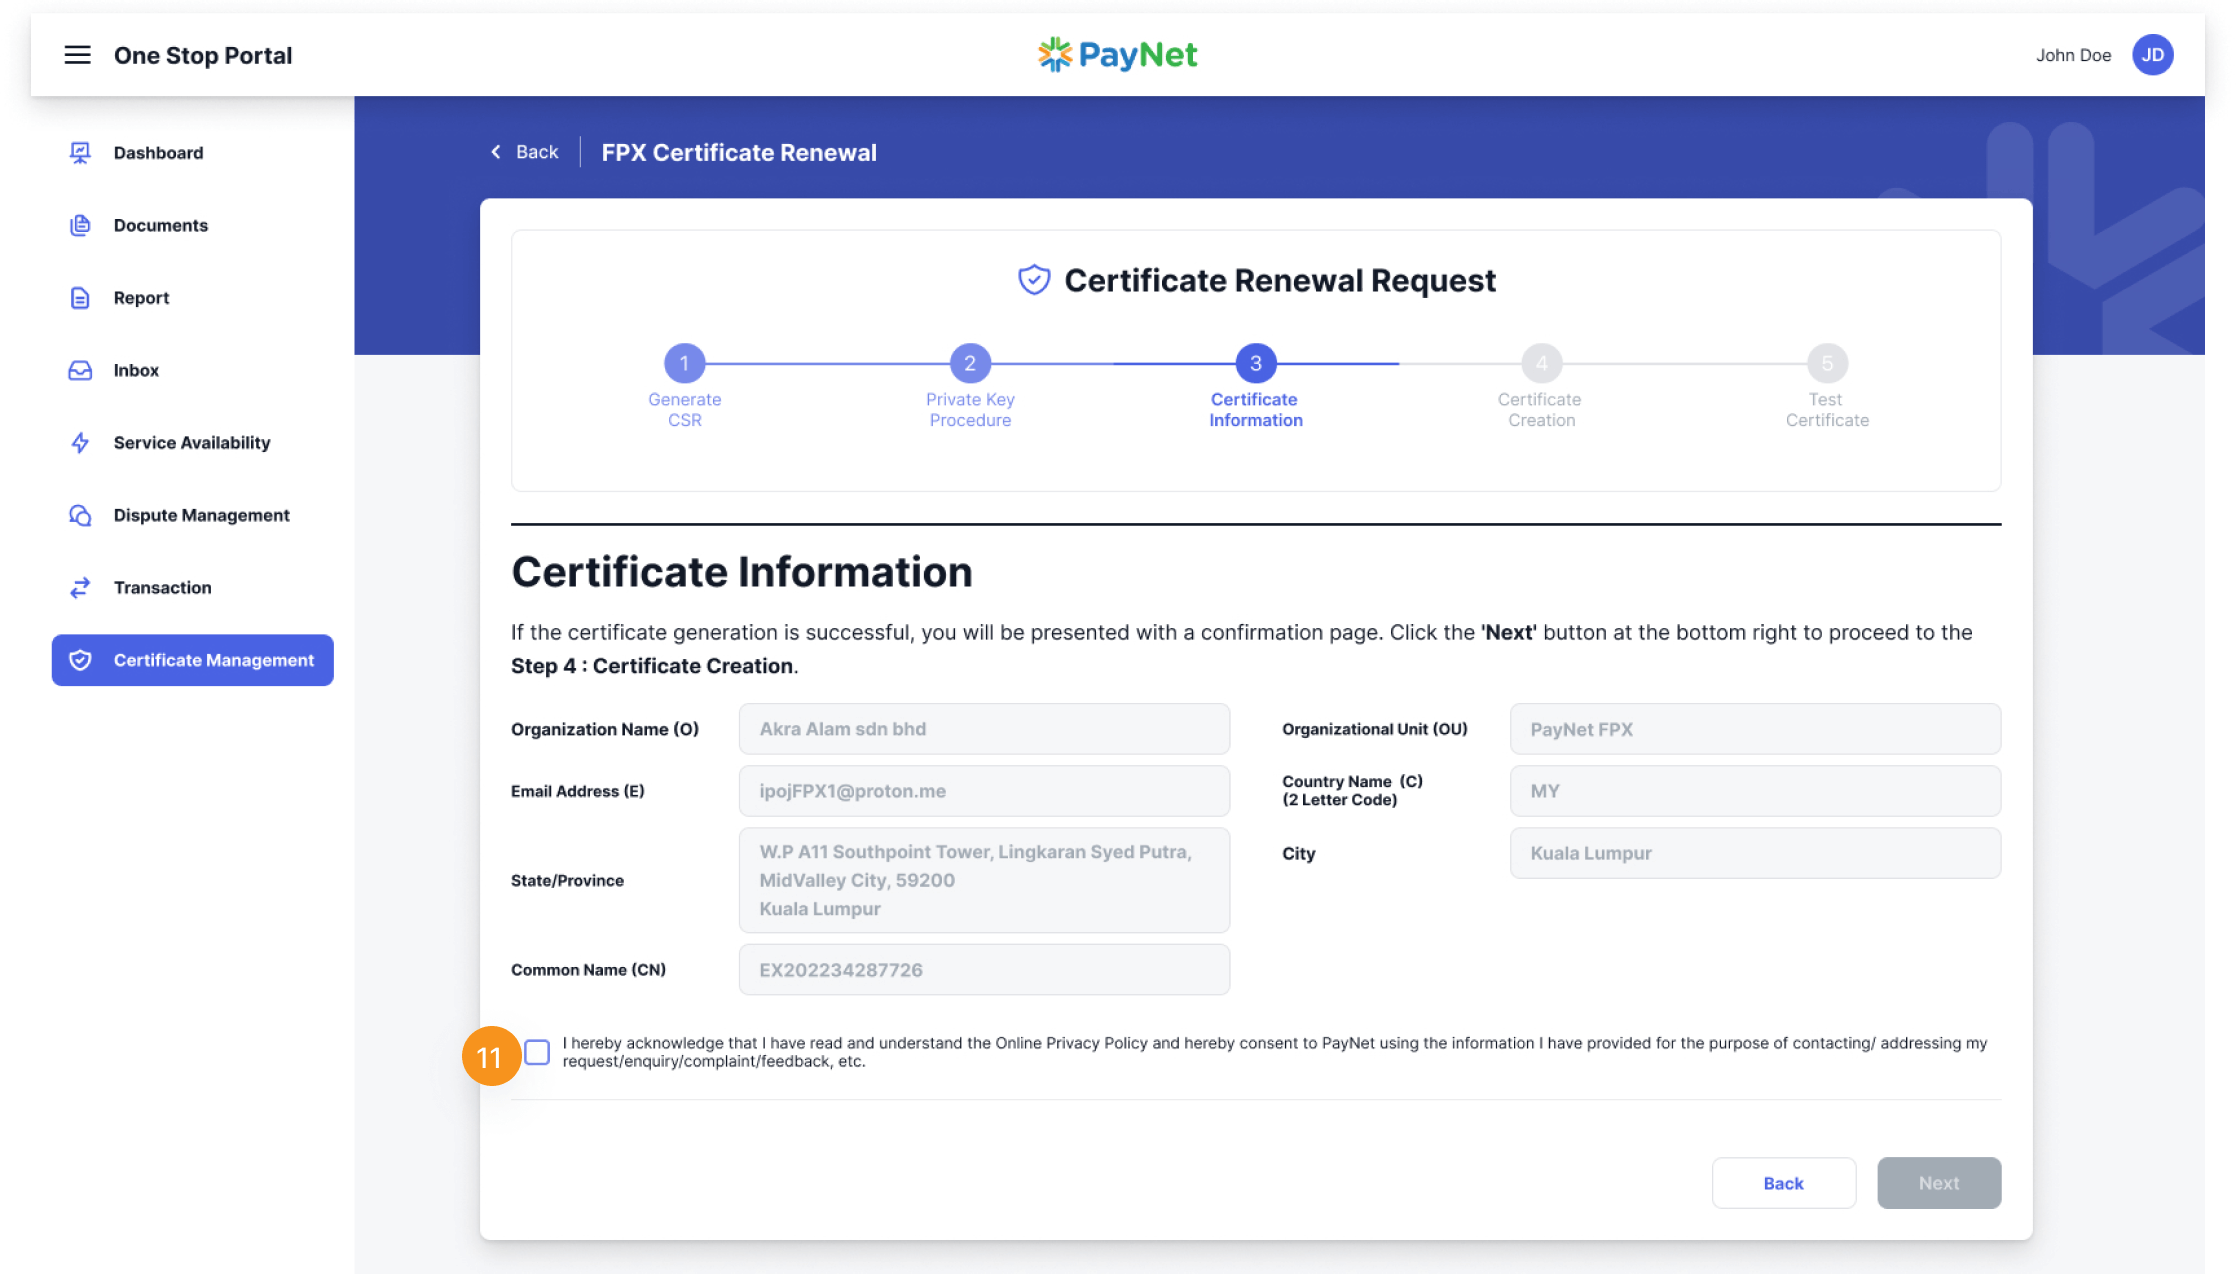
Certificate Information is the next step of Certificate Renewal Request. In this page you will be presented with information of your certificate:
- If you chose 'I DON'T HAVE my own CSR file', we will use your information in our database to generate the CSR and certificate.
- If you chose 'I HAVE my own CSR file', these information are extracted from the CSR you provided.
11
Check the consent box and select ‘Next’ at the bottom right of the page to proceed.
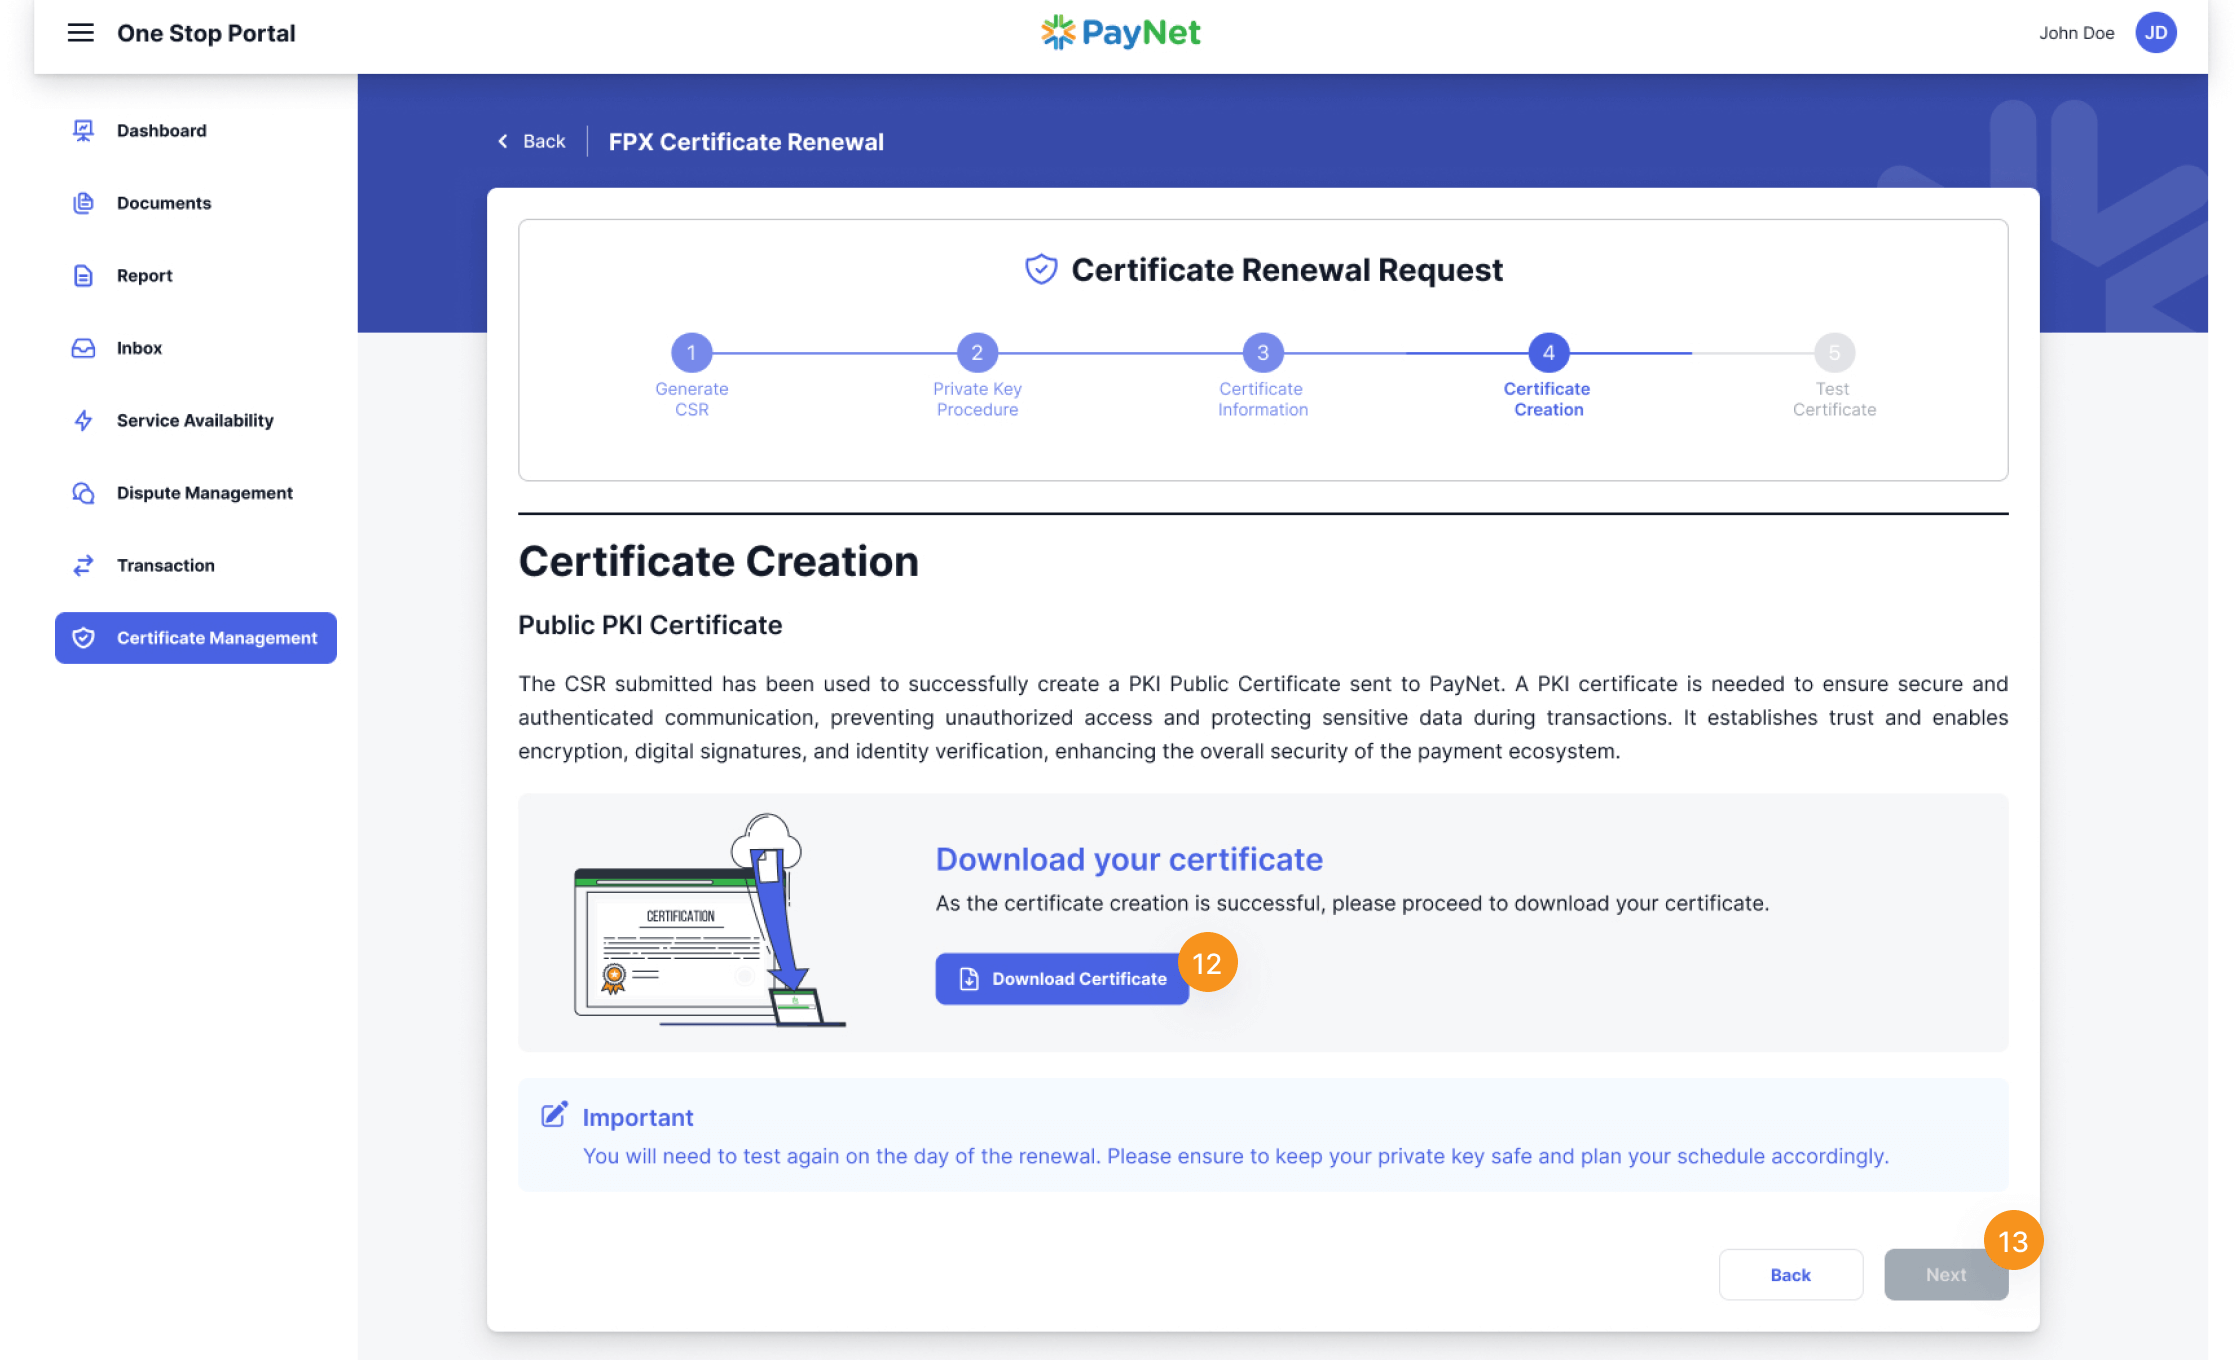
Certificate Creation
As the certificate creation is successful, please proceed to download your certificate.
12
Click on ’Download Certificate’ button to proceed to download your certificate.
13
Select ’Next’ from the bottom right of the page to proceed.
Verify Key Matches
Testing Certificate Process
Why Do We Need to Test Your Private Key?
To uphold the utmost security and trust in our system, verifying key matches is essential. Ensuring the validity and integrity of cryptographic certificates through the testing of private key matching with our public key allows us to confidently proceed with certificate rotation, guaranteeing seamless and secure communication.
What is the Modulus of a Private Key?
In the realm of RSA cryptography, a key pair (comprising a public and private key) is generated based on two large prime numbers. The product of these two prime numbers is what we refer to as the "modulus." This modulus is an essential part of both the private and public keys, acting as a shared link between them.
In simpler terms, the modulus is a unique identifier that helps in ensuring that a particular private key corresponds to a specific public key. By comparing the modulus of your private key with that of our public key, we can verify that they are indeed a matching pair.
Getting Started with testing the certificate
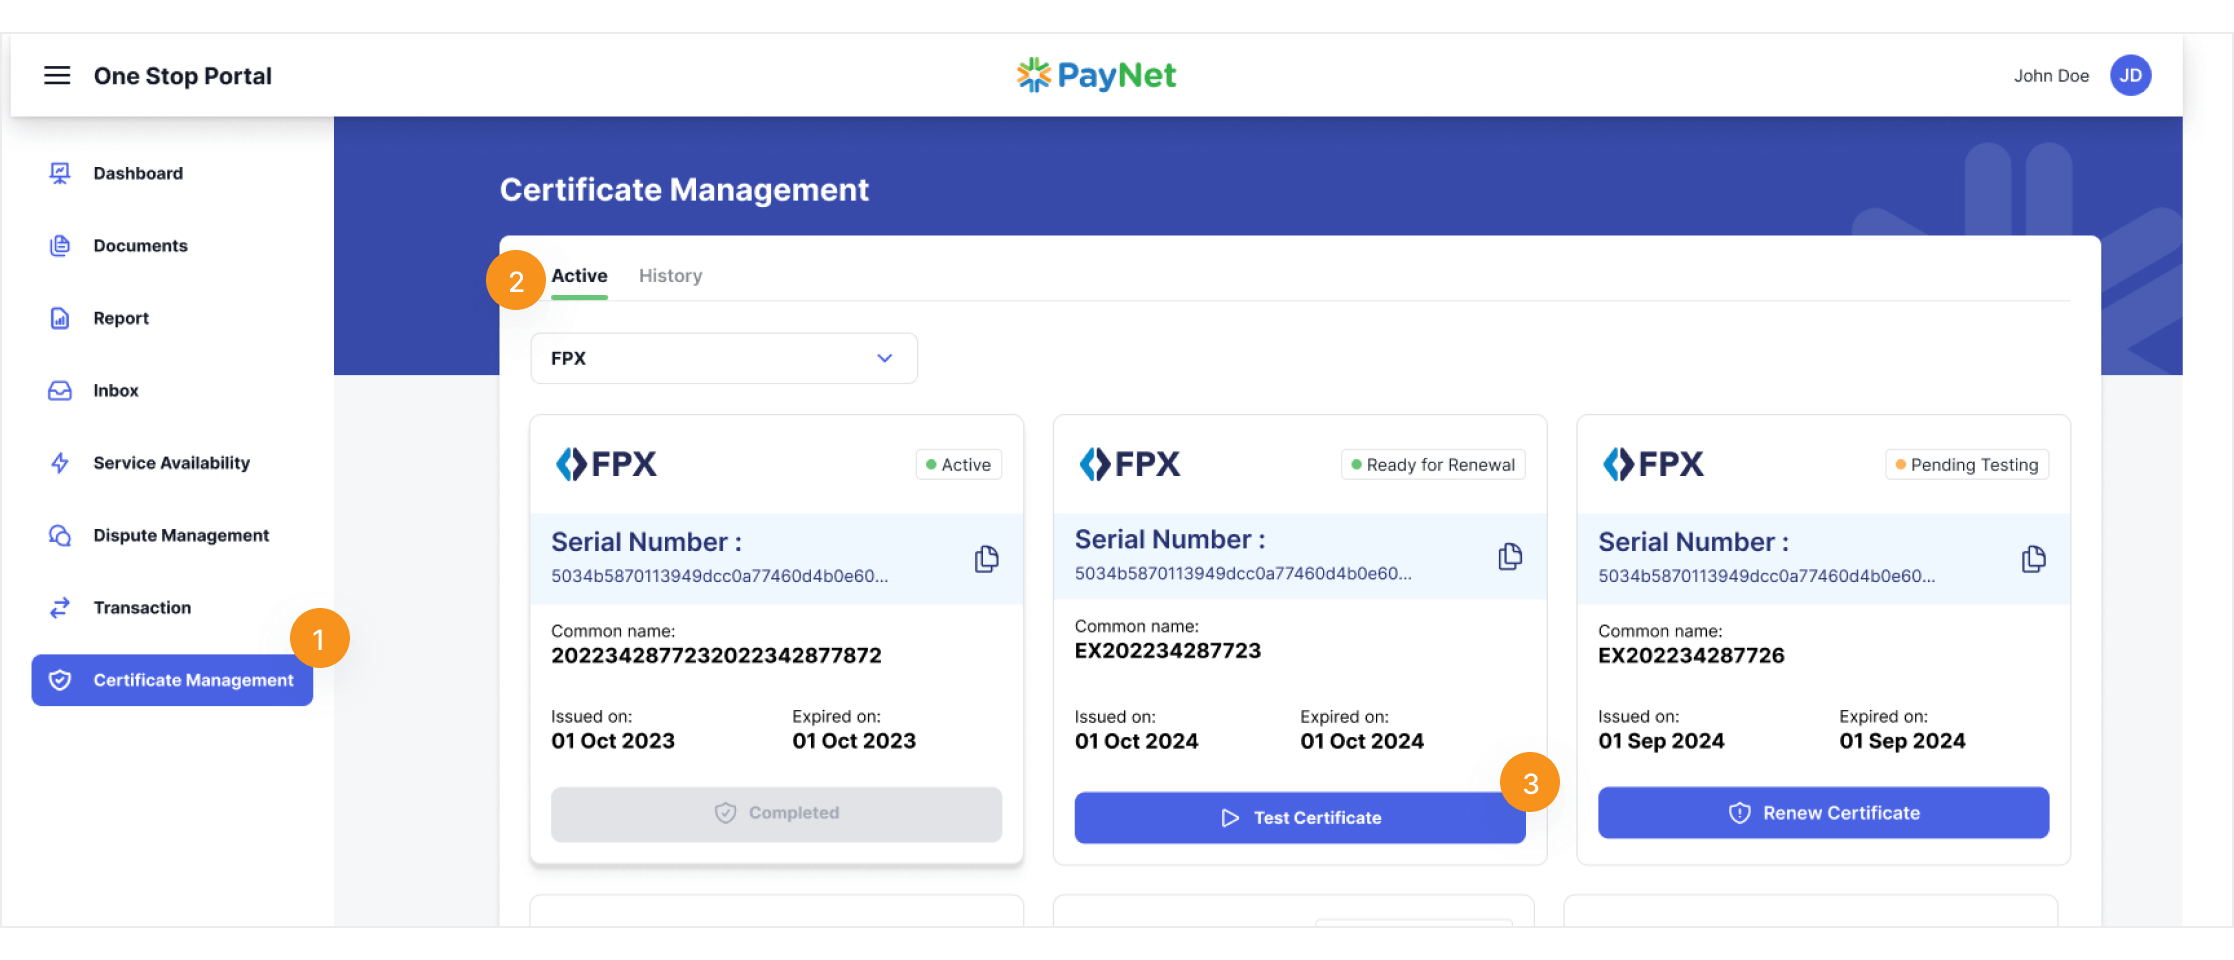
There are two ways to access the testing page:
- If you continue from the previous process, you can select ‘Next’ from the bottom right of the confirmation page.
- If you come from the Certificate Management Dashboard, identify the certificate with the tag ‘Pending Testing’. Follow the steps below to ensure proper functionality and security.
1
Select ‘Certificate Management’ from OSP’s left sidebar.
2
Select ‘Active’ tab on Certificate Management dashboard.
3
Identify the certificate with the tag ‘Pending Testing’. Select the ‘Test Certificate’ button.
Verify the Modulus of Your Private Key
Choose the appropriate option:
- Select I DON’T KNOW how to obtain the modulus of my private key if you are unfamiliar with the process.
- Select I KNOW how to retrieve the modulus of my private key if you can provide the modulus directly.
If you'd like to learn how to generate the modulus yourself, please refer to our Modulus Extraction Guideline
Test Certificate
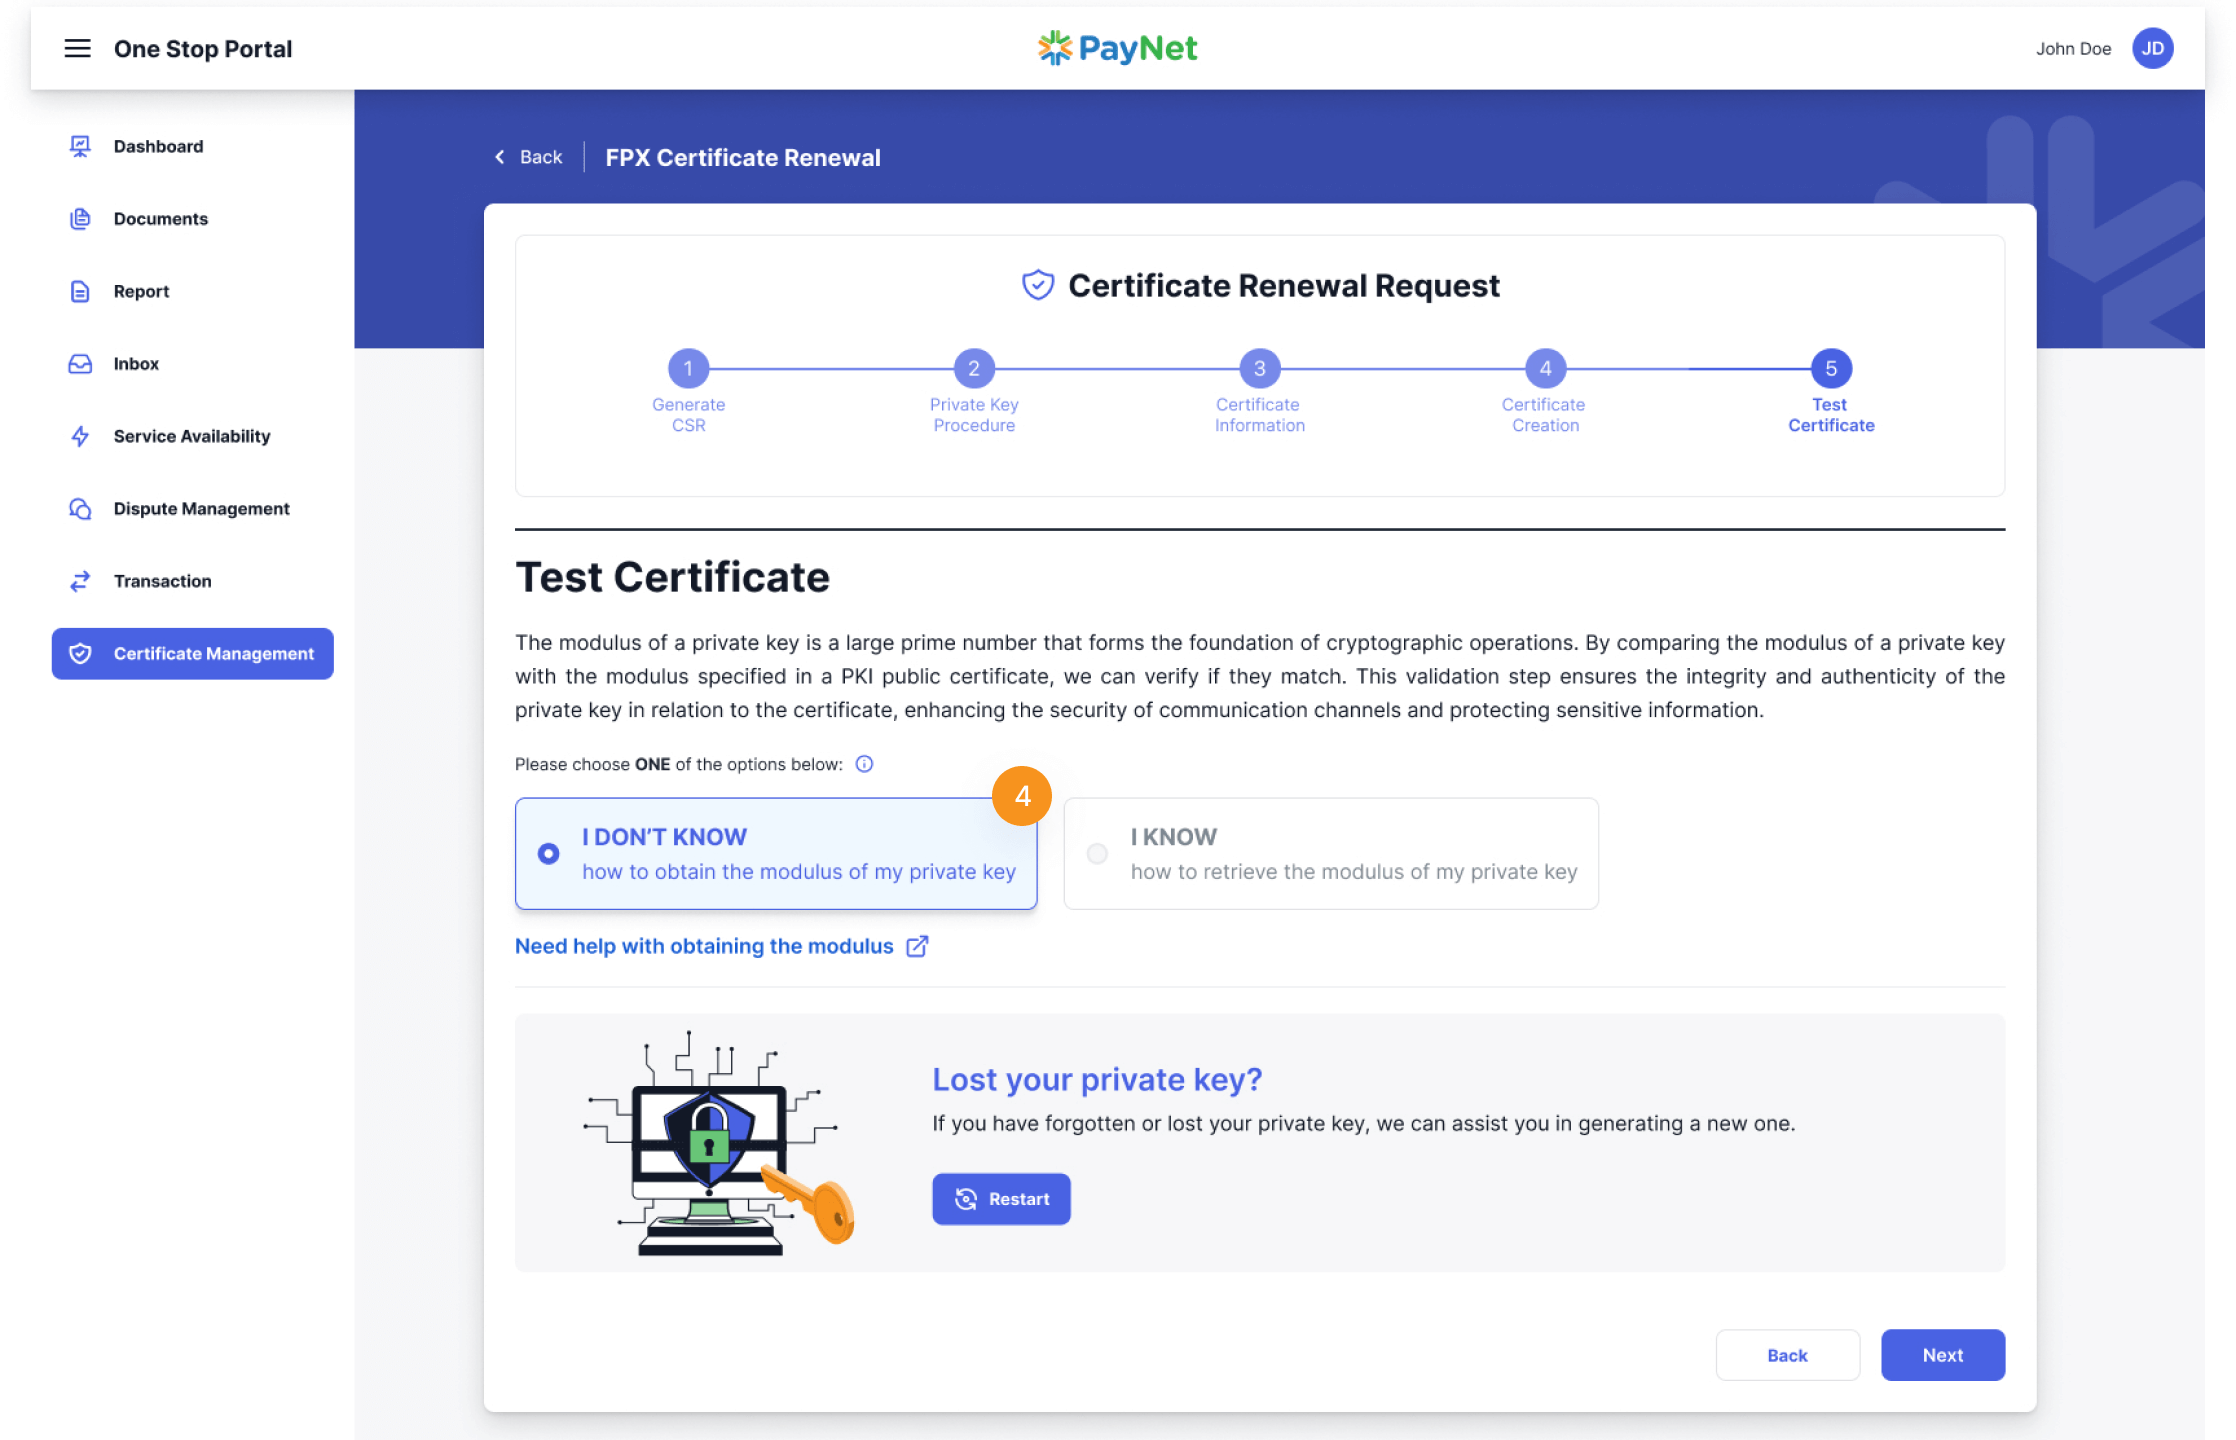
Test Certificate participants will proceed with the renewal process, choose the option that best suits your requirement. There are two (2) options for participants to choose from: the first option is ‘I DON’T KNOW how to obtain the modulus of my private key’ and the second option is ‘I KNOW how to obtain the modulus of my private key.’
- OPTION 1: I DON’T KNOW how to obtain the modulus of my private key
- OPTION 2: I KNOW how to obtain the modulus of my private key
4
Click on ‘I DON’T KNOW how to obtain the modulus of my private key’ button and click ‘Next’ button.
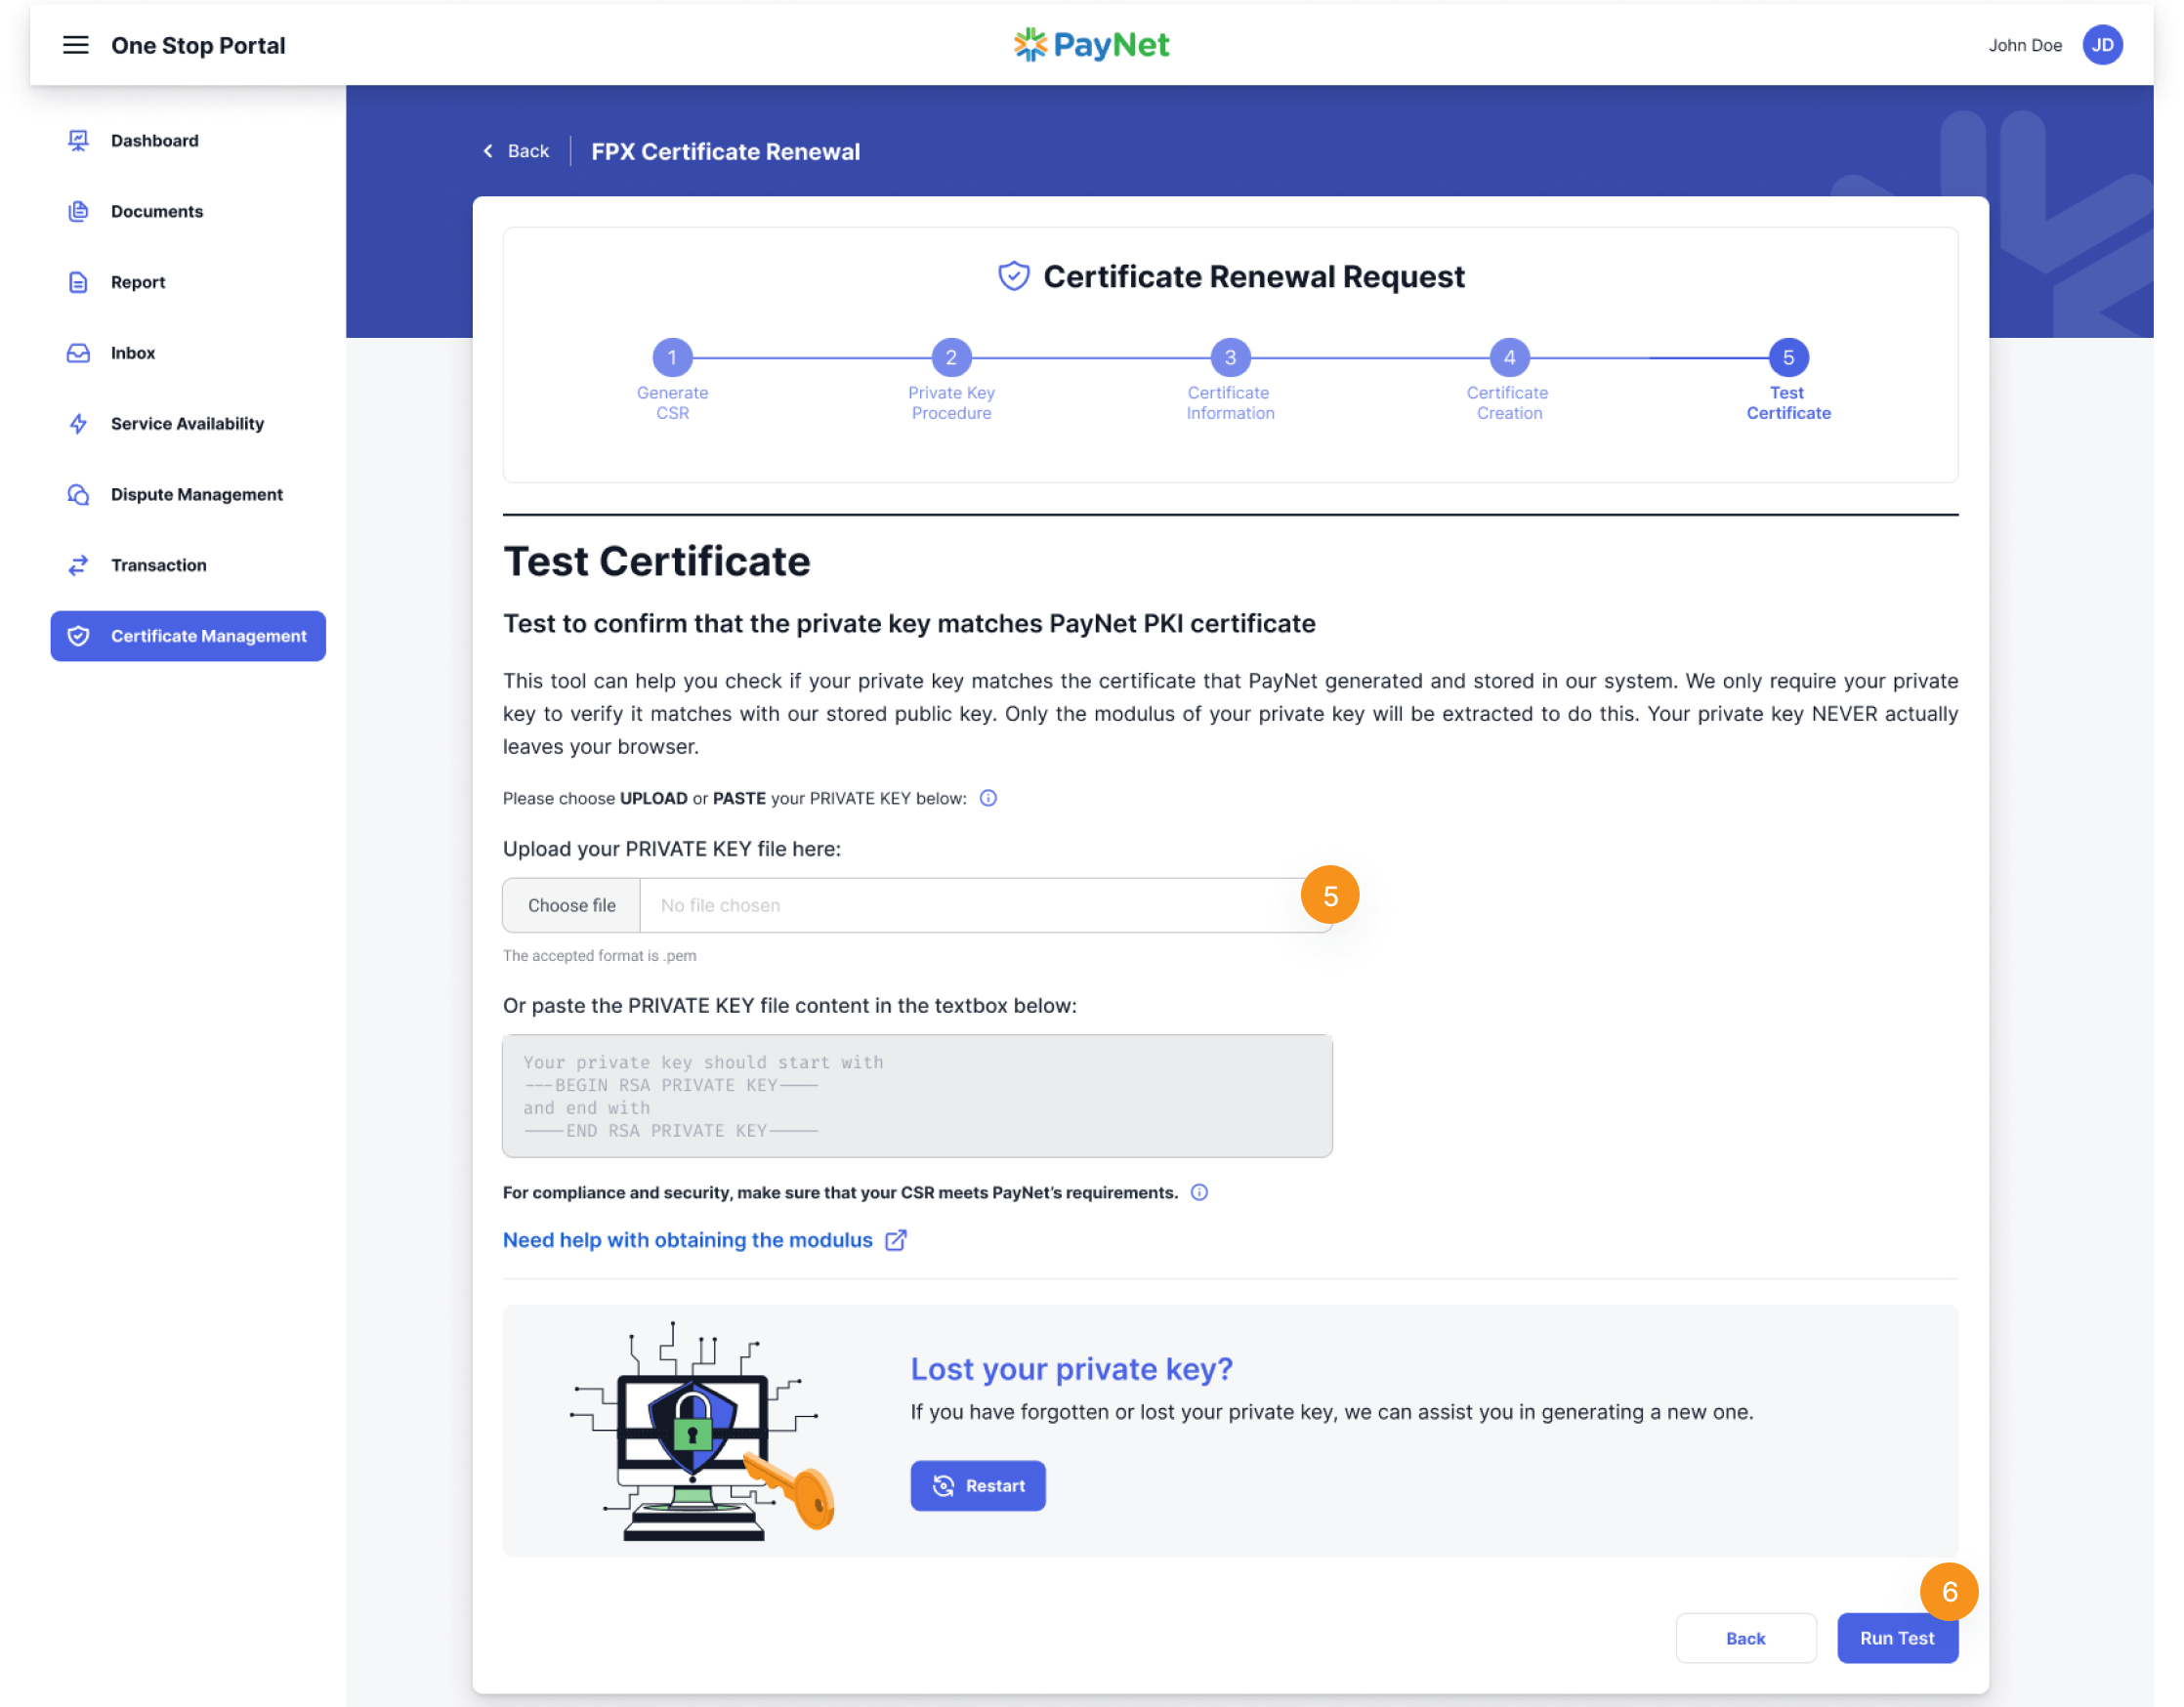
5
The next step requires participants to either upload their private key by clicking on ‘Choose file’ and uploading the file or pasting the private key in the textbox.
6
Then, click on the ‘Run Test’ at the right bottom of the page.
4
Click on ‘I KNOW how to obtain the modulus of my private key’ button and click ‘Next’ button.
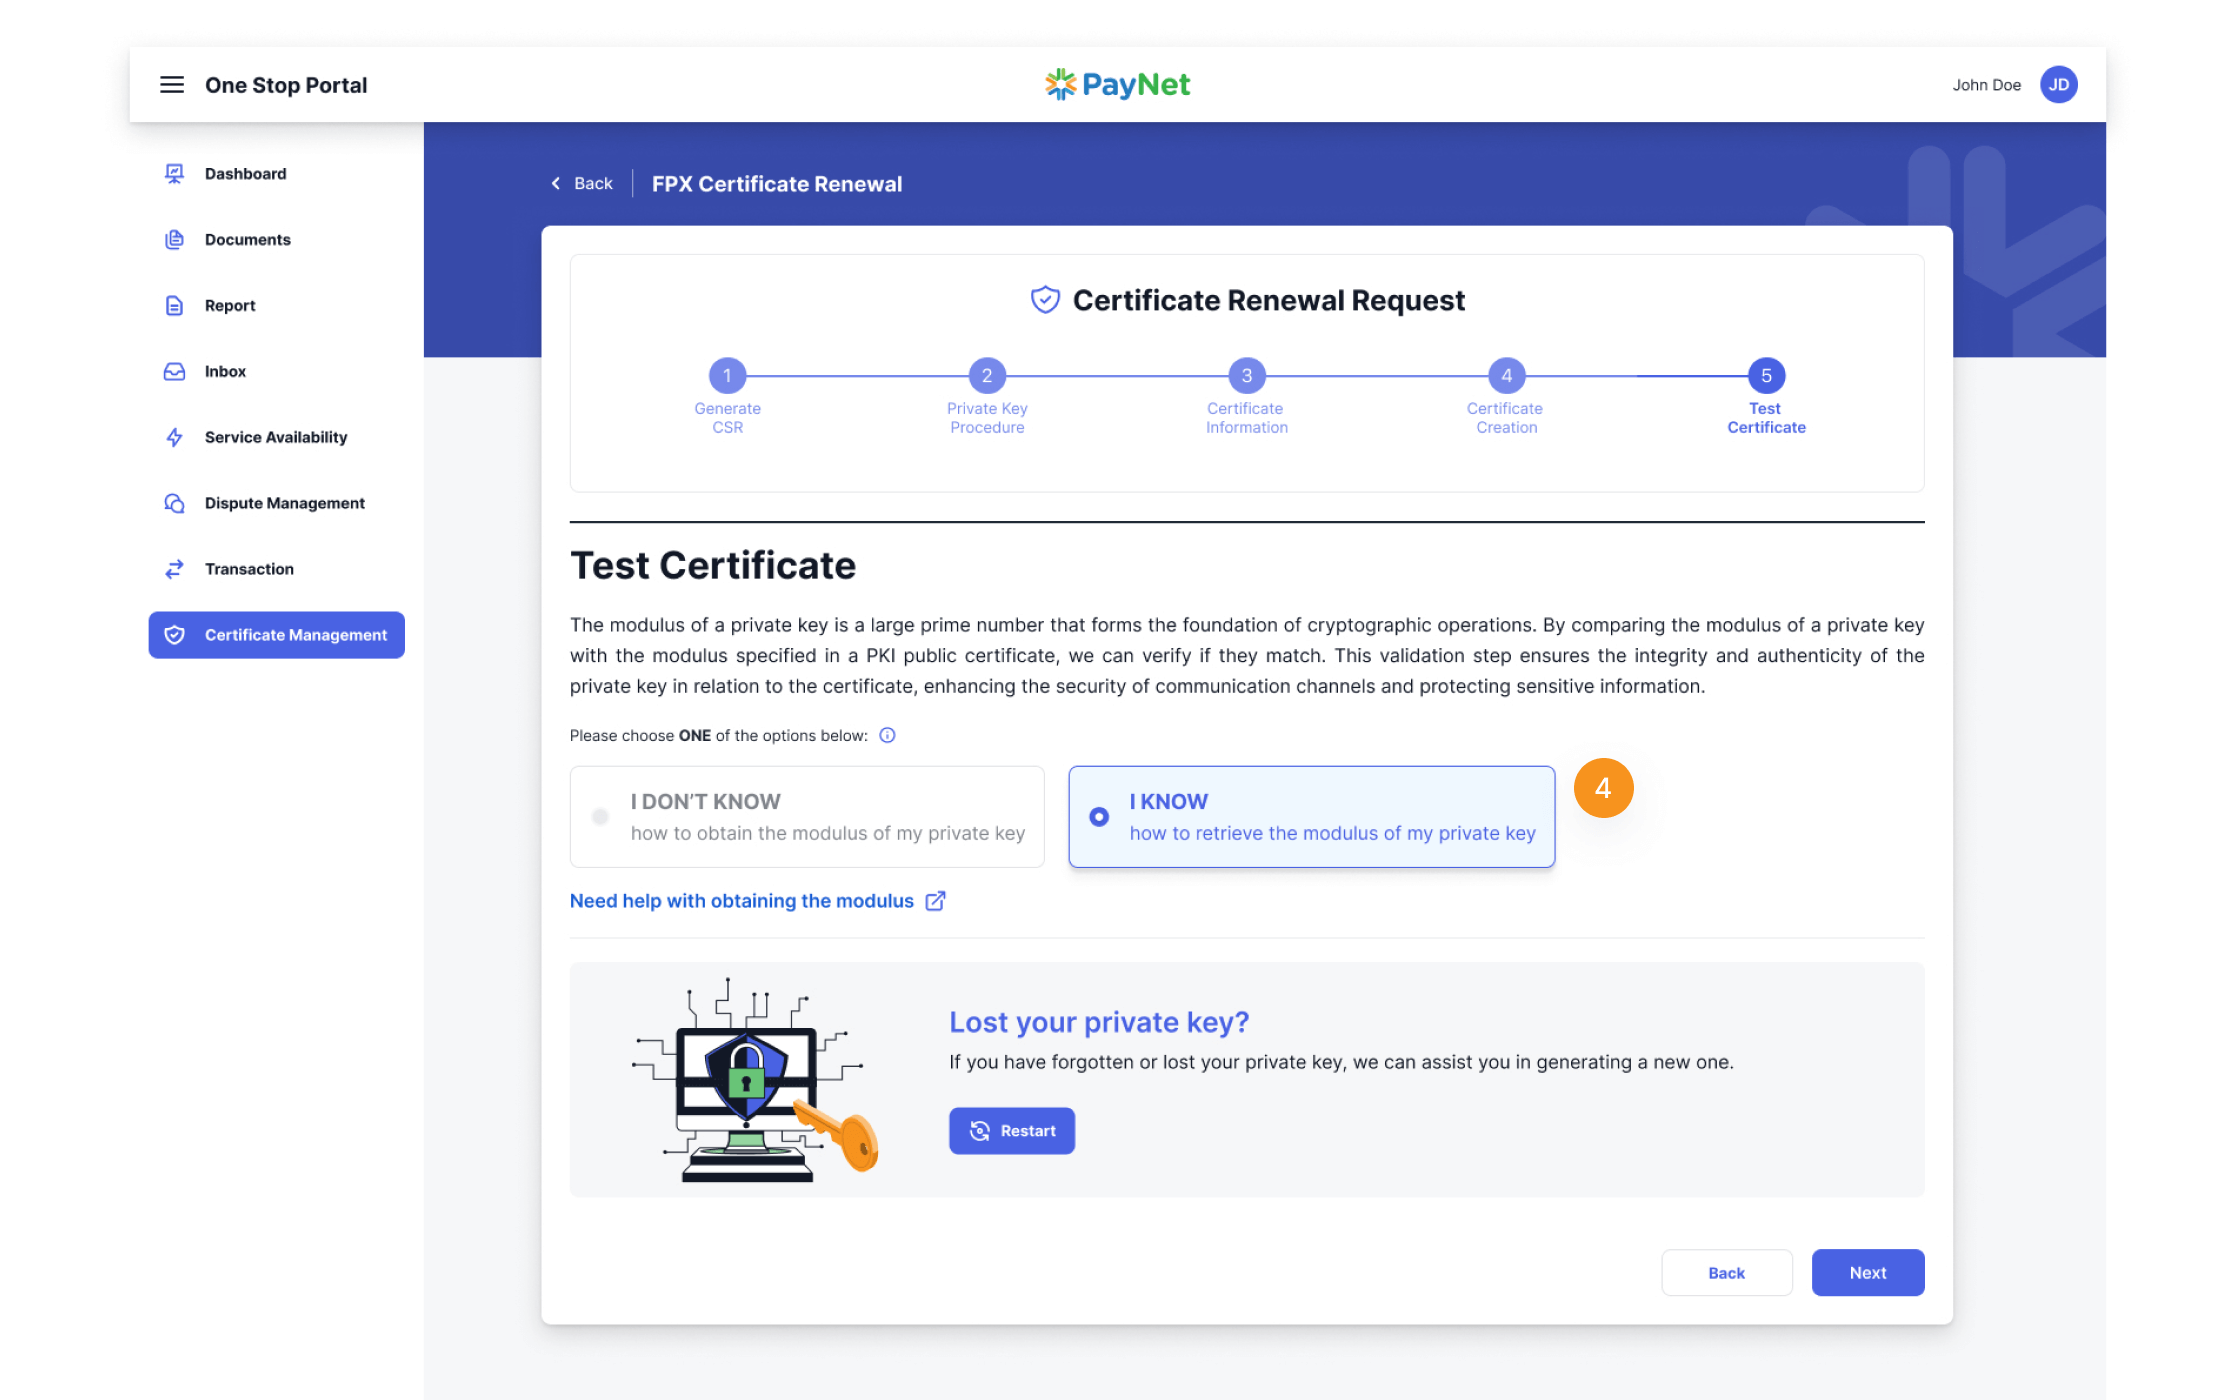
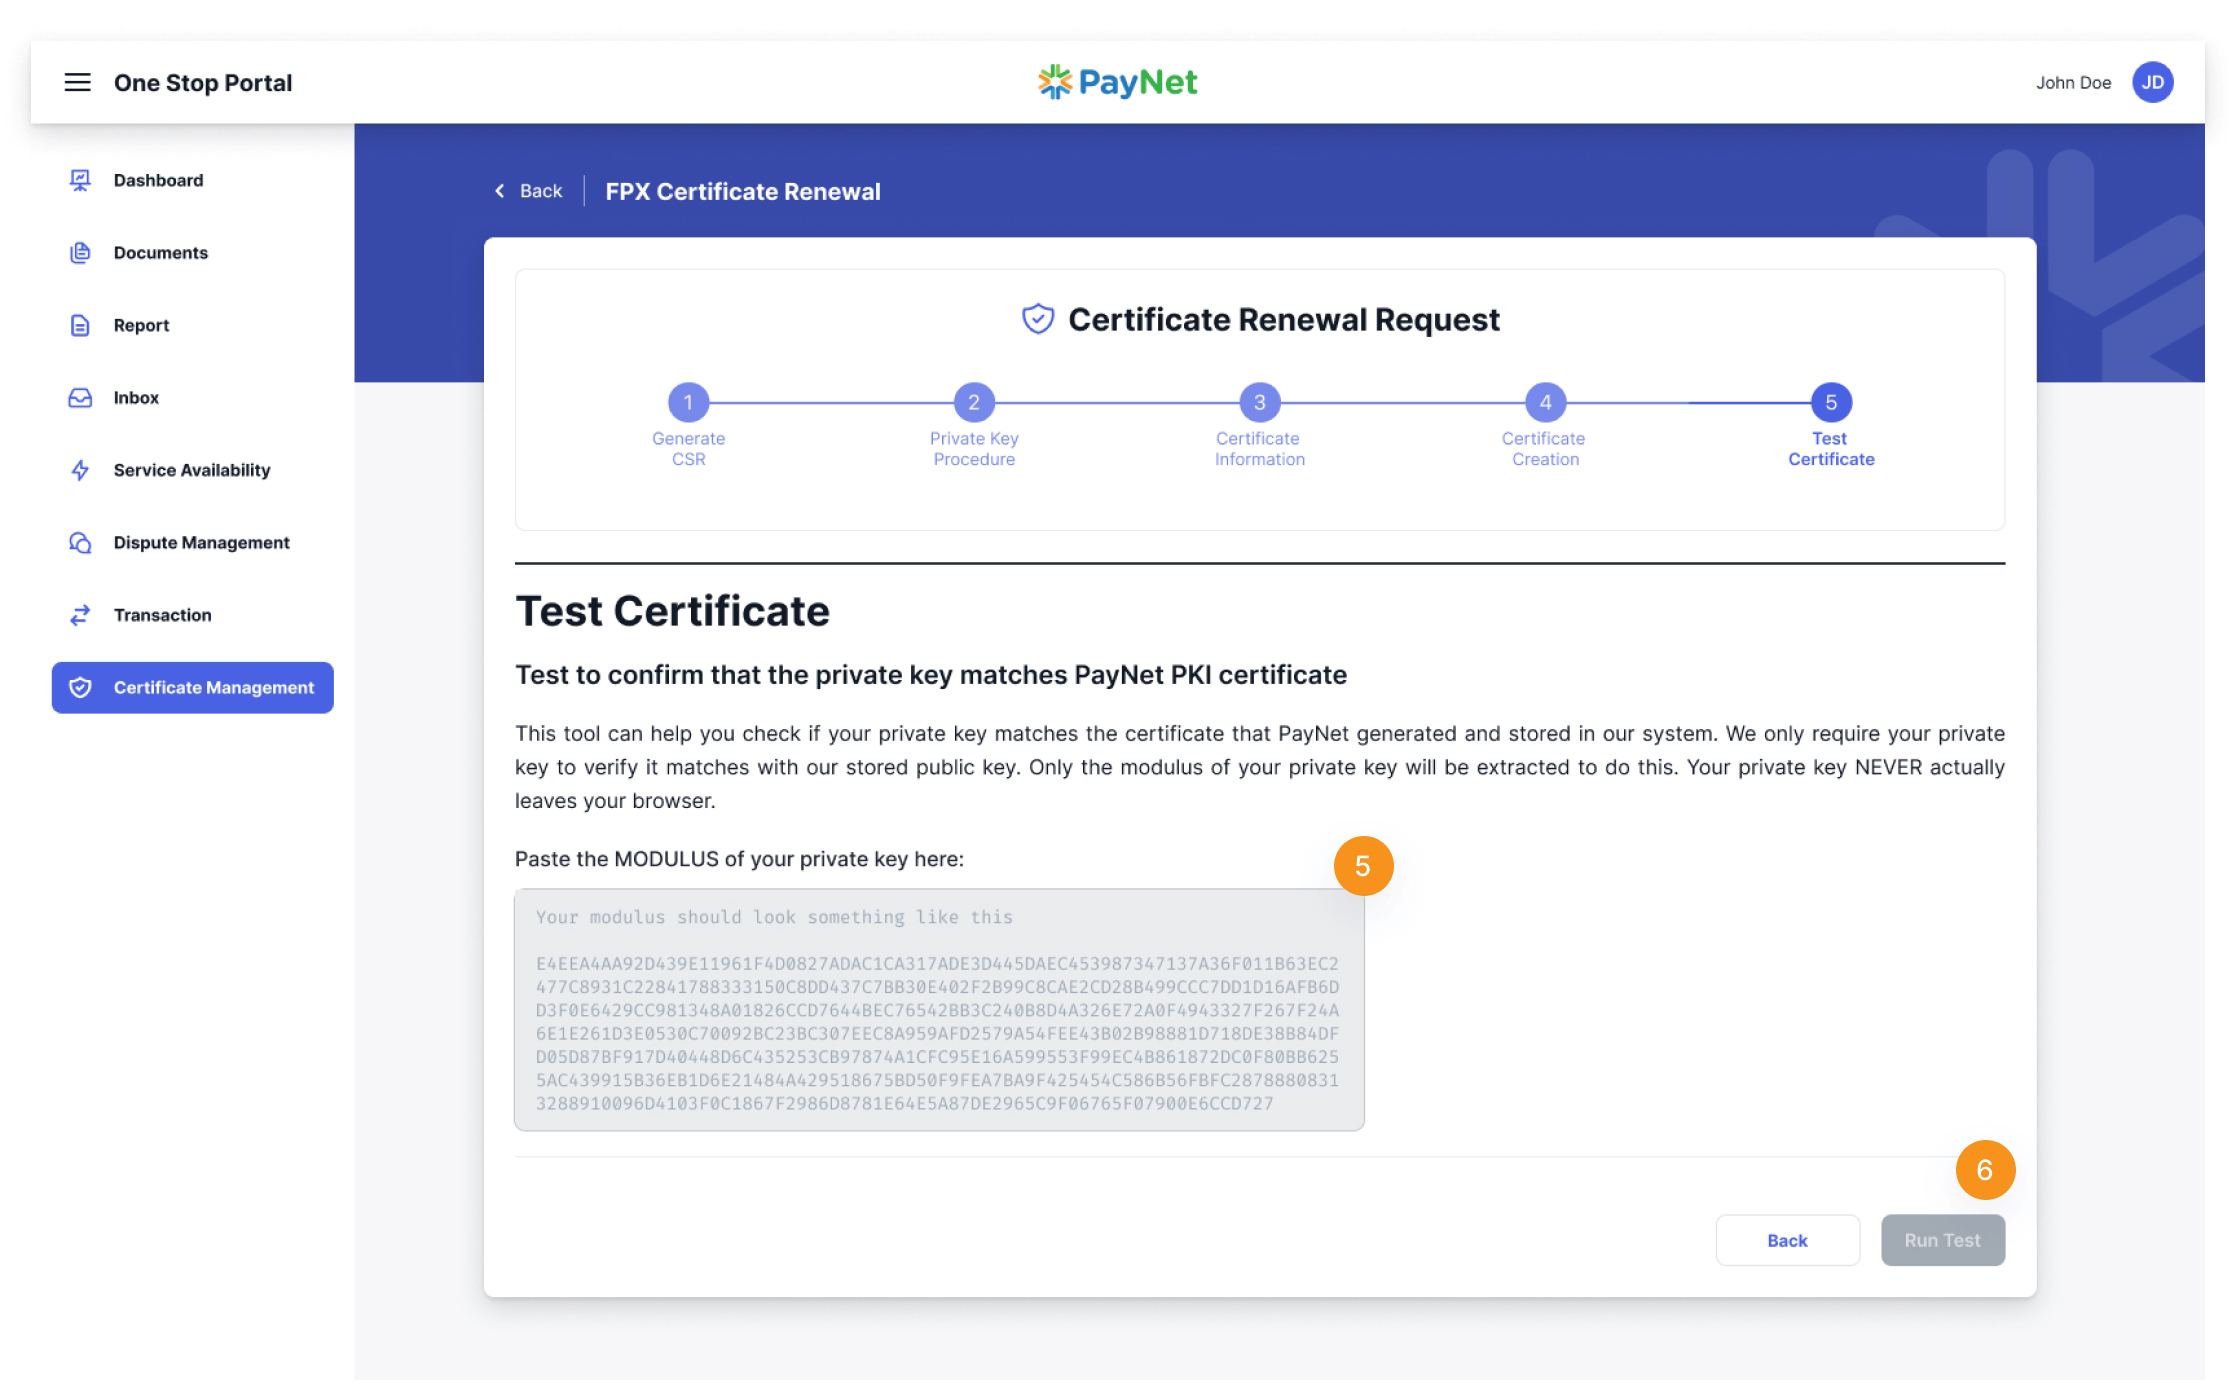
5
Paste the ‘MODULUS’ of your private key in the textbox.
6
Then, click on ‘Run Test’ at the right bottom of the page.
On this page, if participants have lost their private key, they have the ability to request a new one. By clicking on the ‘Restart’ button, participants will be prompted with a dialog box and must agree to several requirements before proceeding to request a new private key.

Scheduled Date for Key Rotation
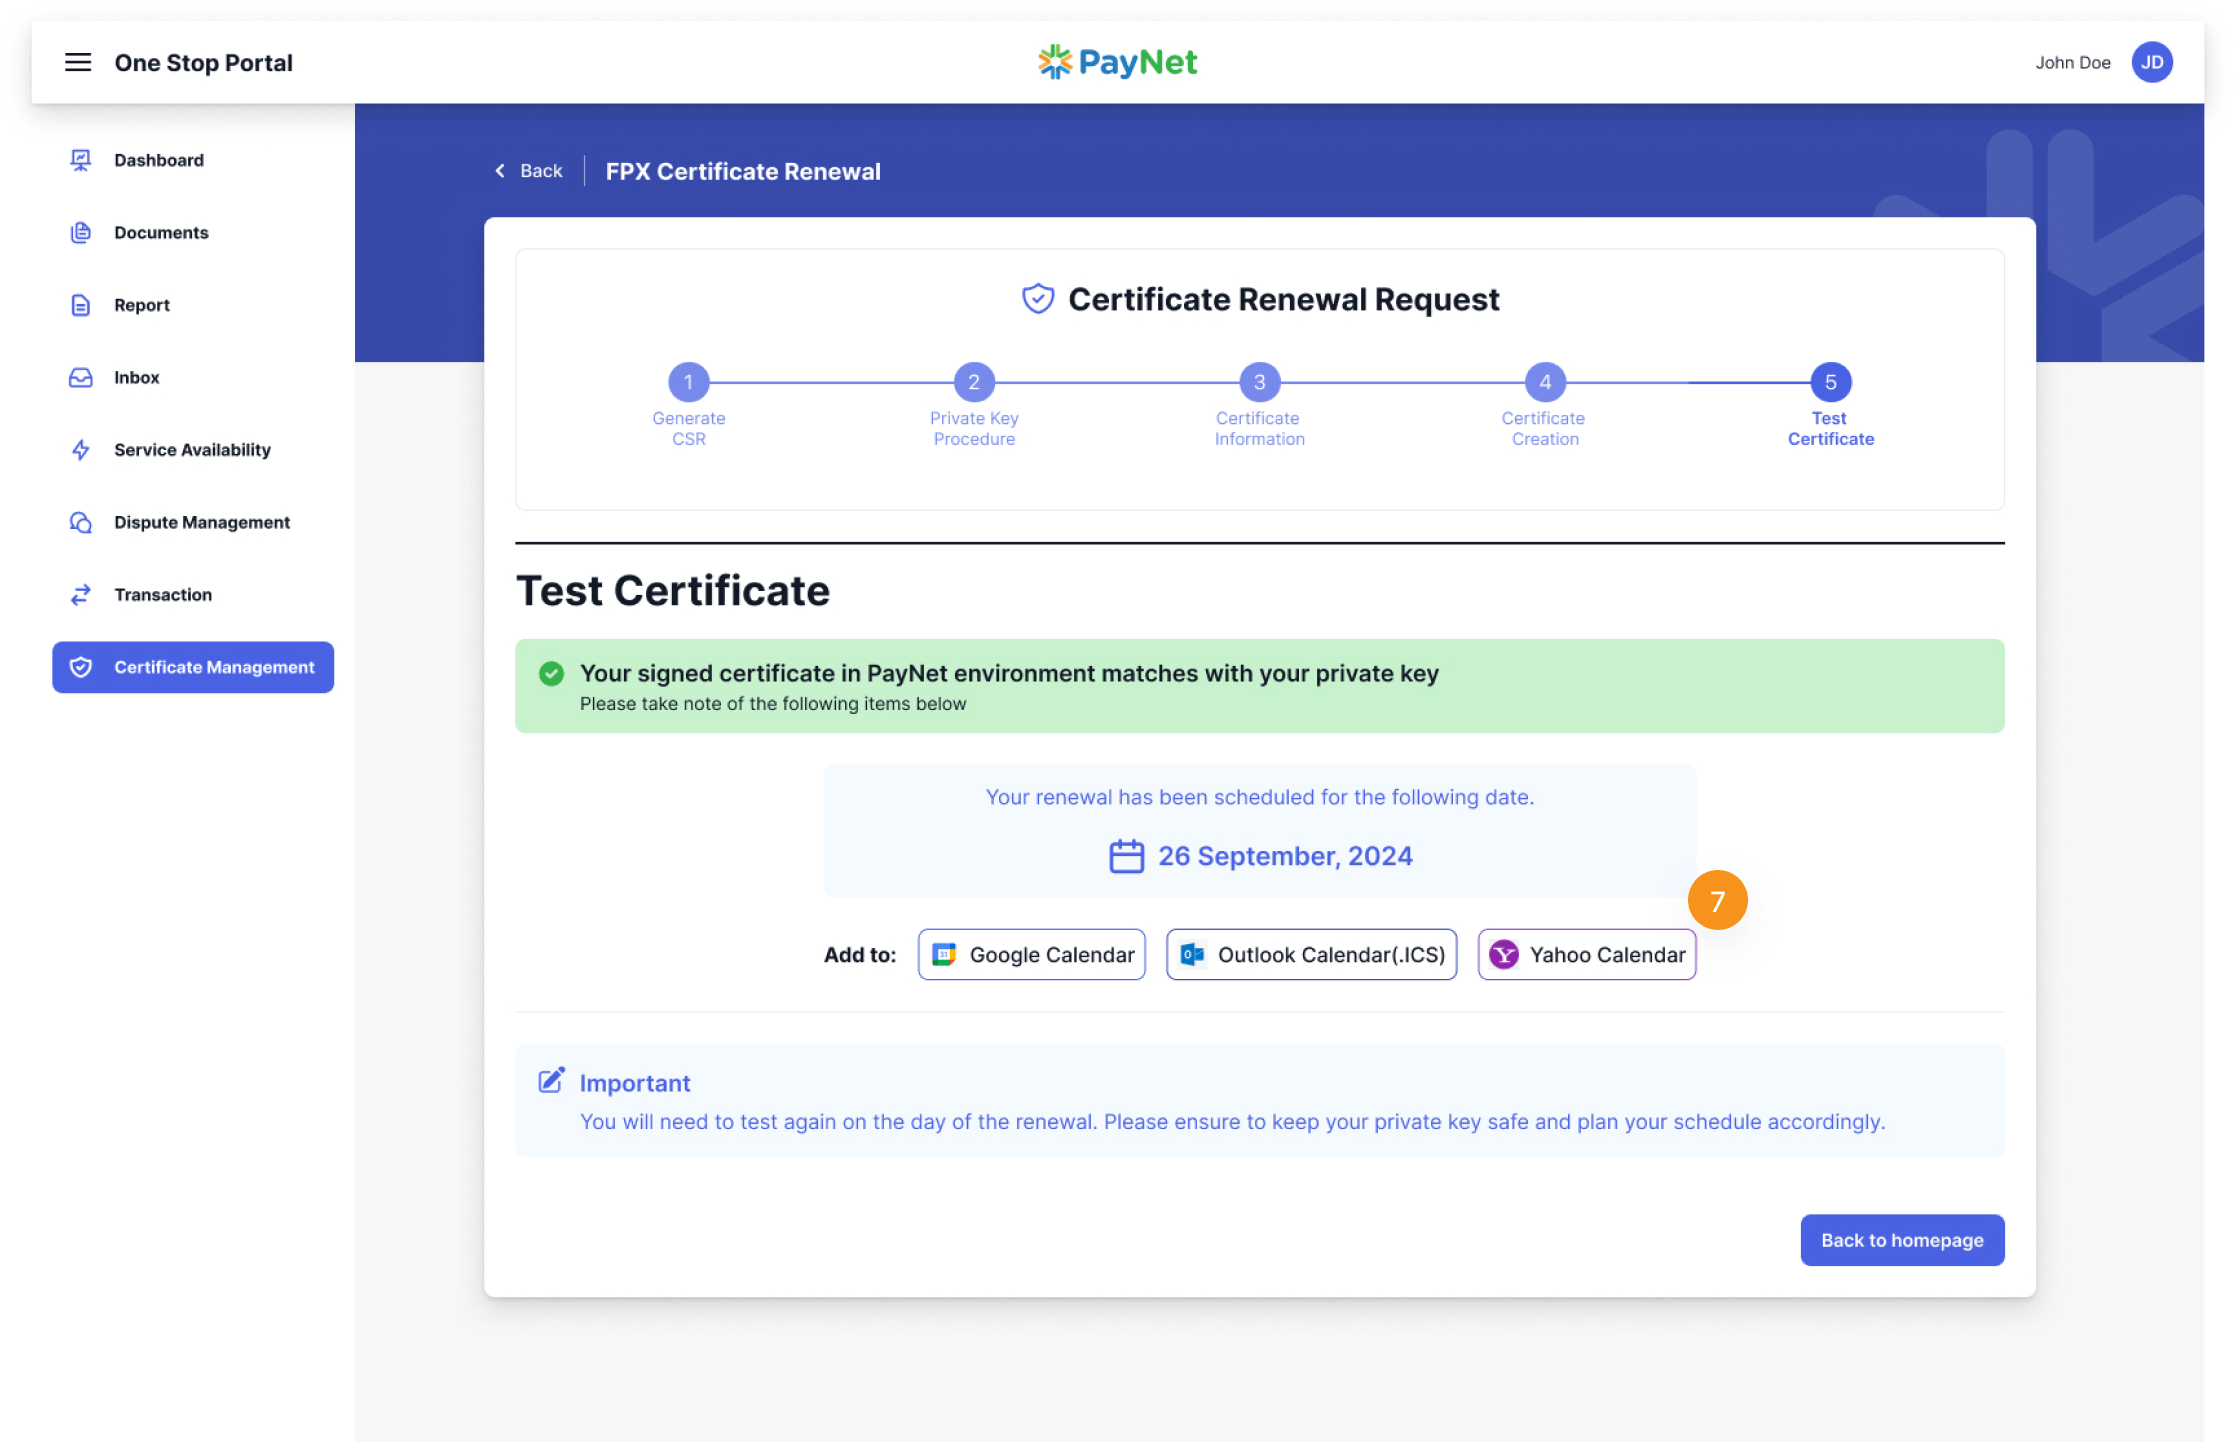
After you have successfully completed the test, the system will automatically schedule the date and time for the key rotation in our system. On the designated time, please log in to One Stop Portal again.
Furthermore, the key matching test will be conducted again, so be sure to keep your private key secure. In addition to this page, we have added new features that allow participants to set a date on their calendar as a reminder.
7
There are three (3) options for participants to set a calendar reminder.
Key Rotation
Verify Key Matches
Ready for renewal?
When the scheduled date arrives, the participant must log in to the OSP portal again. They will receive an email reminder from PayNet a week before, and a calendar reminder if they set one during the scheduling of the key rotation.
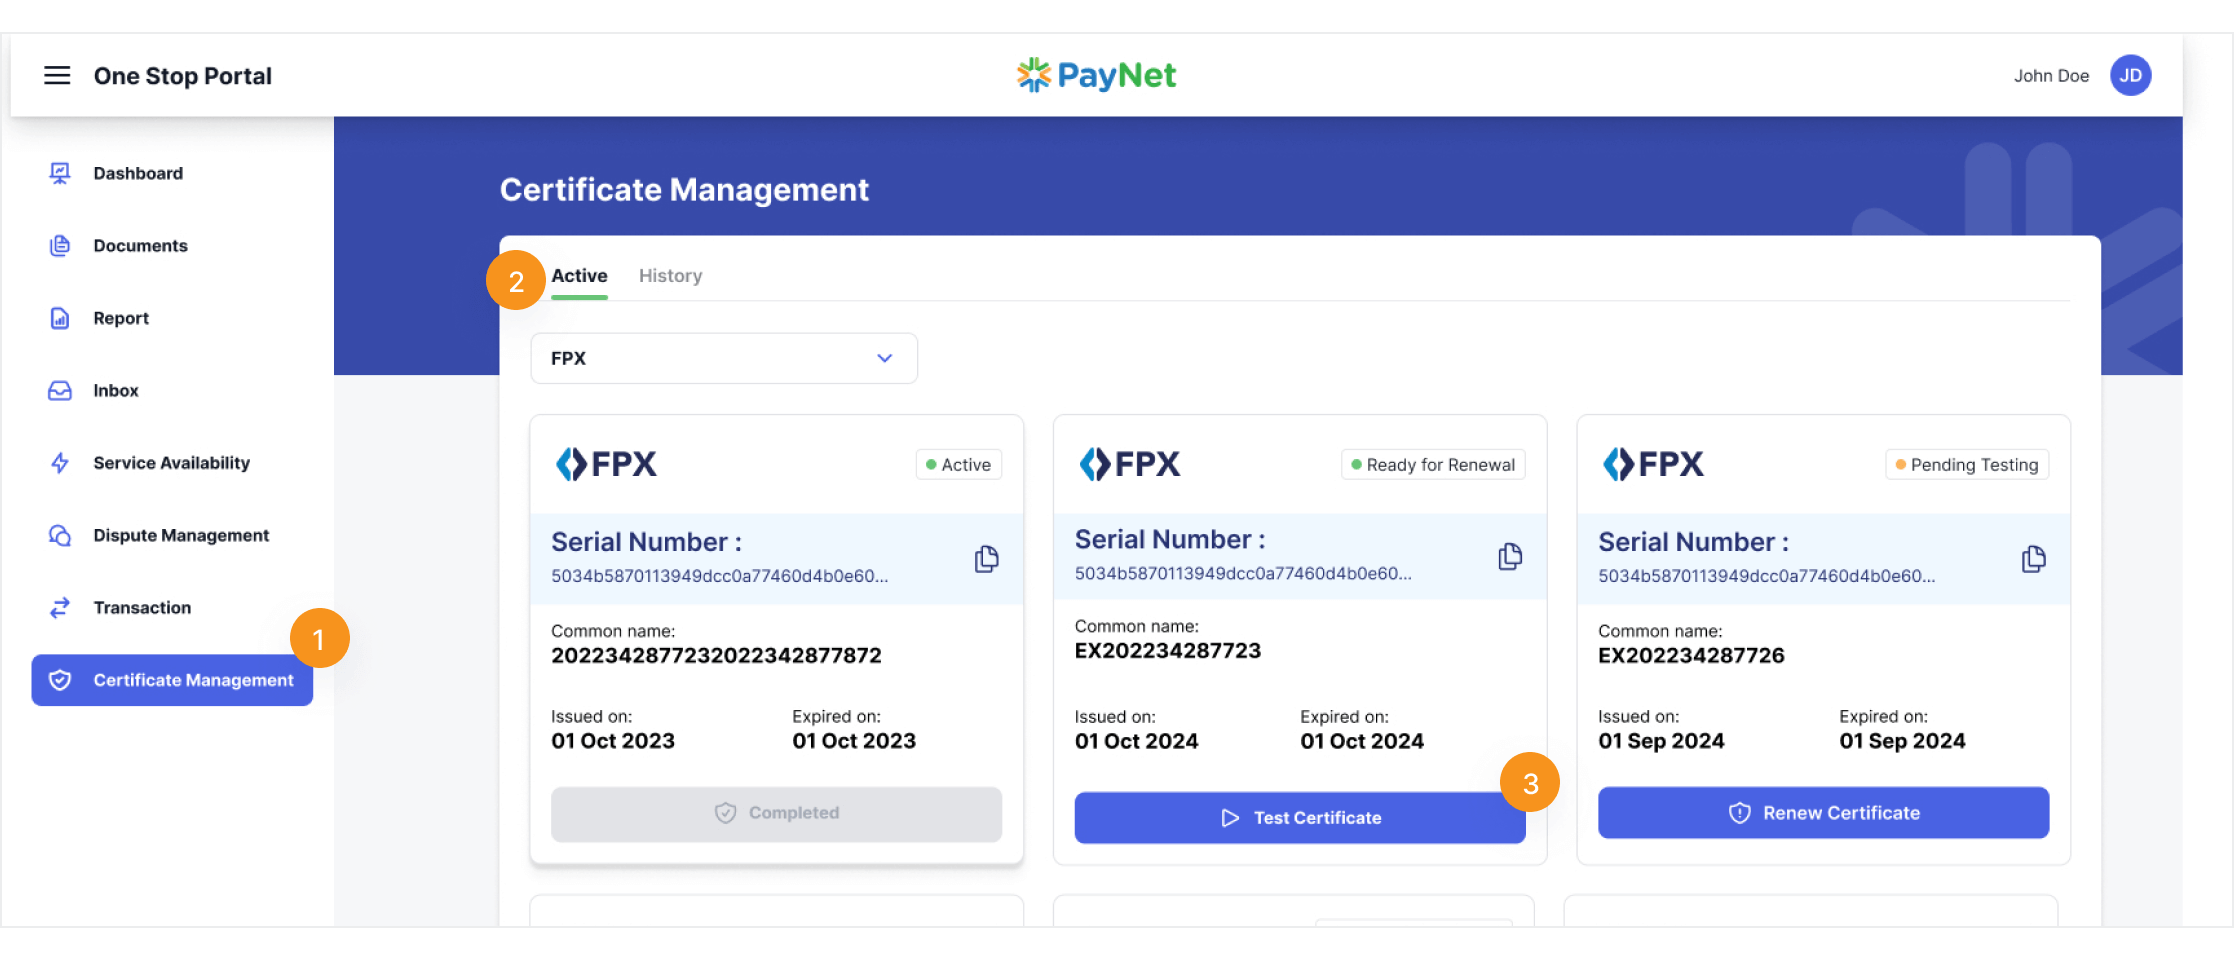
1
Select ‘Certificate Management’ from OSP’s left sidebar.
2
Select ‘Active’ tab on Certificate Management dashboard.
3
Identify the certificates with the green tag labeled ‘Ready for Renewal’, indicating they are ready for uploading on the application side. Select the ‘Test Certificate’ button to run the verification test before officially uploading them to the application server with the new private key.
Verify the Modulus of Your Private Key
Choose the appropriate option:
- Select I DON’T KNOW how to obtain the modulus of my private key if you are unfamiliar with the process.
- Select I KNOW how to retrieve the modulus of my private key if you can provide the modulus directly.
If you'd like to learn how to generate the modulus yourself, please refer to our Modulus Extraction Guideline
Test Certificate
In Step 5: Test Certificate, participants will proceed with the renewal process. There are two (2) options for participants to choose from: the first option is ‘I DON’T KNOW how to obtain the modulus of my private key’ and the second option is ‘I KNOW how to obtain the modulus of my private key.’
- OPTION 1: I DON’T KNOW how to obtain the modulus of my private key
- OPTION 2: I KNOW how to obtain the modulus of my private key
4
Click on ‘I DON’T KNOW how to obtain the modulus of my private key’ button and click ‘Next’ button.

5
The next step requires participants to either upload their private key by clicking on ‘Choose file’ and uploading the file or pasting the private key in the textbox.
6
Then, click on the ‘Run Test’ at the right bottom of the page.

4
Click on ‘I KNOW how to obtain the modulus of my private key’ button and click ‘Next’ button.

5
Paste the ‘MODULUS’ of your private key in the textbox.
6
Then, click on ‘Run Test’ at the right bottom of the page.

On this page, if participants have lost their private key, they have the ability to request a new one. By clicking on the ‘Restart’ button, participants will be prompted with a dialog box and must agree to several requirements before proceeding to request a new private key.

Confirmation and Private Key Upload
If the test is successful, the new certificate will be pushed to our system to rotate the keys. A confirmation screen will also be shown. Once you're done uploading the private key to your application and confirm that transactions can be made successfully, click Back to Homepage. You will be redirected back to the certificate dashboard and can see your newly published certificate.
