We've Launched a New Documentation Website (Beta Launch)
The documentation for DuitNow is now available on our newly launched documentation platform. This is an initial beta rollout of our new documentation site, designed to become the long-term home for all documentation moving forward.
You'll find the familiar content you're used to—now hosted on a new platform that will progressively receive updates and enhancements.
We encourage you to start accessing DuitNow materials there to explore the new experience and ensure you're viewing the latest documentation updates. If you have any feedback, please reach out to us.
Visit the New Documentation WebsiteCSR Renewal Process
- 1 Access Certificate Renewal Module
- 2 Certificate Signing Request (CSR) Procedure
- 2.1 I don’t have my own CSR file
- 2.2 I have my own CSR file
- 2.3 Certificate Information
- 2.4 Certificate Confirmation
- 2.5 Test Certificate
- 2.5.1 I DON'T KNOW how to obtain the modulus of my private key
- 2.5.2 I KNOW how to retrieve the modulus of my private key
- 2.6 Scheduled Date for Key Rotation
- 2.7 Confirmation & Private Key Upload
As security is our top priority, we require all certificates to be renewed periodically. To renew the certificate for DuitNow Pay, you must have access to One Stop Portal (OSP).
- Renewal in PRODUCTION environment, go to One Stop Portal here.
- Renewal in System Integration environment, go to One Stop Portal here.
- If you do not have access to OSP, you may register a user account that is associated with your company.
- If you have an account, but do not have access to the required module, please contact your Relationship Manager representative from PayNet.
Once you have the credentials and access required, you may follow the steps below to initiate a Certificate Signing Request (CSR) to renew your DuitNow Pay Certificate.
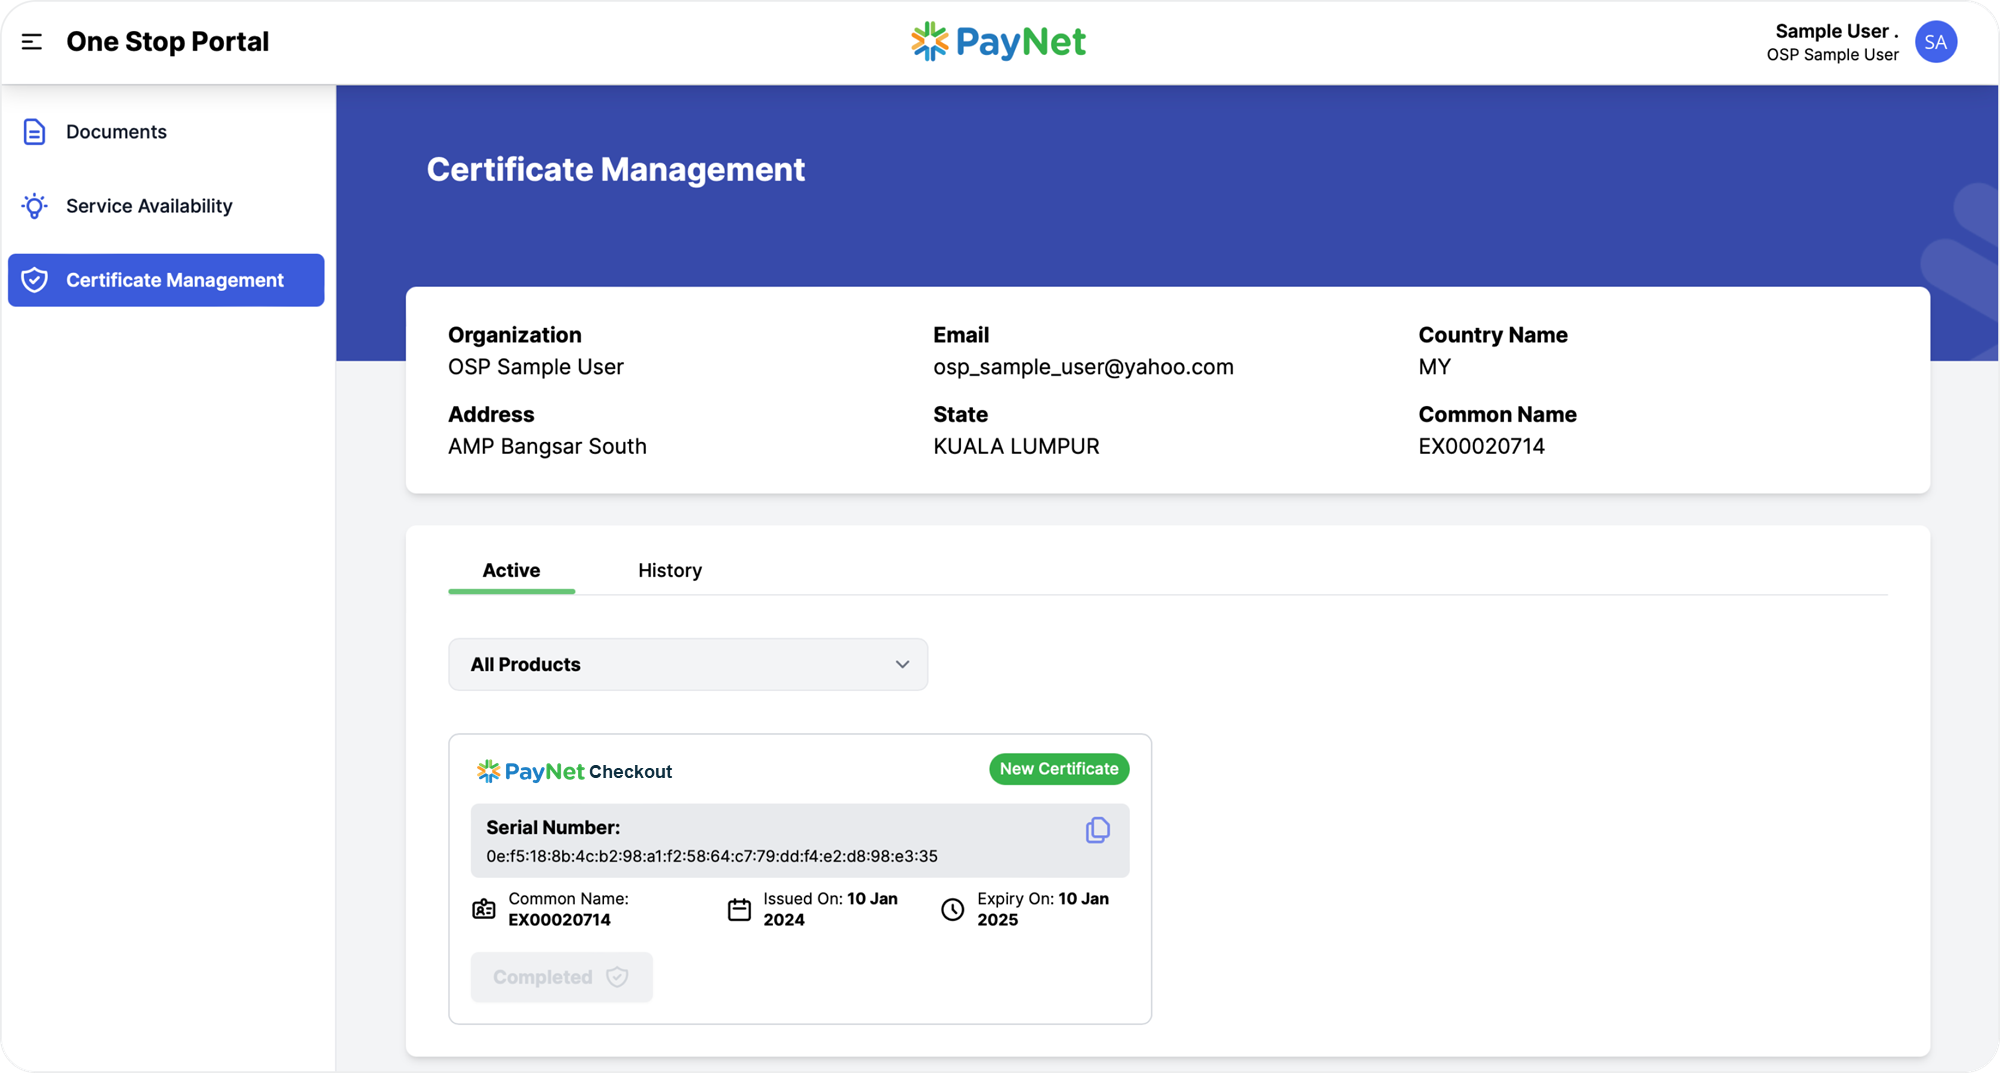
Access Certificate Renewal Module
Step 1: Login to One Stop Portal with your credentials.
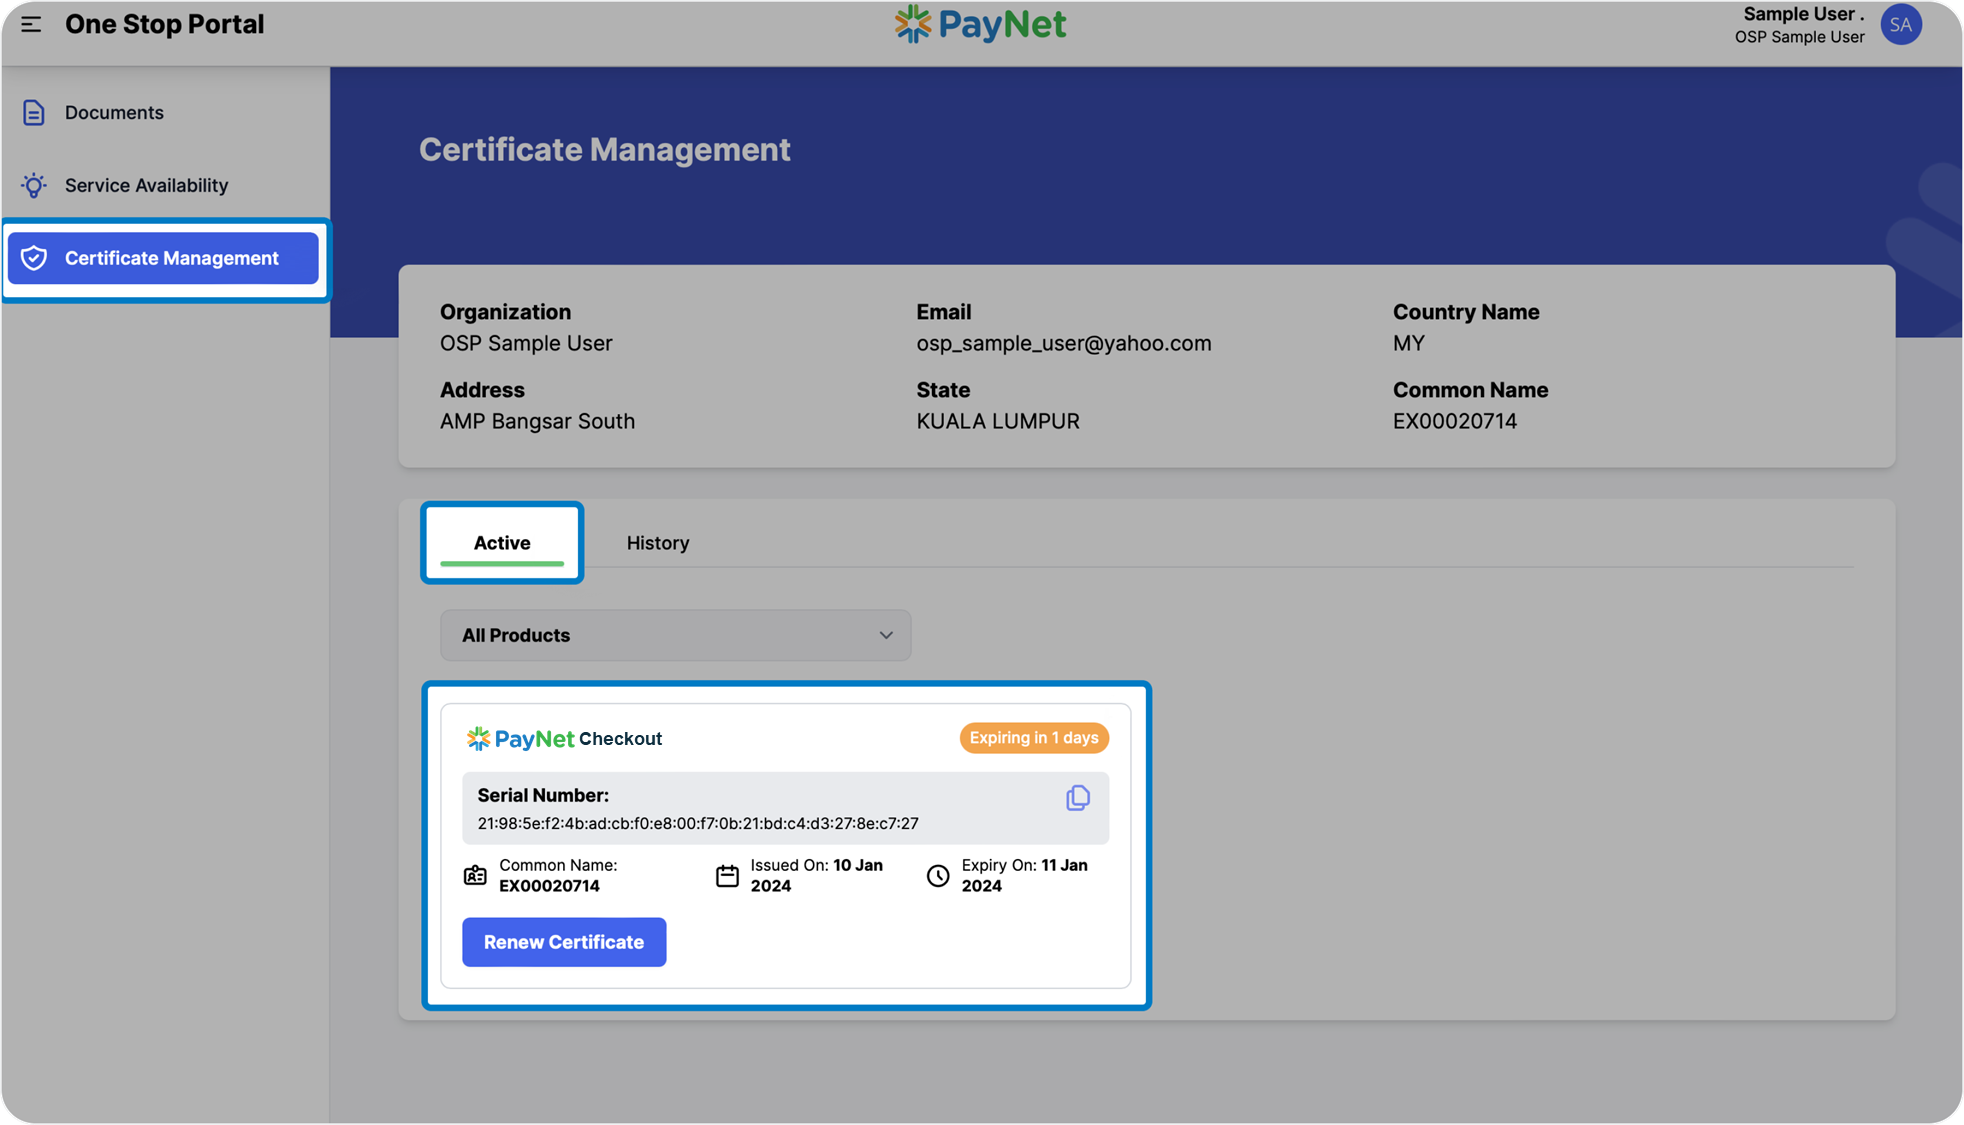
Step 2: On the left-hand-side navigation bar, click Certificate Management.
Step 3: Select Active tab on Certificate Management main page.
Step 4: Identify certificates with status that is either Expiring in x day(s) or Expired, and click Renew Certificate button.
The Renew Certificate button doesn't appear until 90 days before the certificate expires.
Certificate Signing Request (CSR) Procedure
There are two options to select when initiating certificate renewal:
- Option 1: I don’t have my own CSR file
→ when you select this option, PayNet can generate a new CSR for you; OR - Option 2: I have my own CSR file
→ when you select this option, you can utilize your existing CSR.
Please select the option that best suits your preference.
CSR (Certificate Signing Request) is a file that will be used to create a 'signed public certificate'. It should include registered information about your business, and a public key matching the private key used to electronically sign the CSR.
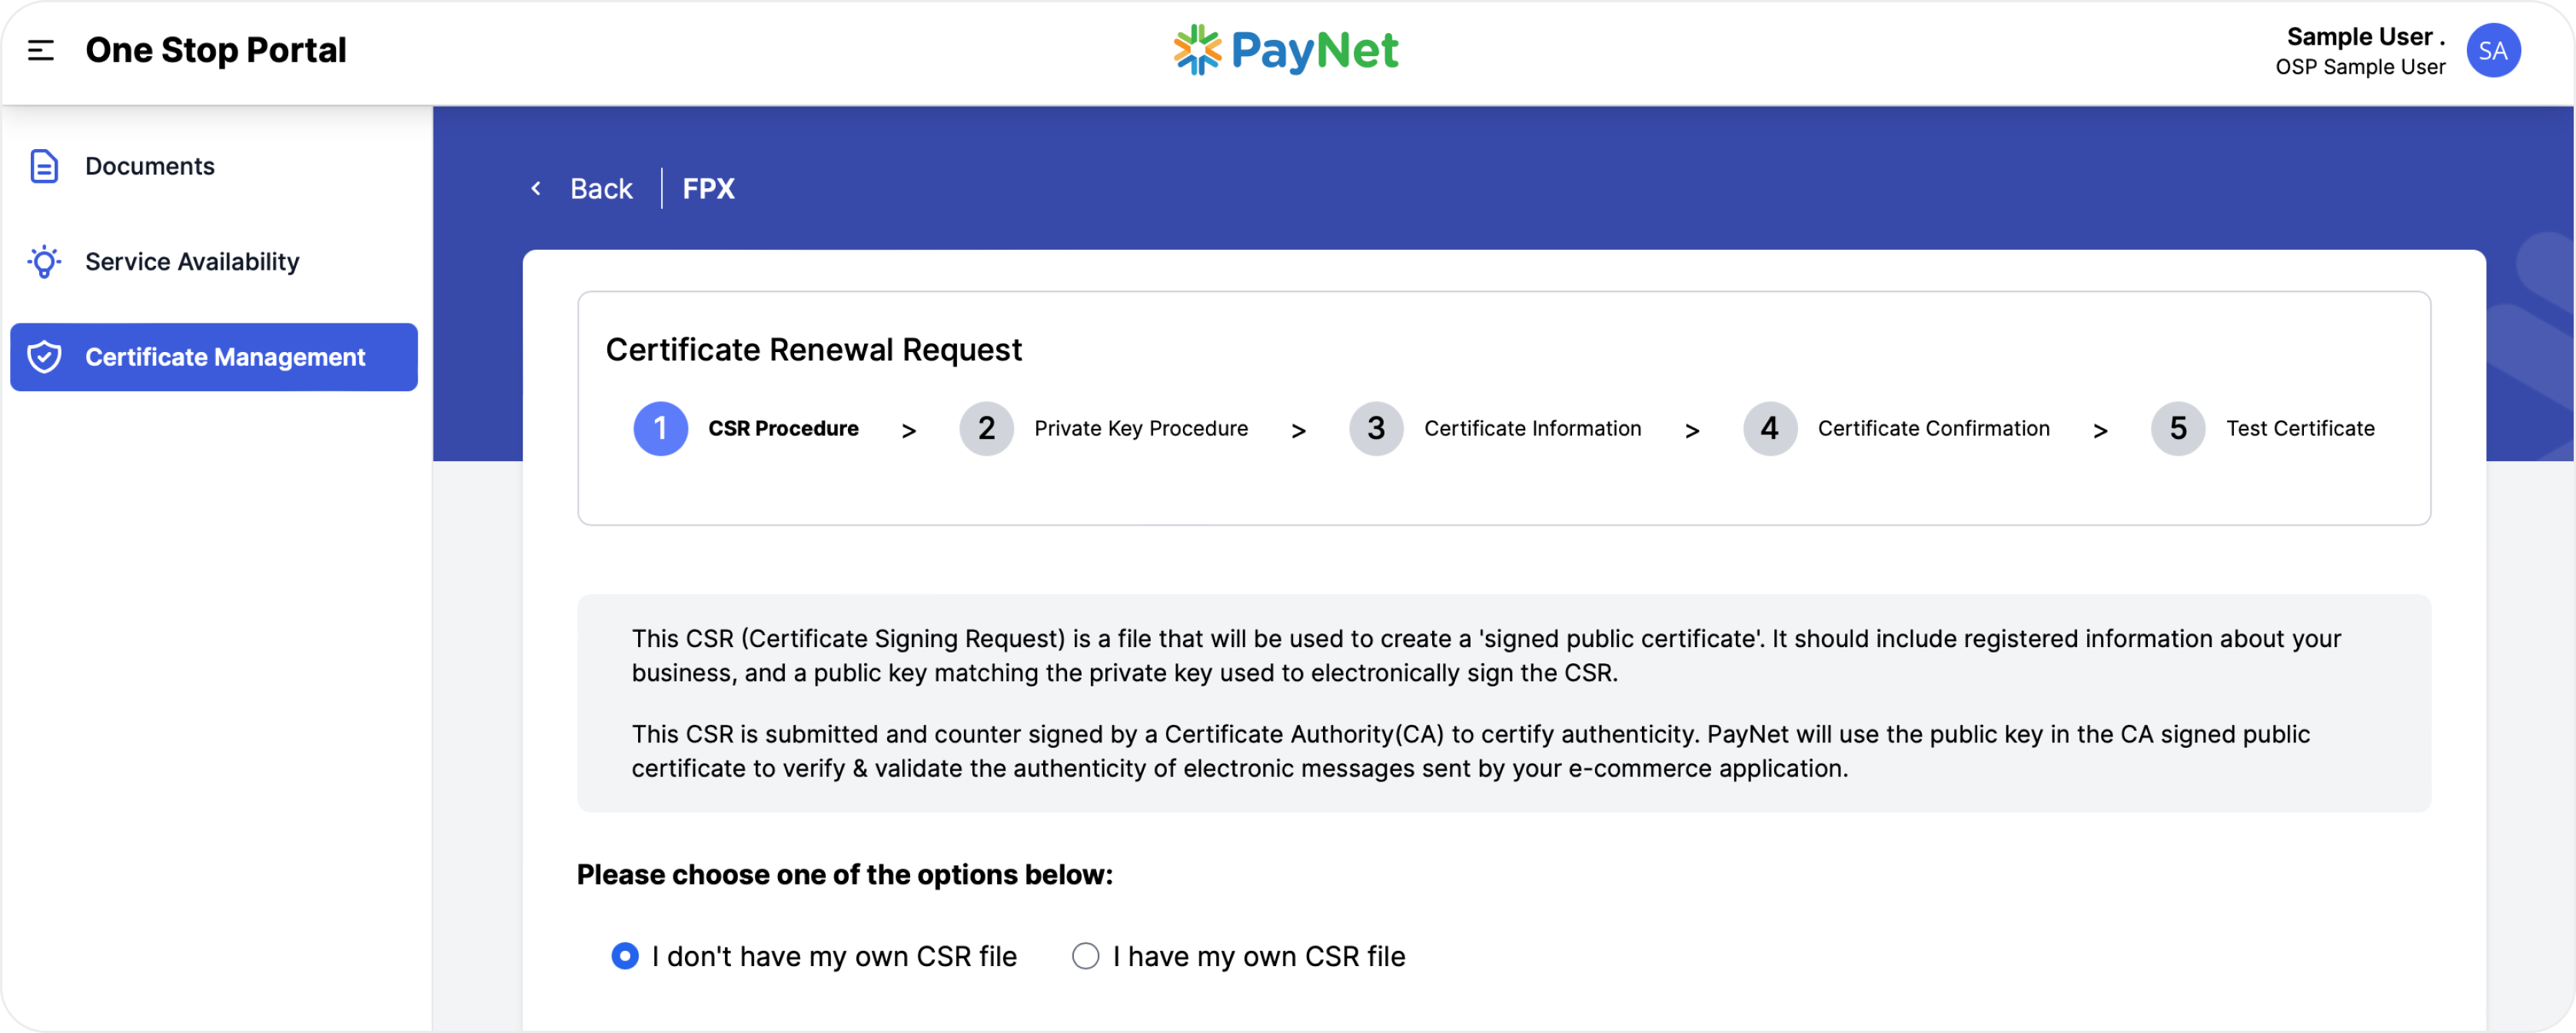
I don’t have my own CSR file
Step 1: Select the 'I don’t have my own CSR file' option, and click the 'Next' button.

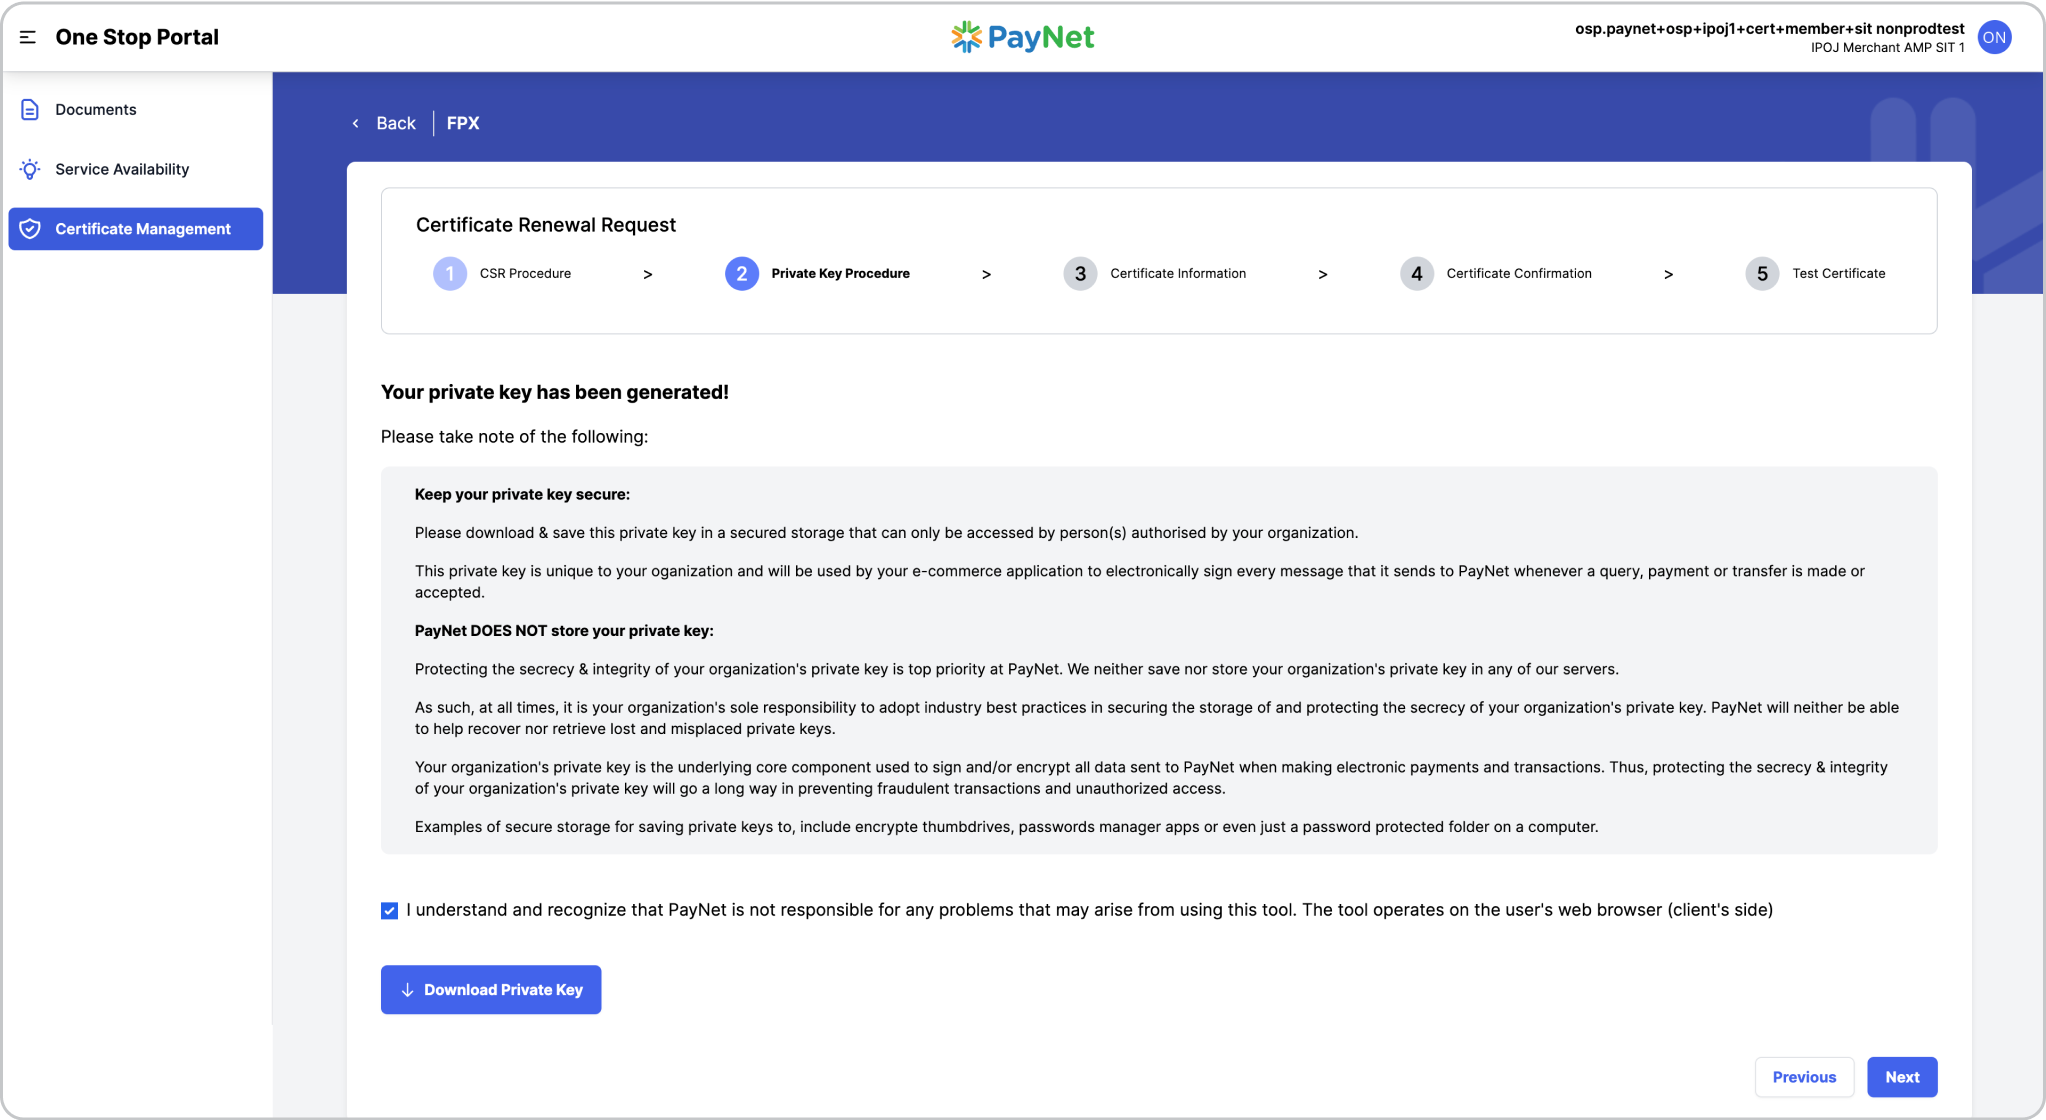
Step 2: In the Private Key Procedure, review the notes and ‘check’ the checkbox to confirm your understanding of the system's associated risks and click the ‘Download Private Key’ button.
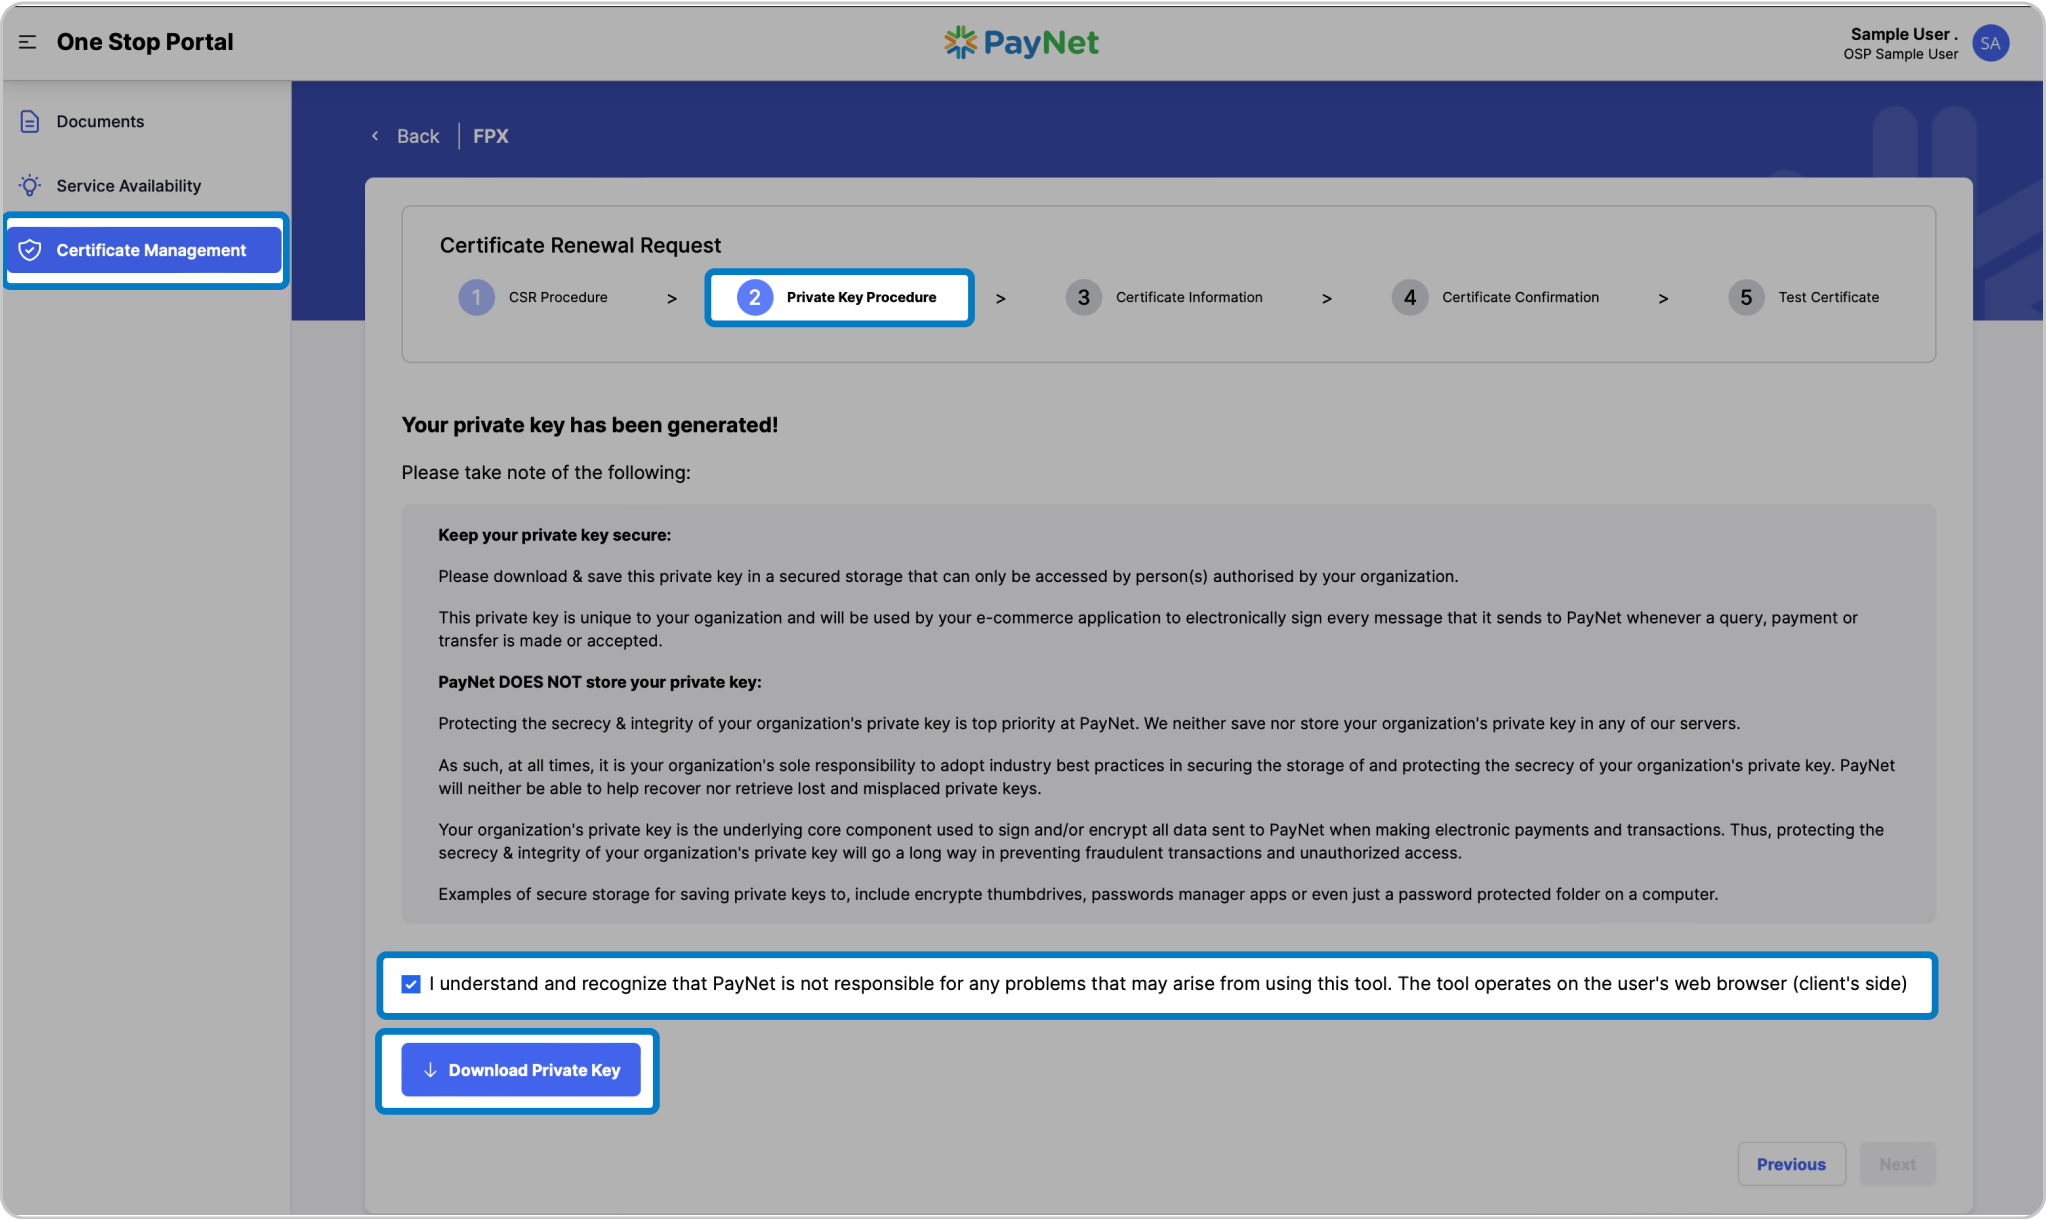
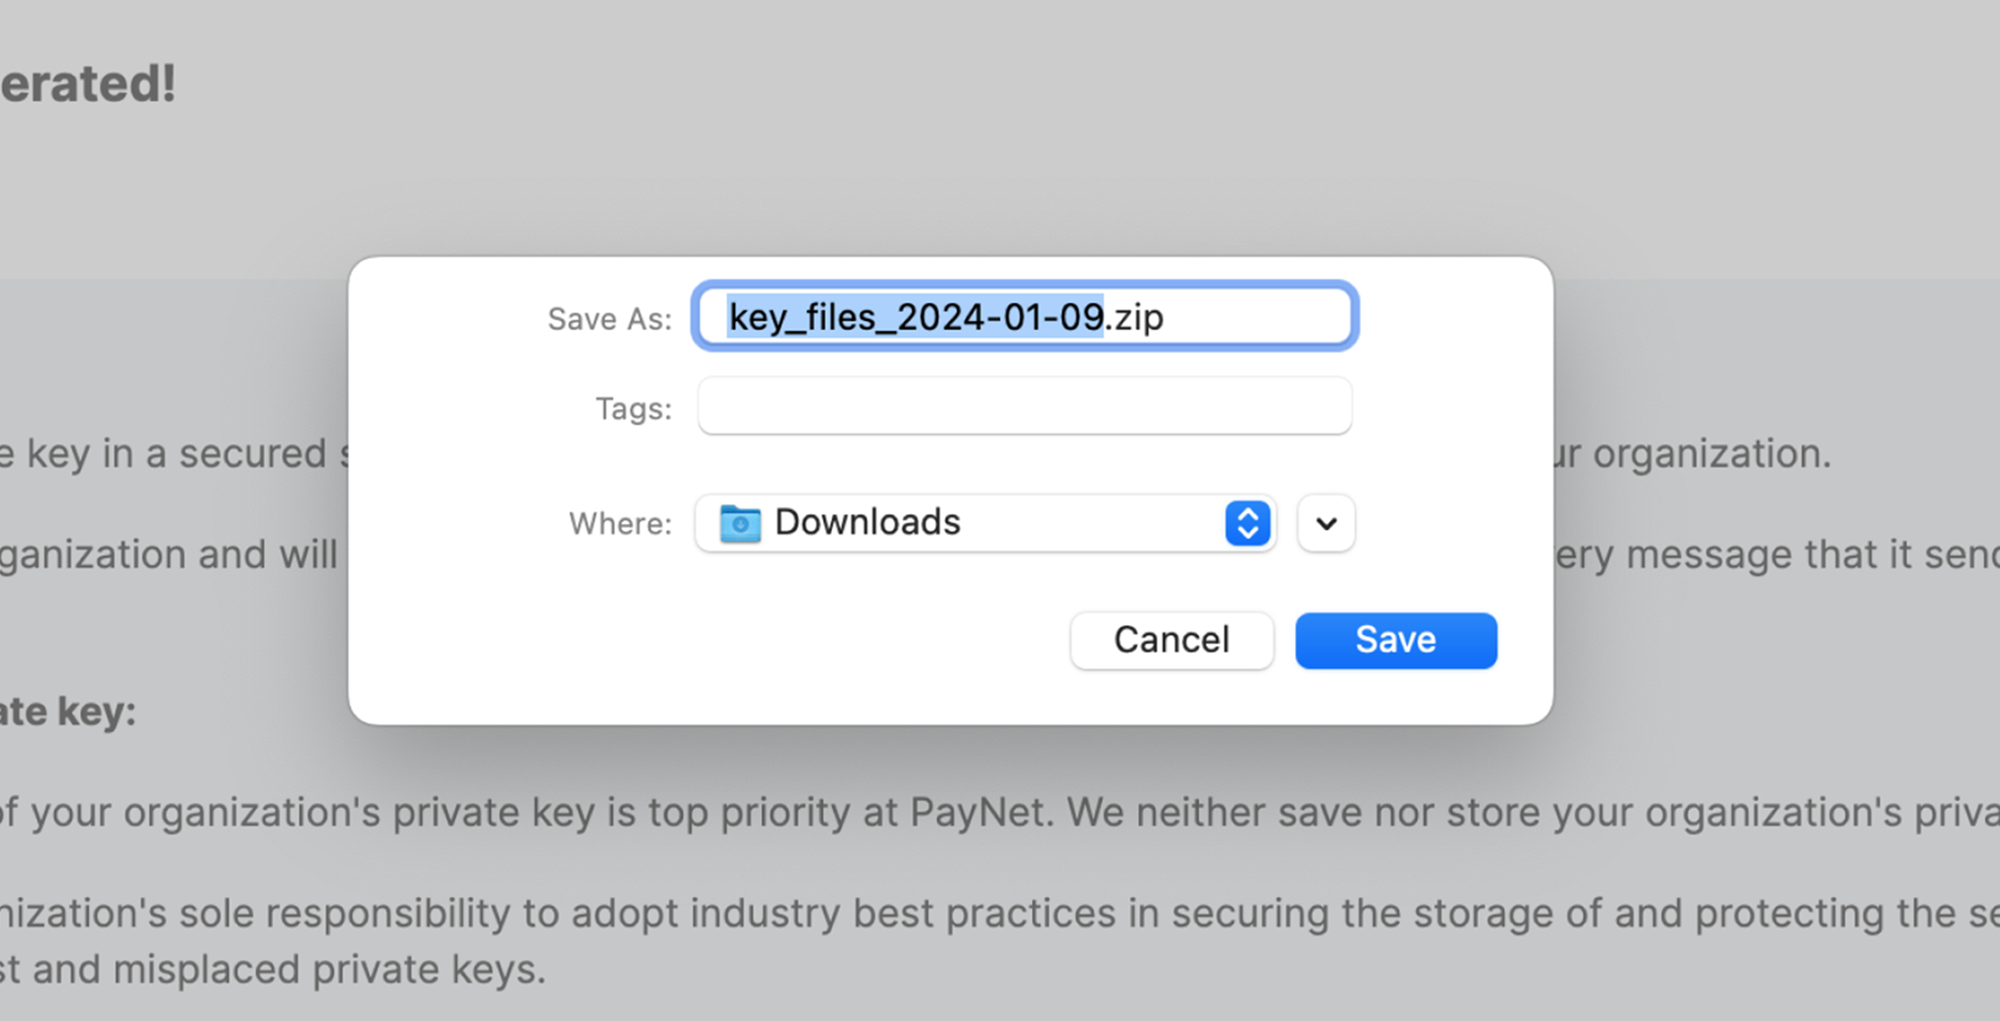
Step 3: When prompted, Save the ZIP file containing the files required for the certificate renewal procedure.
Step 4: Click Next to proceed to the next step.
Step 5: Navigate to the folder where the downloaded file is saved, and extract (unzip) the file.
The unzipped folder should contain three files:
a new CSR file (.csr), a private key file (.pem) and the public key file (.pub).
The date of the generation is included in the files' name. Be sure to note where you securely store it.

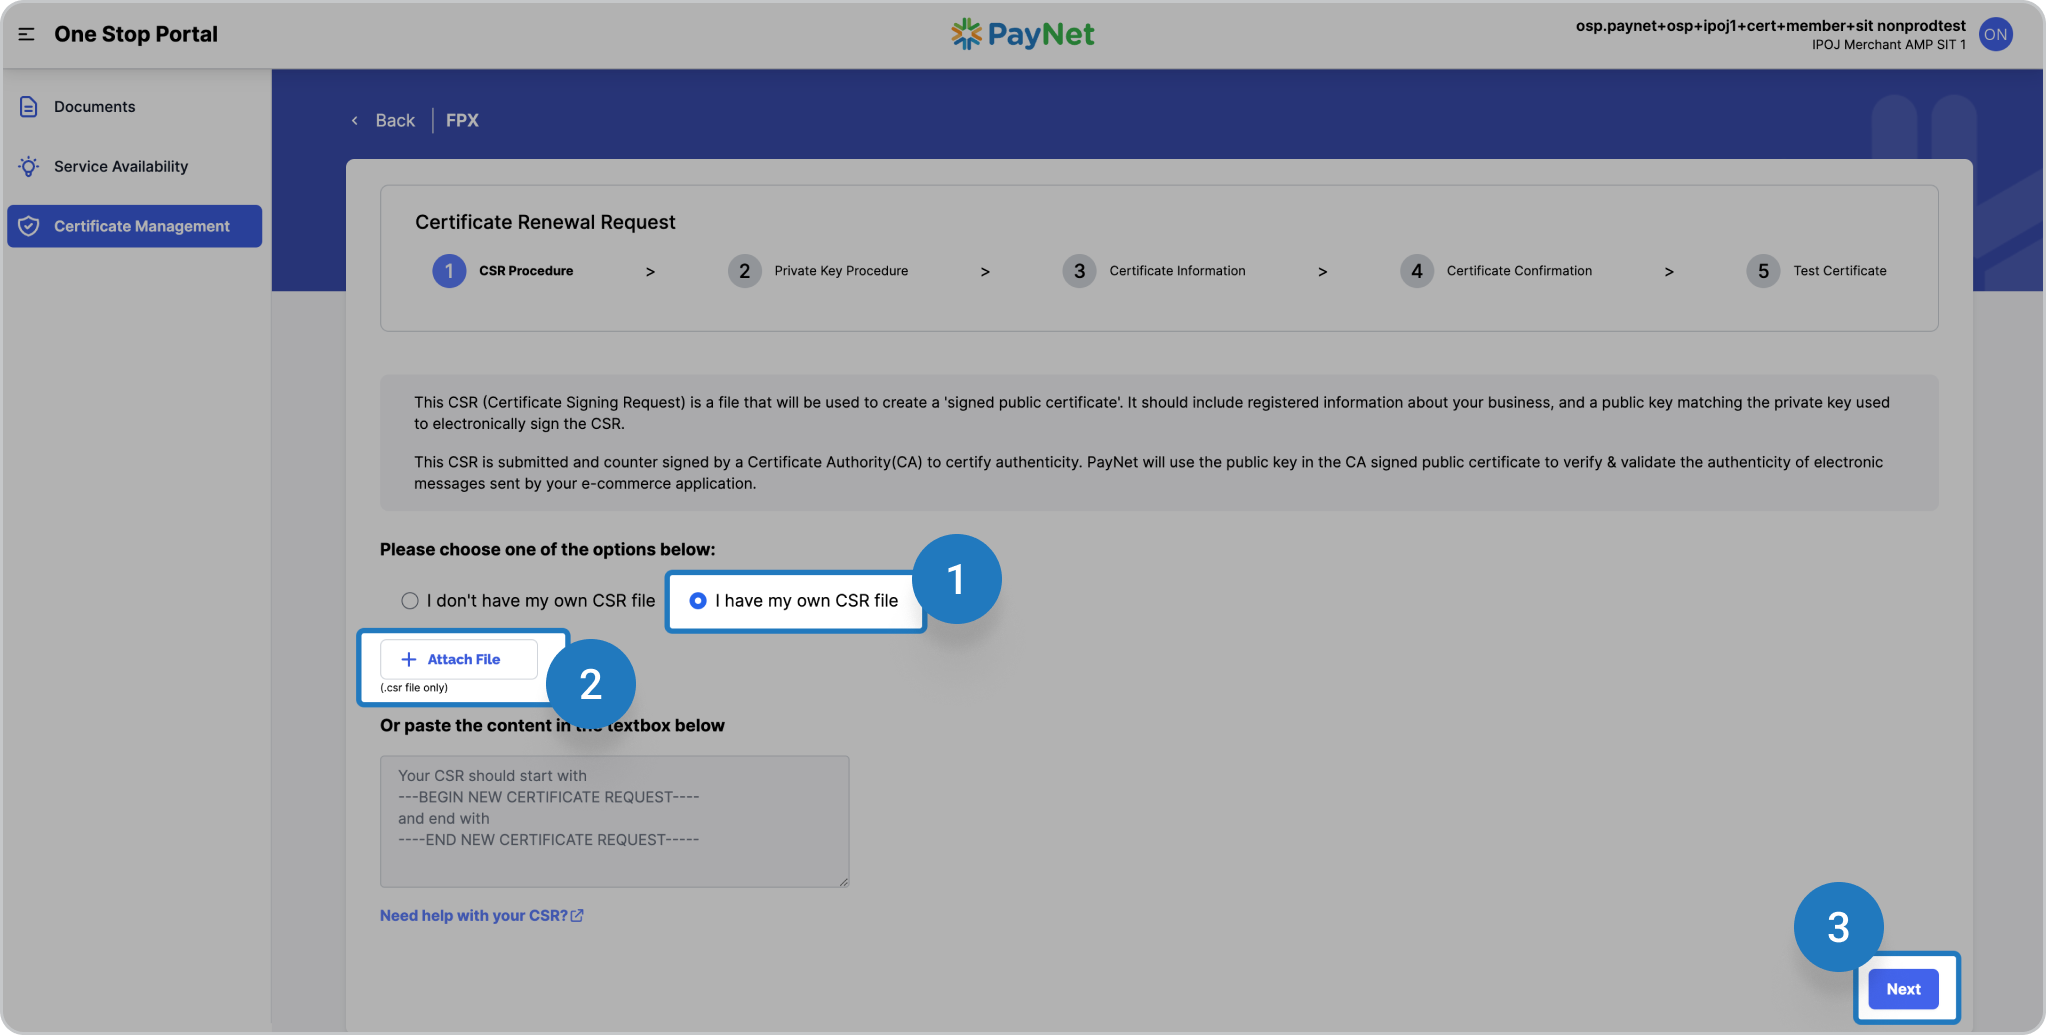
I have my own CSR file
Step 1: Select the 'I have my own CSR file' option.
Step 2a: Click the Attach File button, and select a .CSR file; OR
Step 2b: Paste the CSR content in the textbox. (Your CSR must include the -----BEGIN NEW CERTIFICATE REQUEST----- and -----END NEW CERTIFICATE REQUEST----- tags).
Step 3: Click the 'Next' button.
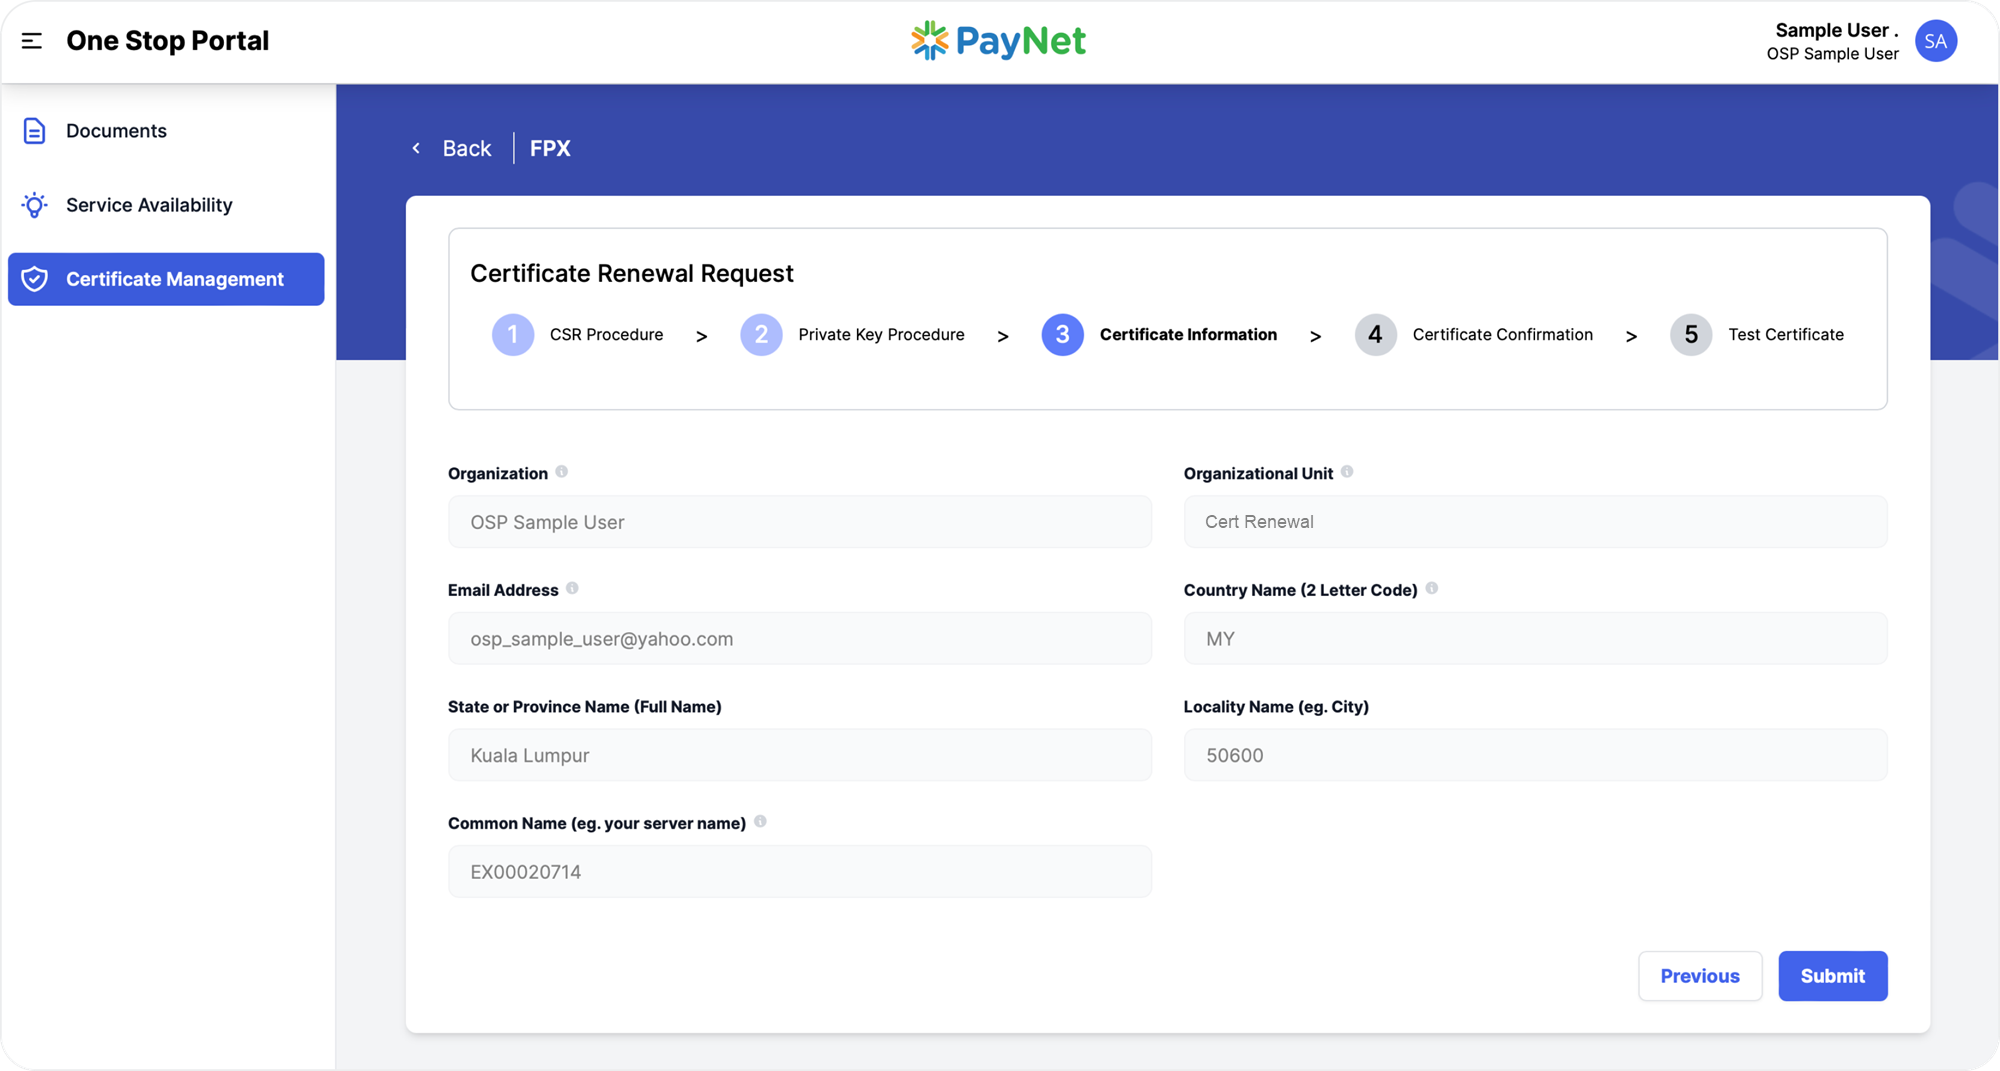
Certificate Information
Step 1: After the CSR has been provided by you, or generated by us, you are required to verify the information of the certificate:
- If you chose 'I don't have my own CSR file', we will use your information in our database to generate the CSR and certificate.
- If you chose 'I have my own CSR file', these information are extracted from the CSR you provided.
Verify the information displayed.
Step 2: Click Submit button to proceed to the next step.
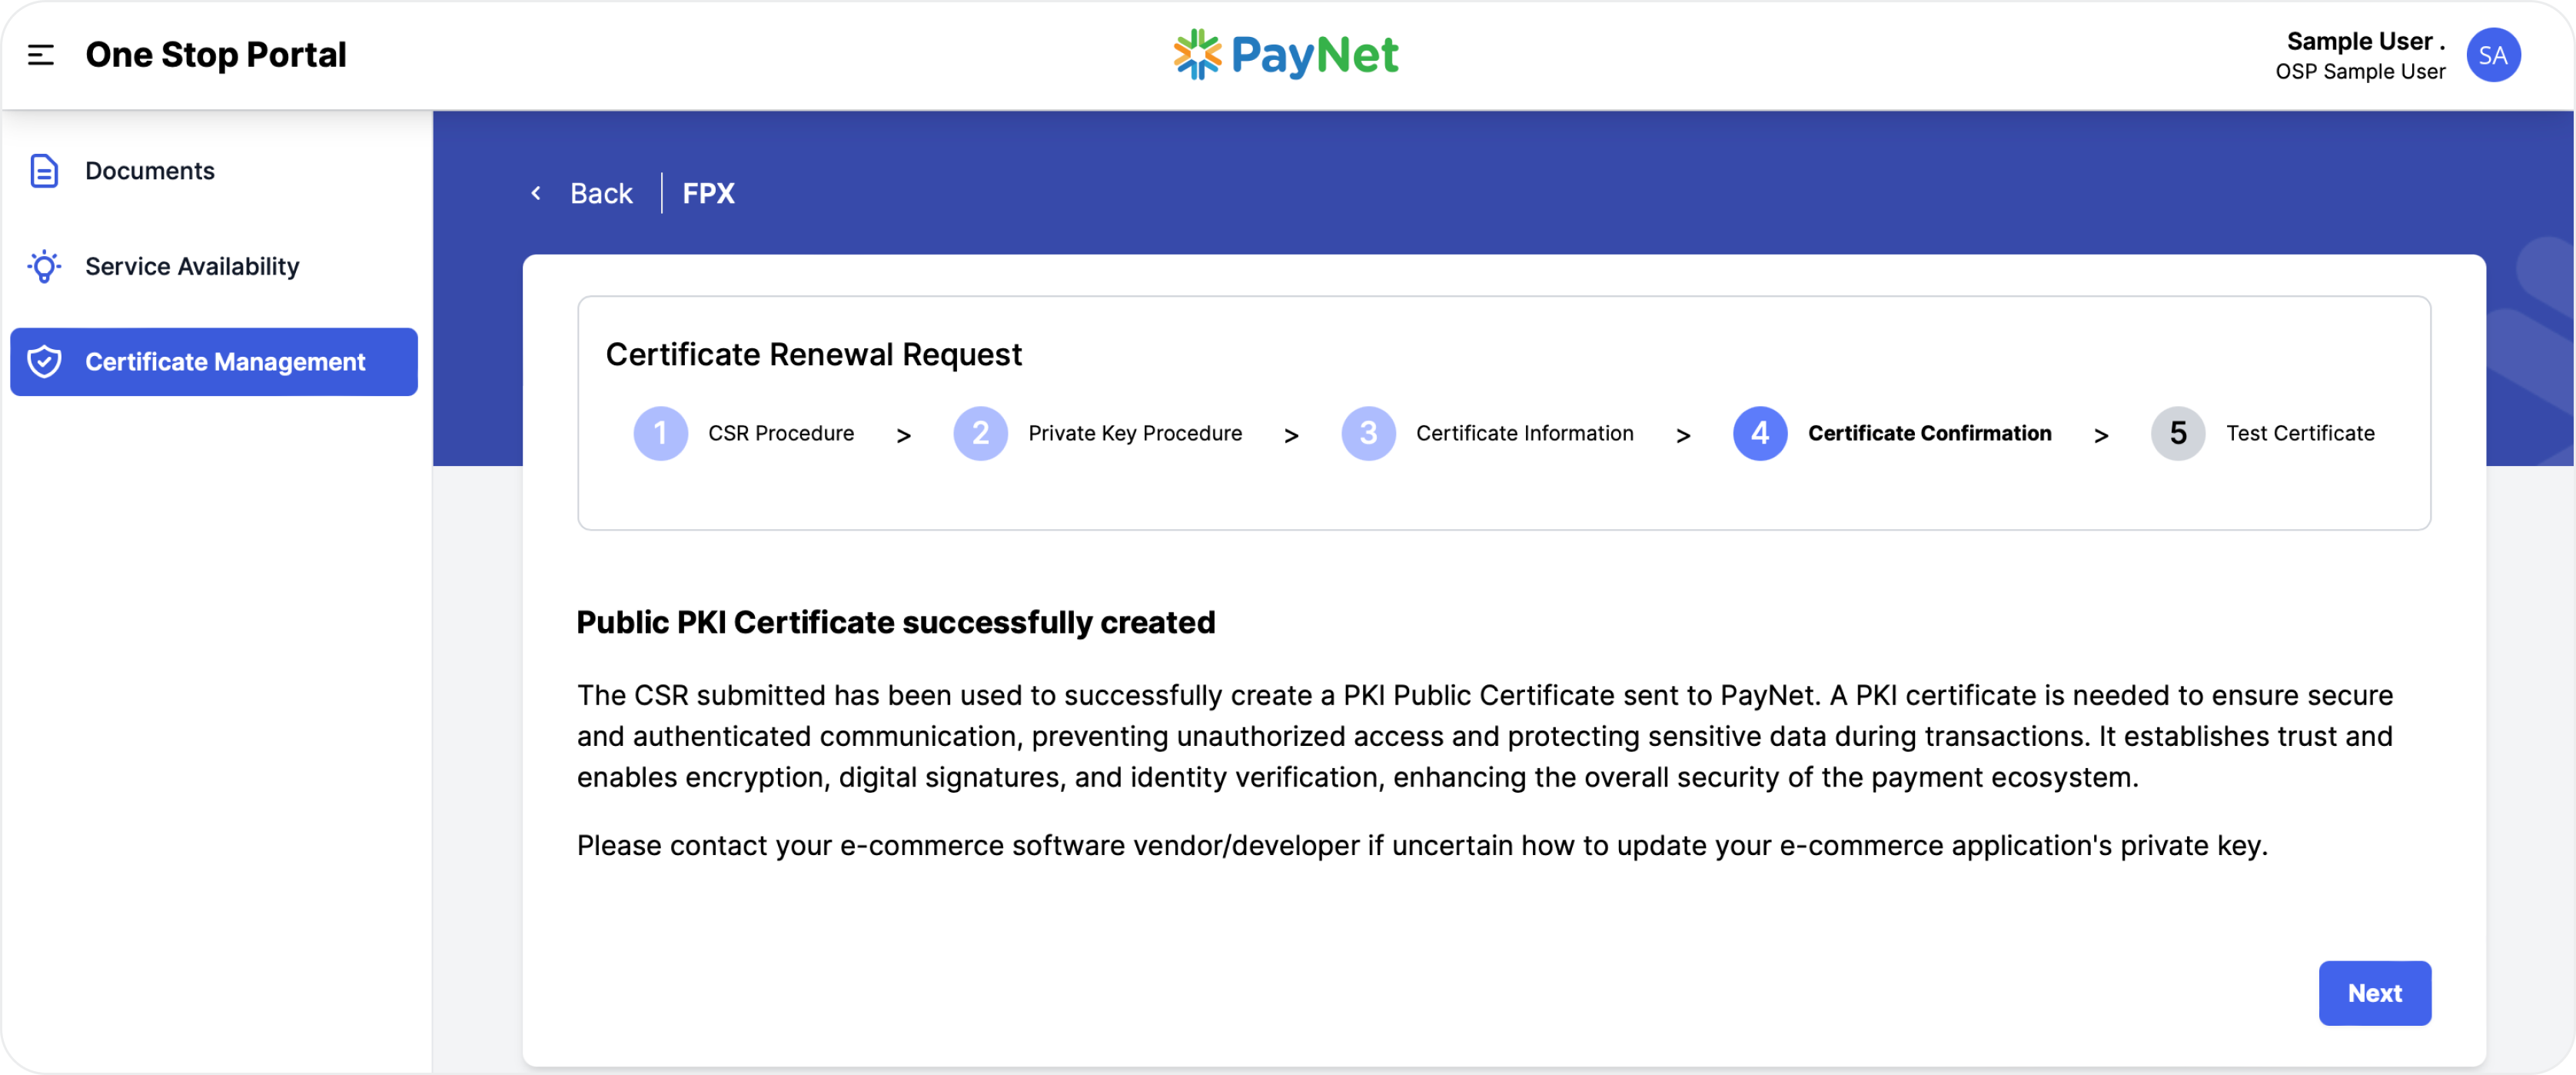
Certificate Confirmation
Step 1: Once the certificate generation is successful, a confirmation page will be displayed. Click the Next button to proceed to the next step.
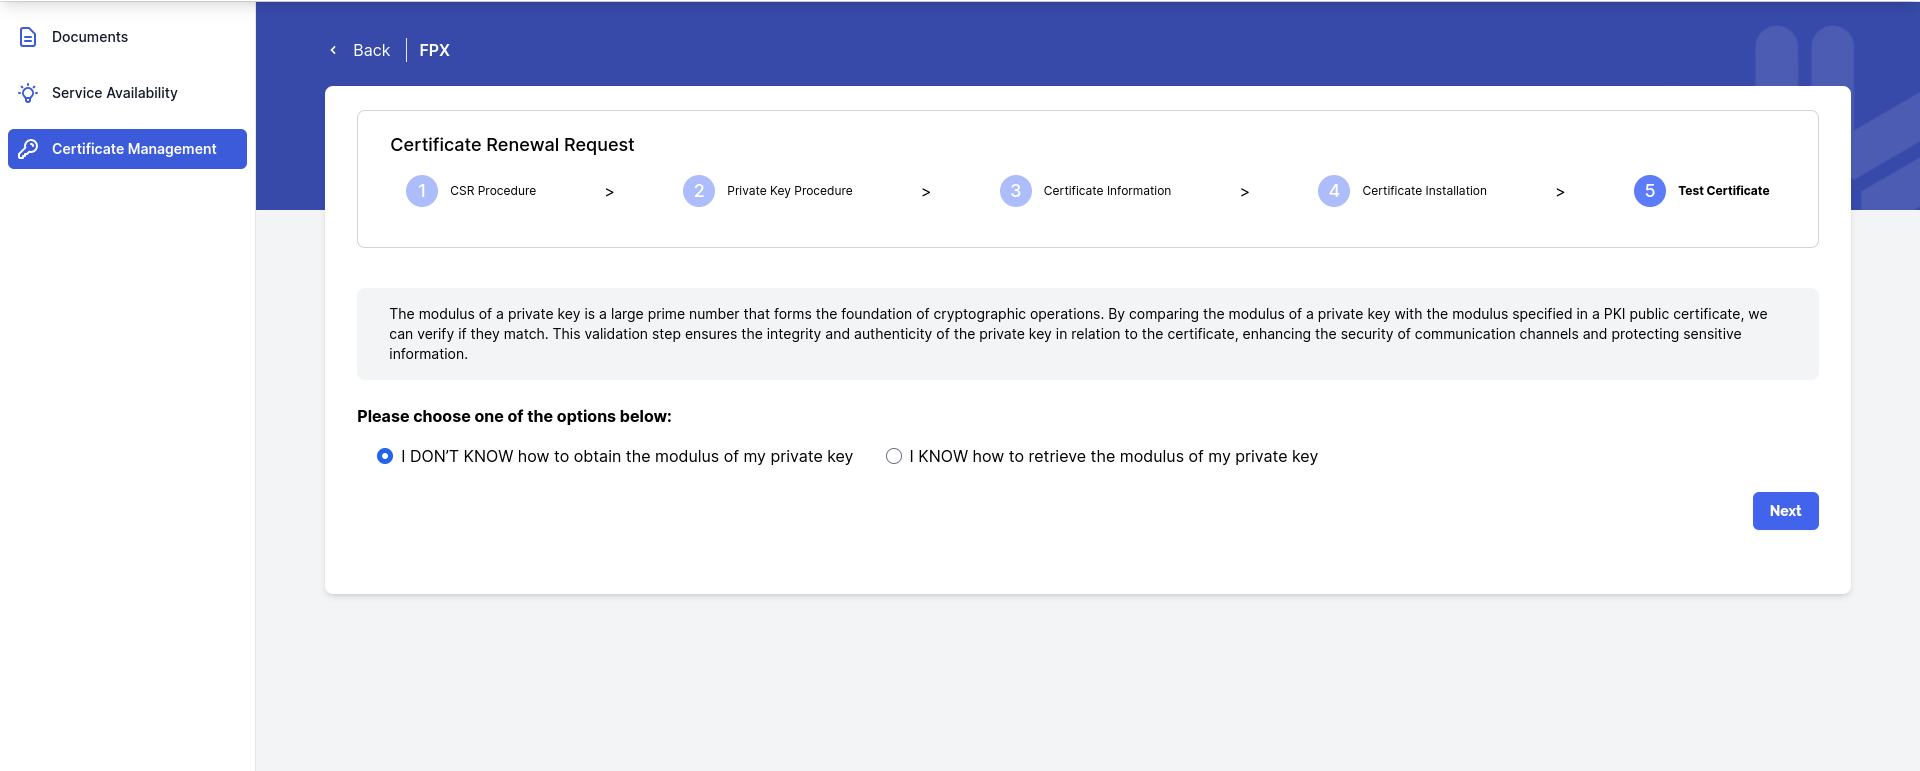
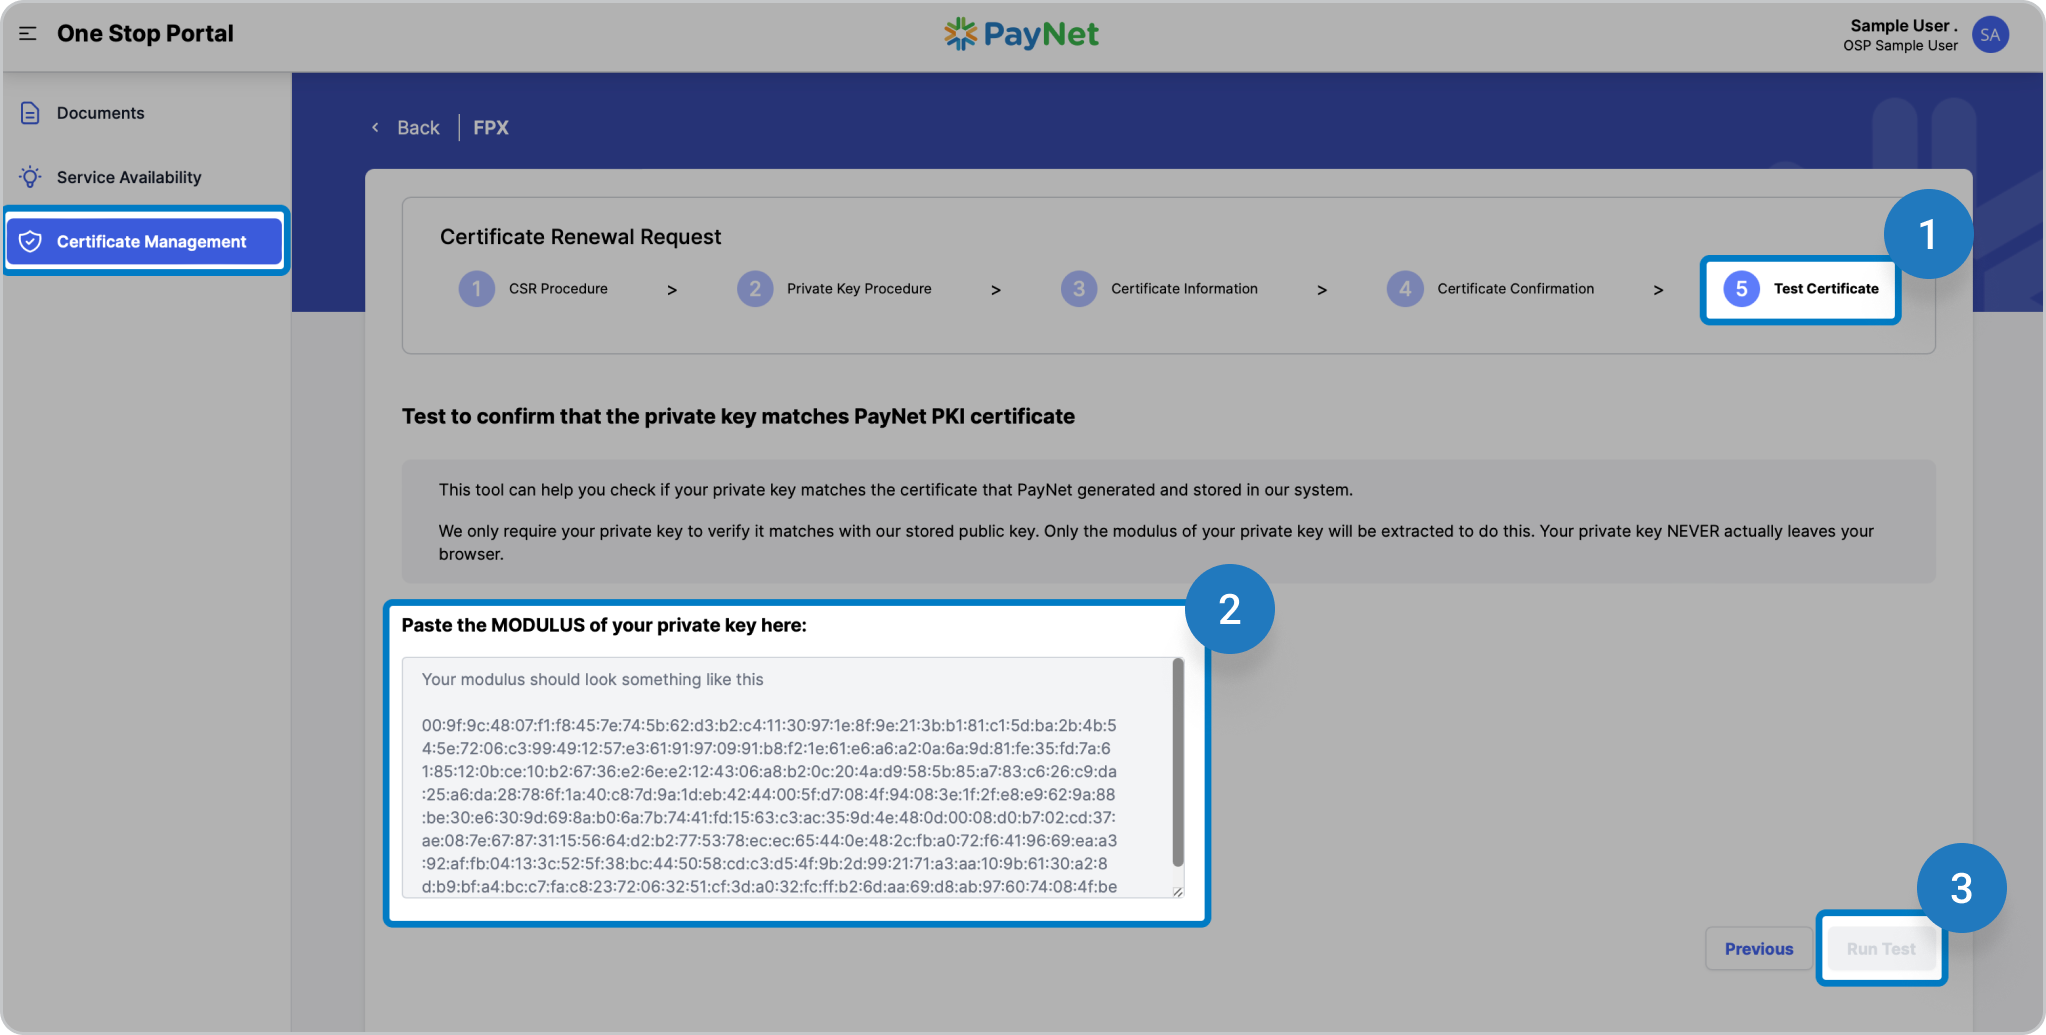
Test Certificate
Step 1: Verify the modulus of your private key by choosing one from the following options:
- Option 1: I DON’T KNOW how to obtain the modulus of my private key
→ if you are unfamiliar with the process; OR - Option 2: I KNOW how to retrieve the modulus of my private key
→ if you can provide the modulus directly.
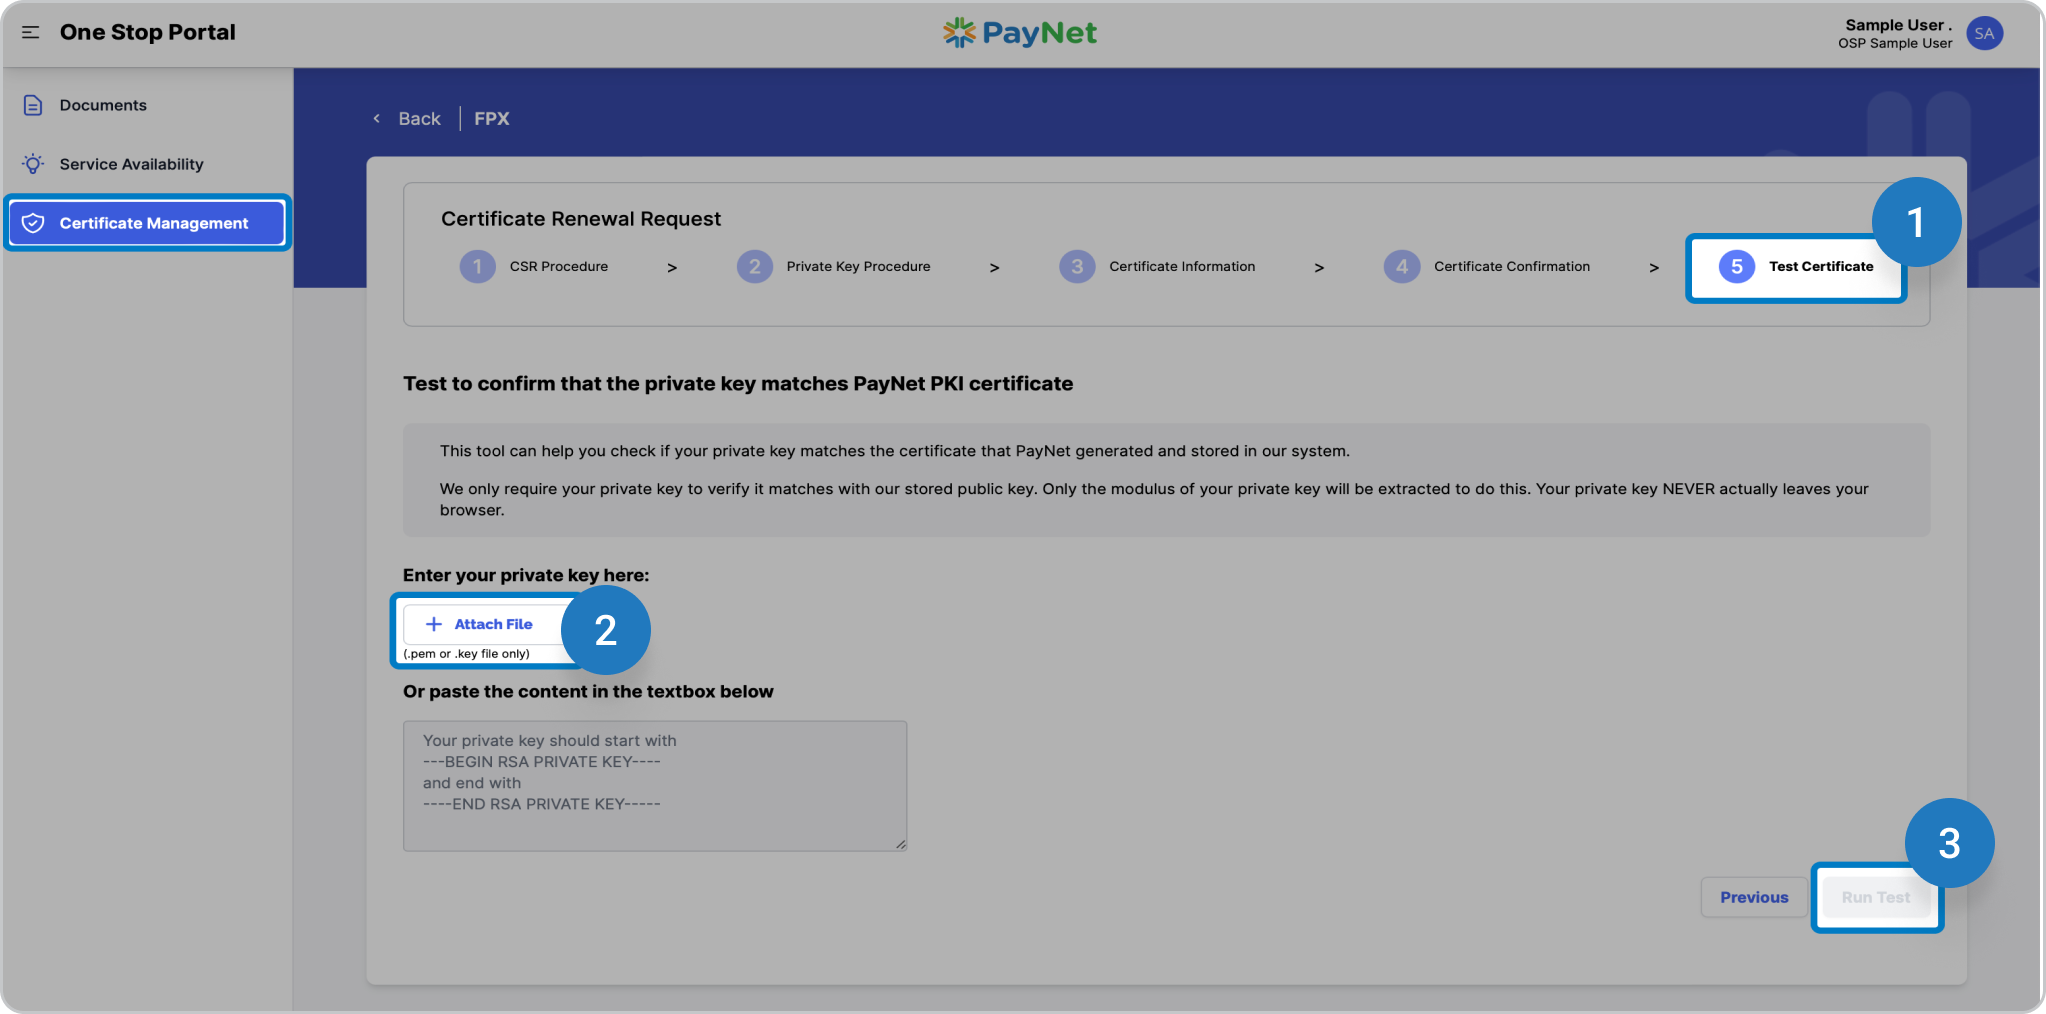
I DON'T KNOW how to obtain the modulus of my private key
Step 1: Select the ‘I DON’T KNOW how to obtain the modulus of my private key' option.
Step 2a: Click the Attach File button, and select a .pem or .key file; OR
Step 2b: Paste the private key content into the textbox. (Your private key must include the -----BEGIN RSA PRIVATE KEY----- and -----END RSA PRIVATE KEY ----- tags).
Step 3: Click the 'Run Test' button.
I KNOW how to retrieve the modulus of my private key
Step 1: Select the ‘I KNOW how to retrieve the modulus of my private key' option.
Step 2: Paste the Modulus of your private key in the textbox provided.
Step 3: Click the 'Run Test' button.
Scheduled Date for Key Rotation
After you have successfully completed the test, the system will automatically schedule the date and time for the key rotation in our system.
IMPORTANT: Key matching test will be conducted again, so be sure to keep your private key secure.
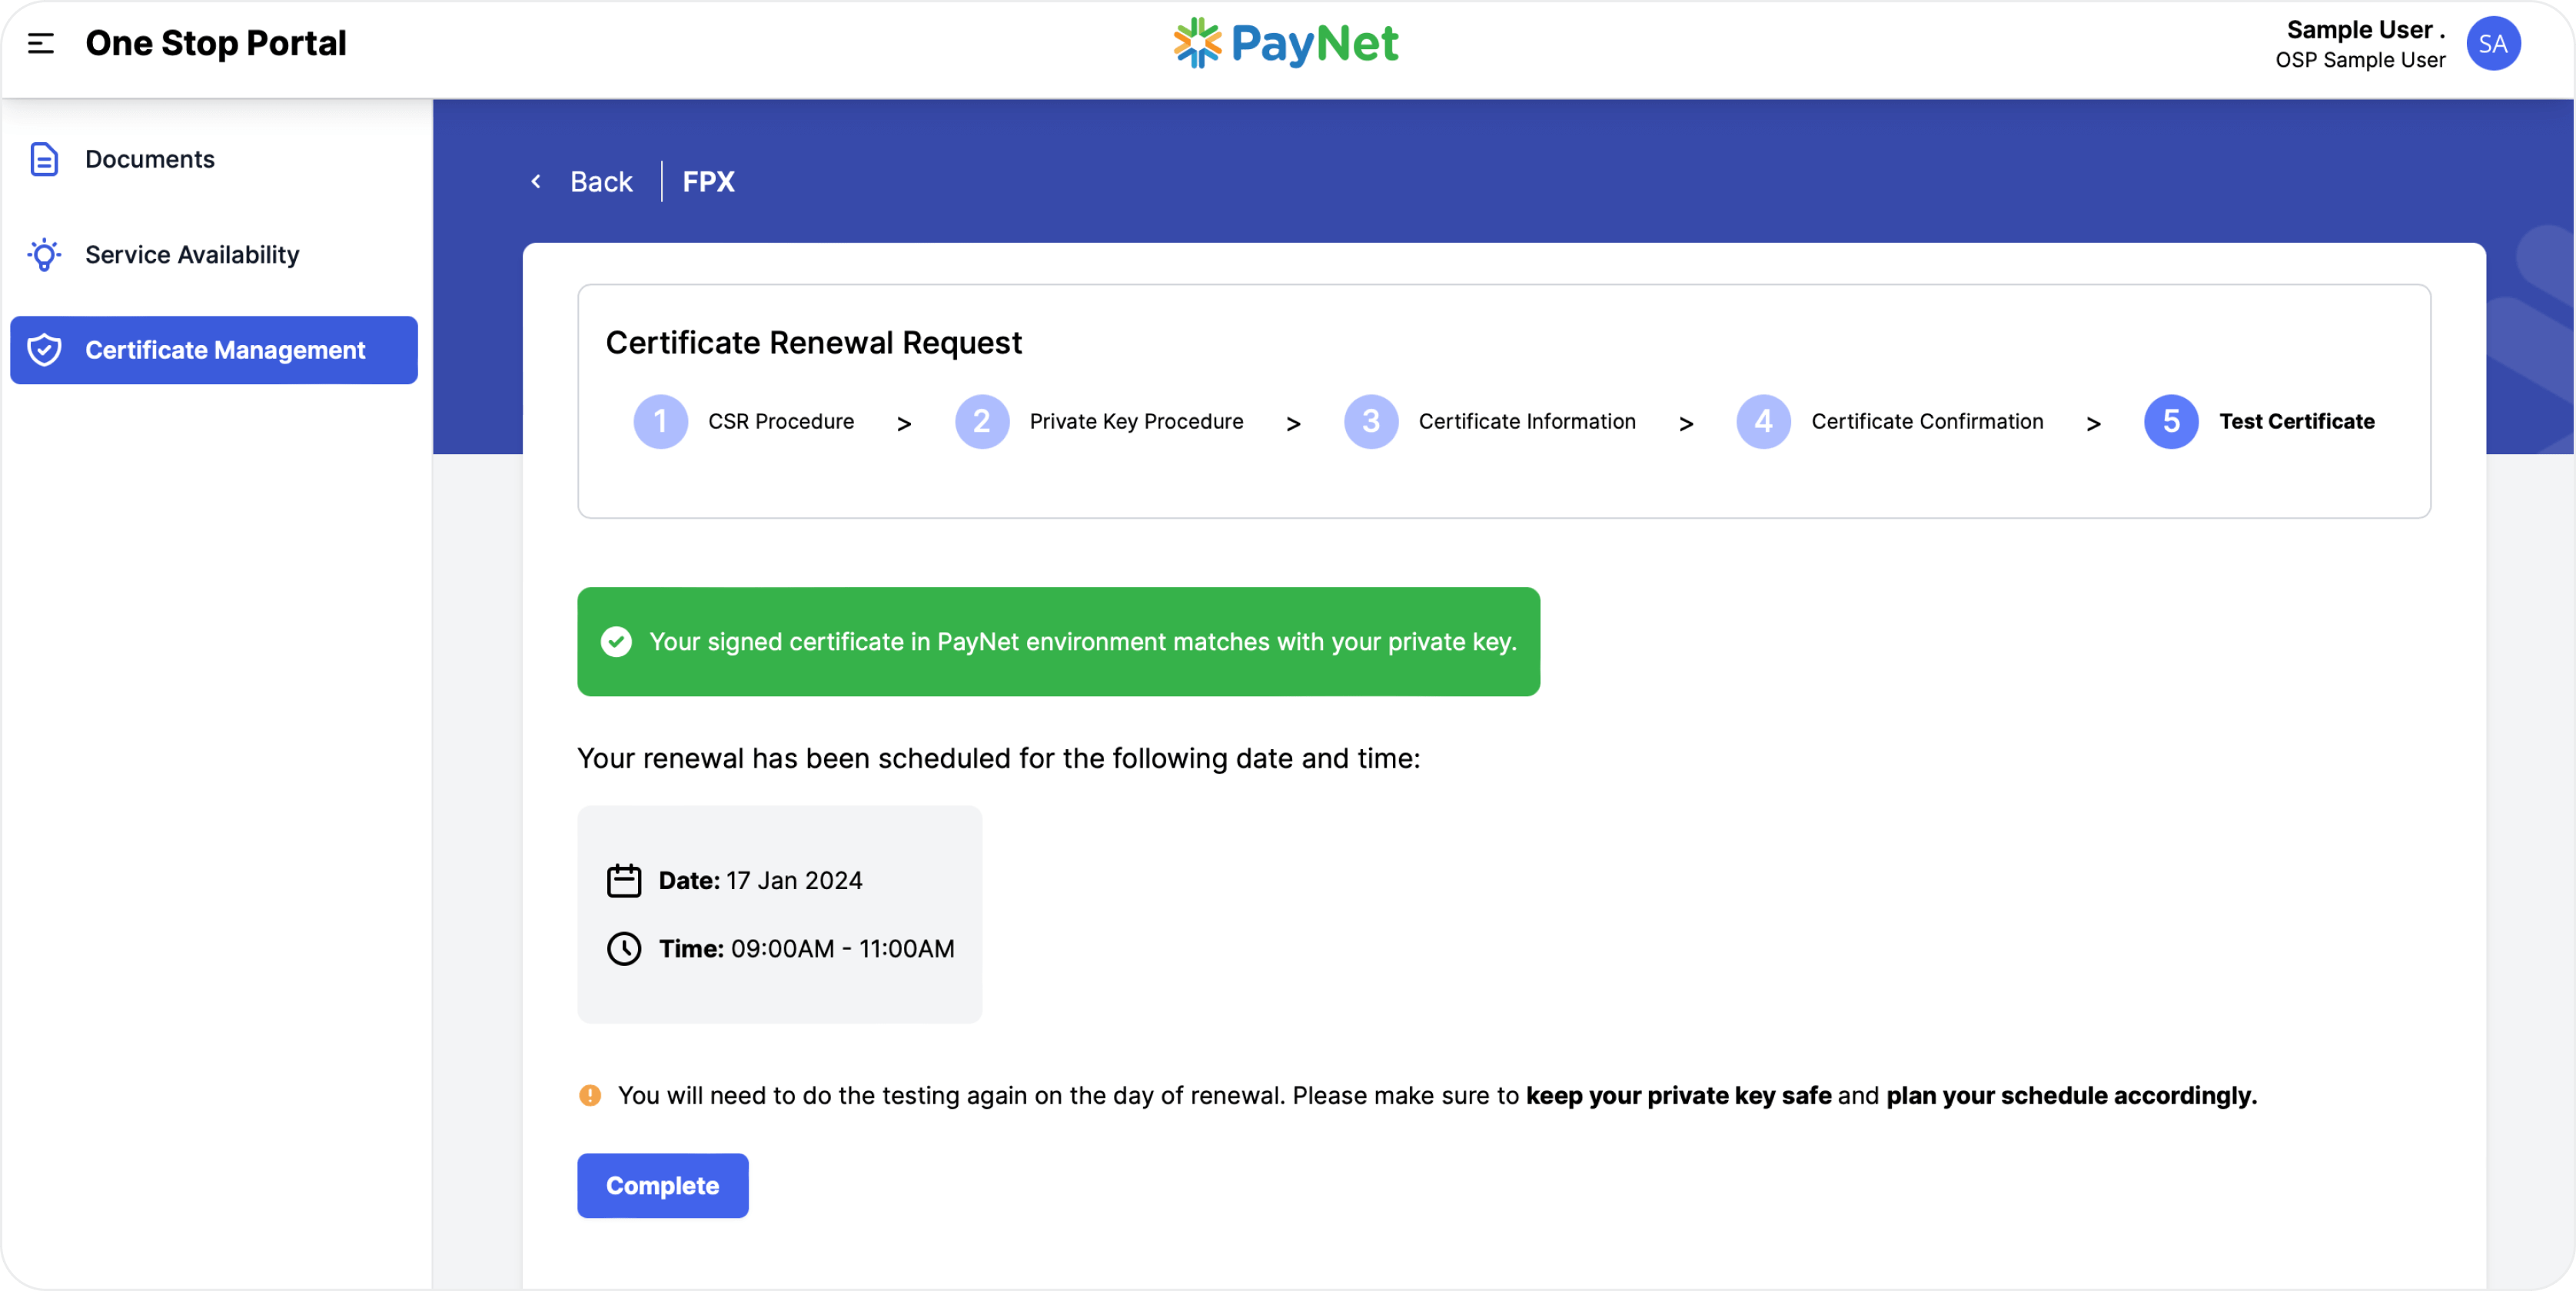
On the designated time, please log in to One Stop Portal again.
- Renewal in PRODUCTION environment, go to One Stop Portal here.
- Renewal in System Integration environment, go to One Stop Portal here.
Confirmation & Private Key Upload
On the date and time of the scheduled renewal, you will need to access into One Stop Portal again to perform the key matching test for the renewal.
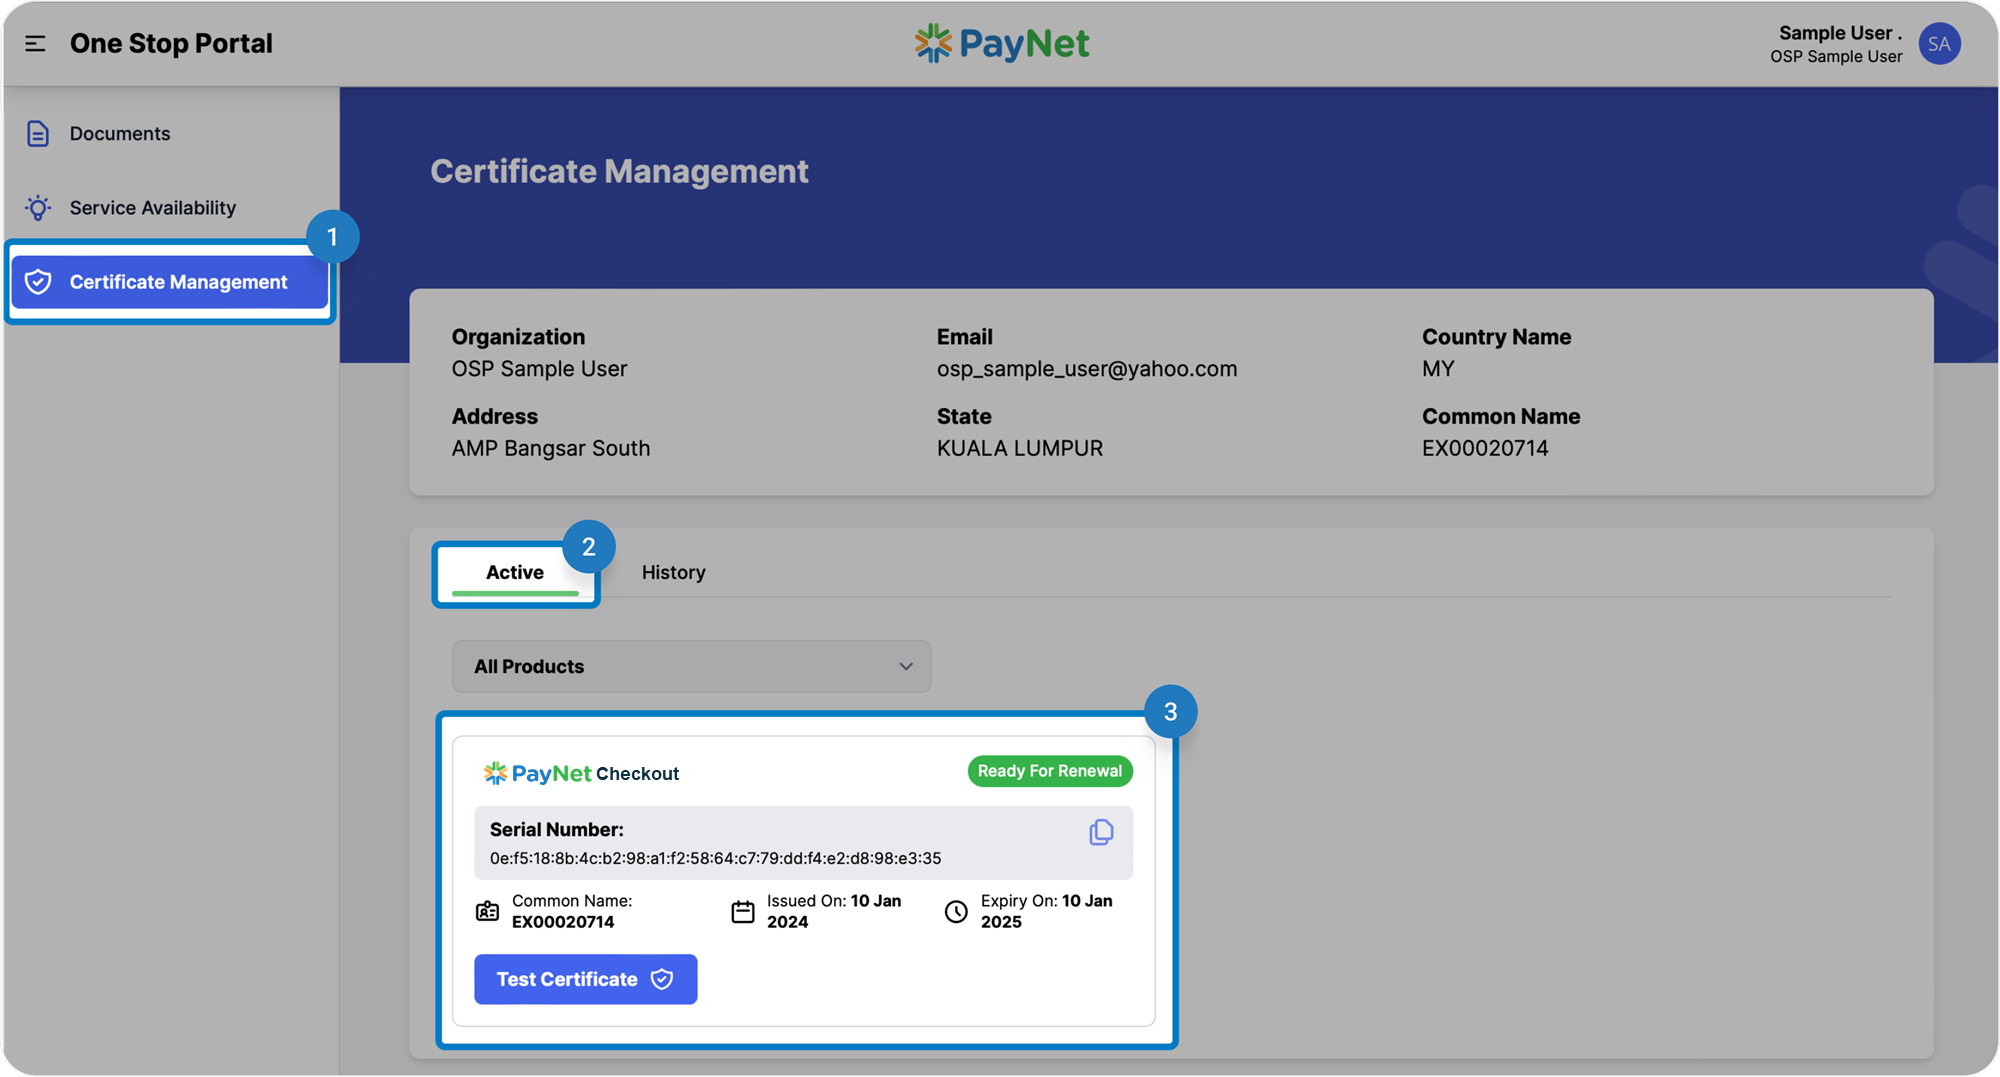
Step 1: On the left-hand-side navigation bar, click Certificate Management.
Step 2: Select Active tab on Certificate Management main page.
Step 3: Identify the certificate with status that is Ready For Renewal, and click the Test Certificate button.
Step 4: Perform the Test Certificate steps again.
Step 5: Once the test is successful and we successfully push the public key to our system, a confirmation screen will appear.
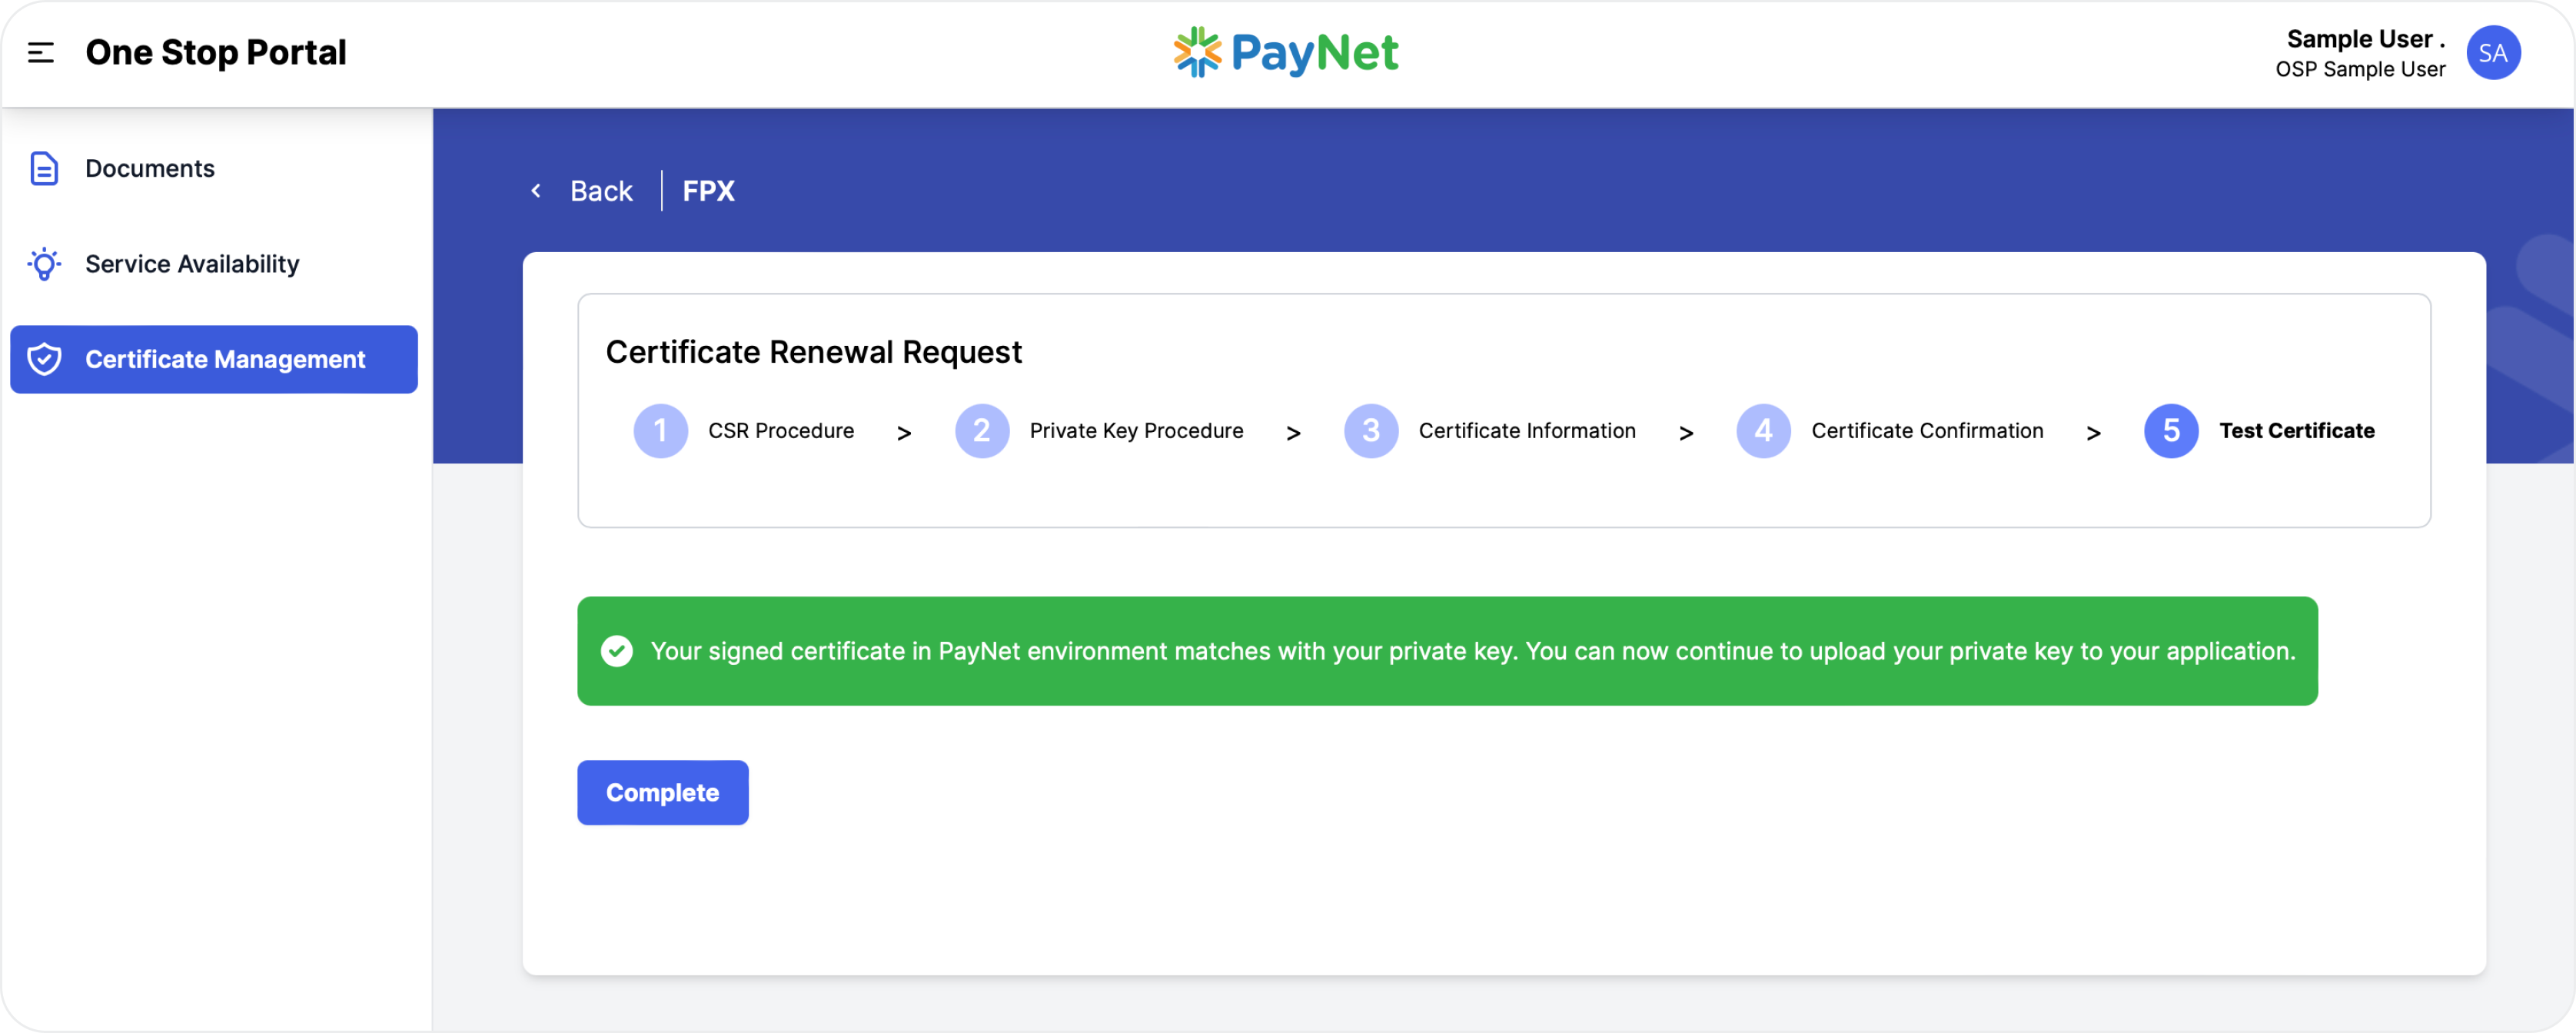
Step 6: You need to upload your private key to your application at this stage.
IMPORTANT: Failure to upload your private key to your application at this stage may interrupt your business.
Step 7: After you have uploaded the private key to your application and confirm that transactions can be made successfully, click the Complete button.
You will be redirected back to the certificate dashboard and can see your newly published certificate.